Split Operation
The Split tool cuts an existing polygon or polyline into two features by drawing a single cut line across it. The geometry split is computed by JTS (Java Topology Suite) on Android and GEOSwift on iOS — both wrap the same GEOS C library, so the algorithm and result are identical. You decide which of the two pieces keeps the original feature ID and attributes, the other becomes a new feature.
Split is part of the Advanced Editing Pro+ feature set. Free and Pro users can see the master toggle in Settings > Advanced Editing but turning it on opens the subscription paywall.
- Android
- iOS
When to use Split
- Splitting a parcel along a new boundary (cadastral subdivision).
- Cutting a forestry stand into two management units.
- Dividing a long line feature (cable, pipeline, road centerline) into two segments at a chosen point.
- Trimming a polygon along a road or river that newly bisects it.
Before you start
To use Split you need:
- A Mapit Pro Plus subscription.
- The Advanced Editing master toggle on in Settings > Advanced Editing.
- An existing polygon or polyline feature to split. Multipart features (multipolygon, multilinestring) are not supported in v1 - the Split entry is hidden for them.
The flow
1. Open the feature for editing
Tap an existing polygon or polyline feature on the map to start an edit session on it. The right-side toolbar shows the usual edit FABs (Stop Feature, Add Vertex, Mode Cycle, etc.) plus a new Tools chip near the top of the stack.
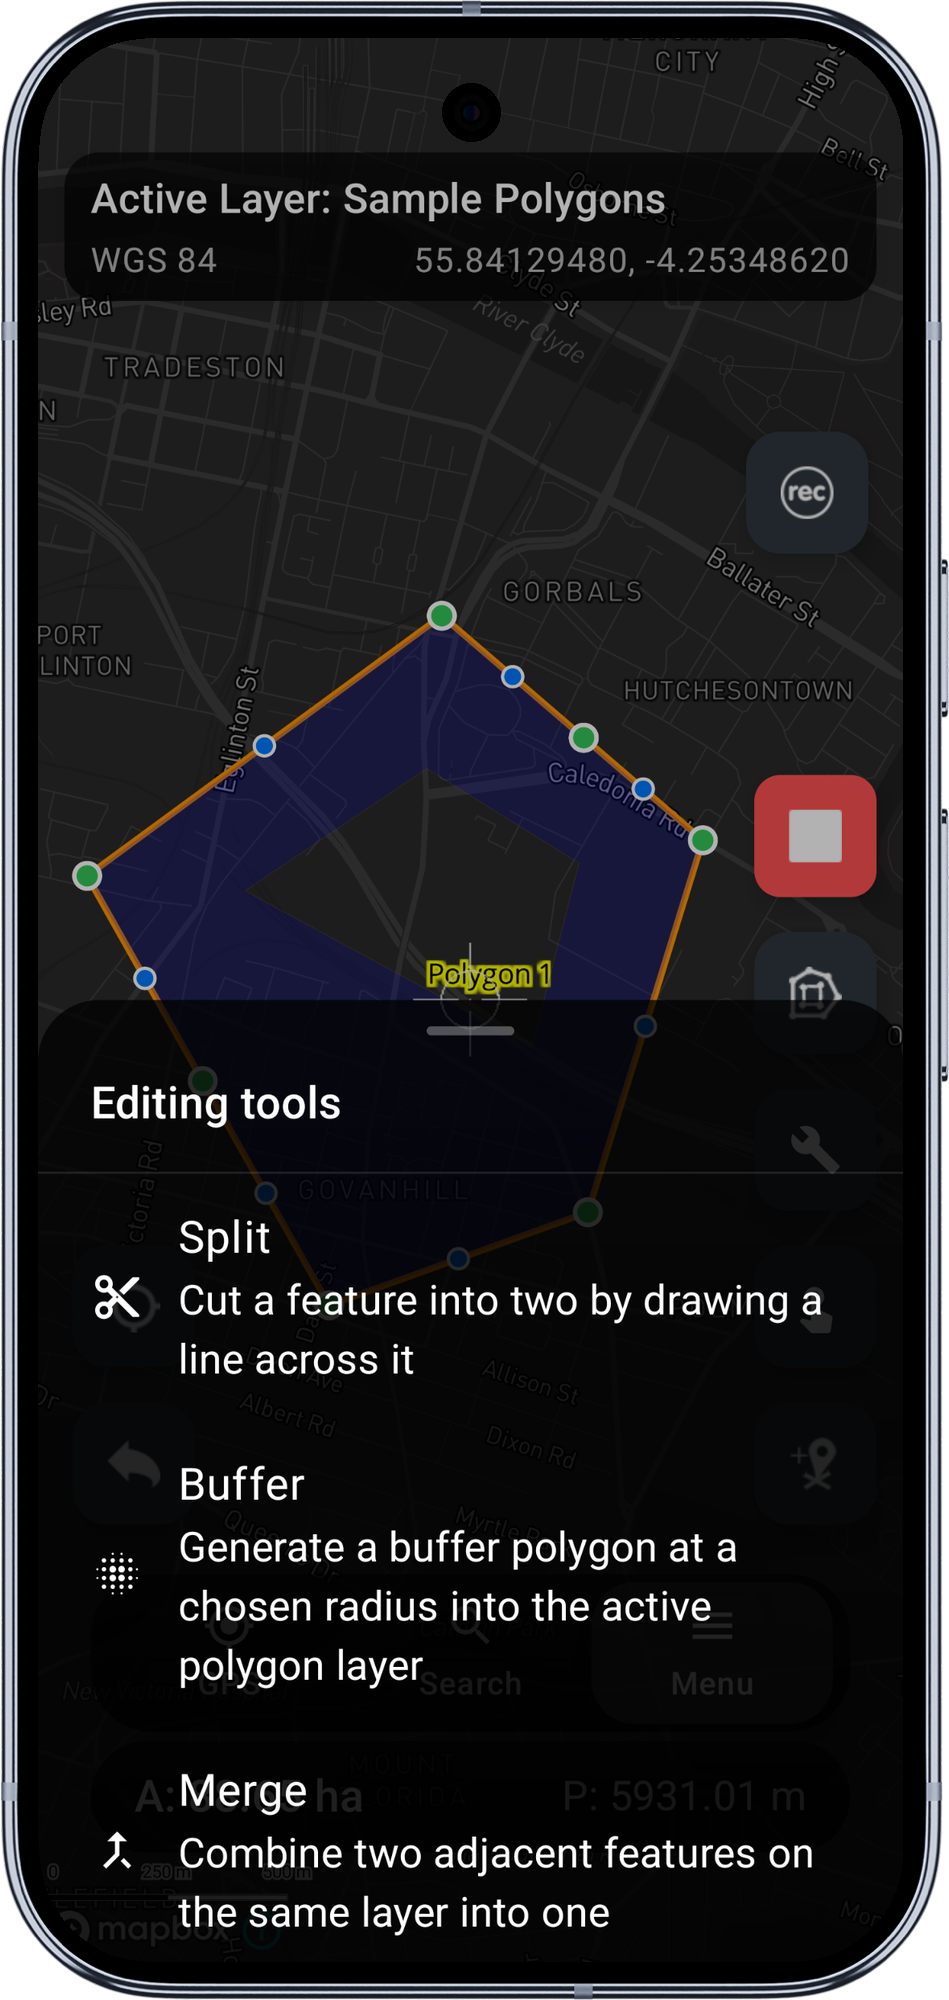
2. Open the editing tools sheet
Tap the Tools chip. A bottom sheet slides up listing the available advanced editing tools. With v1 the only entry is Split.
Tap Split.
3. Read the first-run tutorial
The very first time you use Split, a three-step tutorial appears:
- Draw the cut line - how the input modes (crosshair, tap-on-map) feed the cut line, and that Add Vertex keeps appending vertices to it.
- Where the cut line must go - the validation rules below.
- Watch the colour - the cut line colours encode validity (orange = drawing, red = invalid, green = valid).
The tutorial only fires once. Tap Done or Skip to dismiss; both mark it seen and continue into split mode.
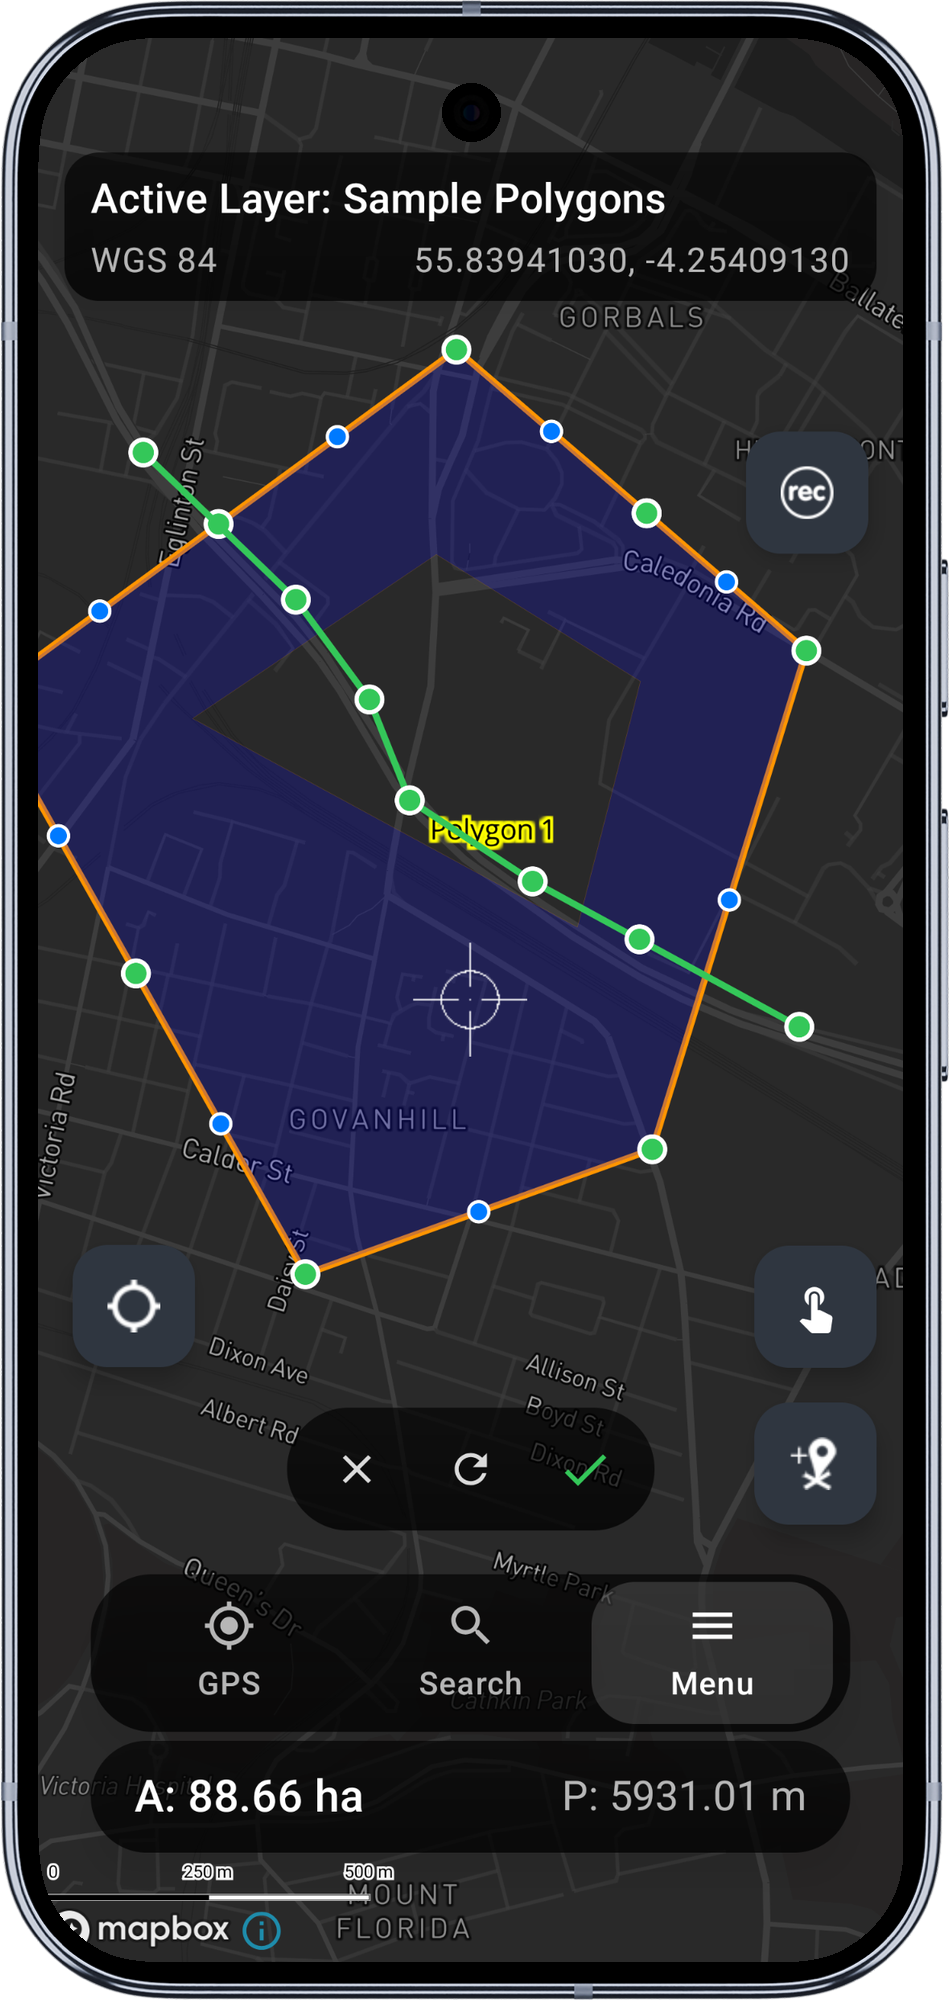
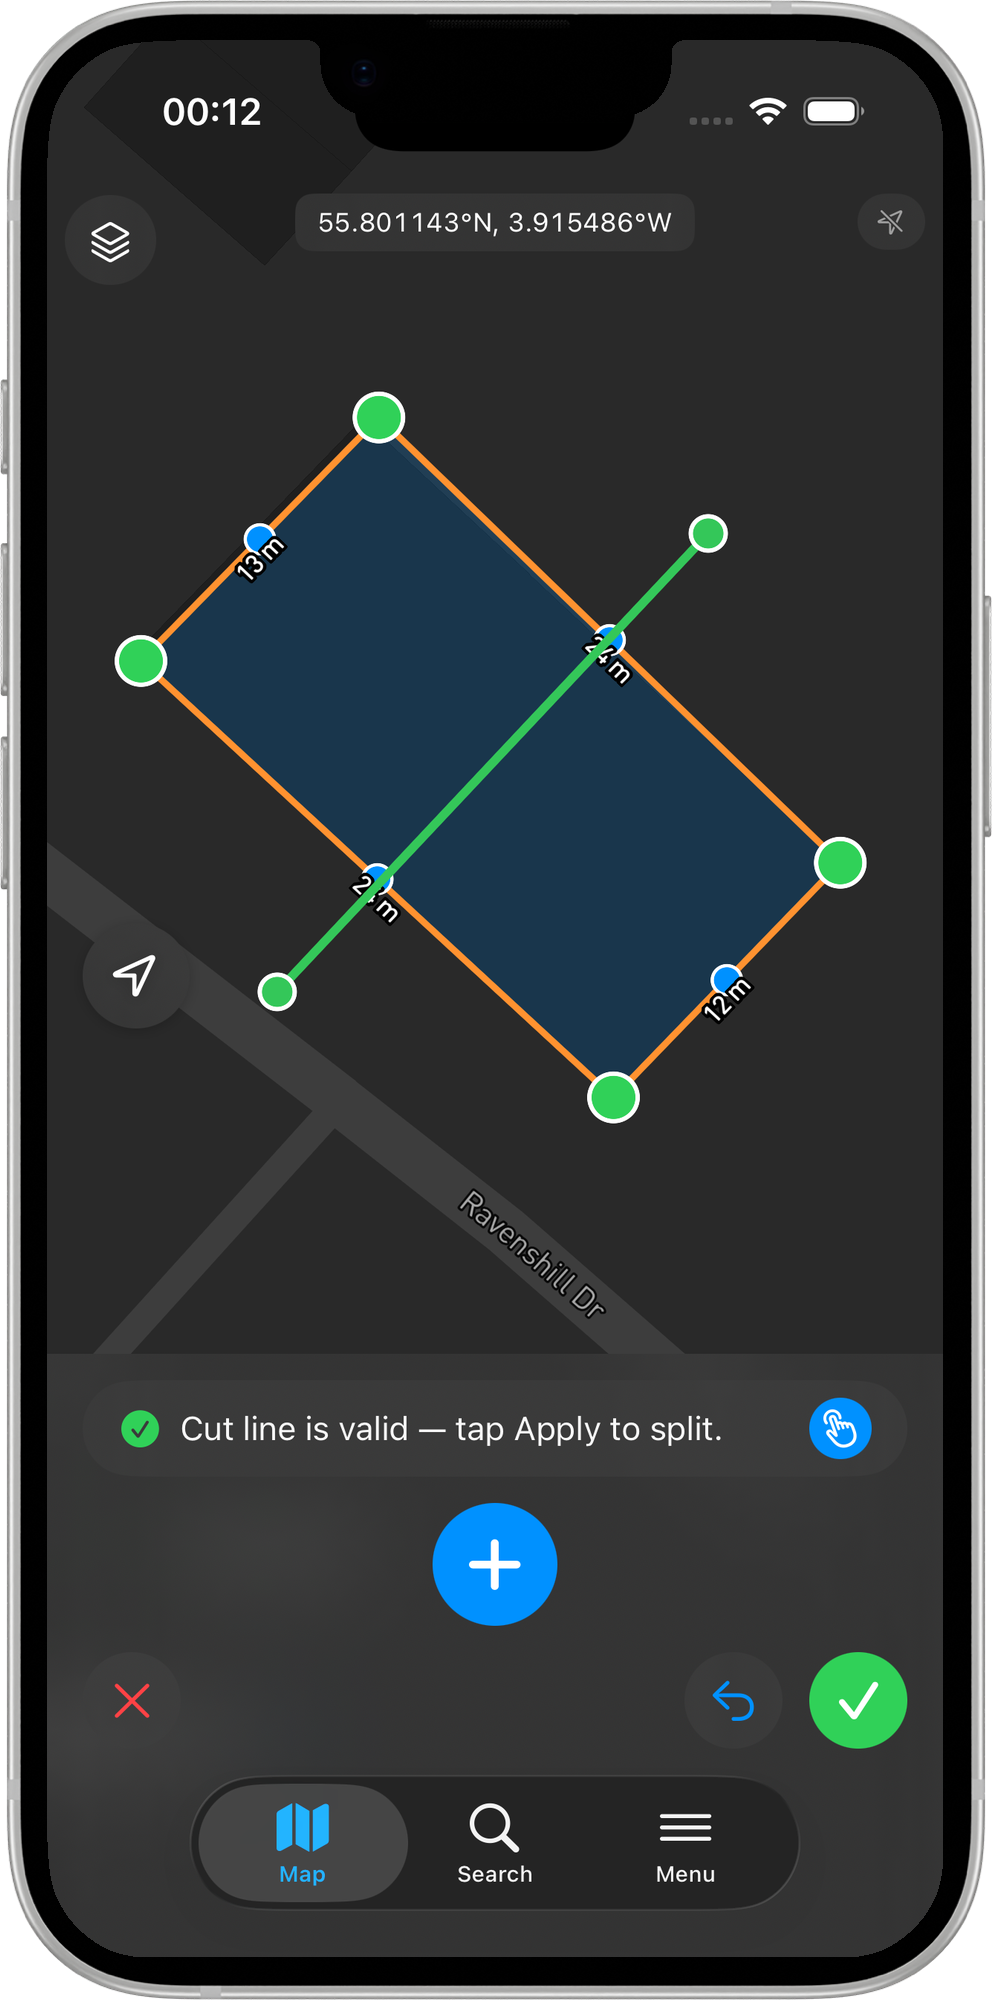
4. Draw the cut line
The regular edit FABs disappear, replaced by a compact pill above the bottom navigation bar with three icon buttons: Cancel, Reset, and Apply. The cut line is drawn using the same vertex input modes as a polygon - crosshair (pan the map, tap Add Vertex) or tap on the map (each tap places a cut-line vertex).
The line tints itself live as you add vertices:
- Orange while drawing - fewer than two vertices, or simply not yet finished.
- Green once the cut line is currently a valid input - the Apply button enables.
- Red if the line breaks one of the validation rules below. The prompt text above the toolbar explains why.
Validation rules
For polygon targets, the cut line must:
- Have at least two vertices.
- Not cross itself (no figure-of-eight or back-tracking).
- Start outside the polygon's outer ring.
- Cross the outer ring exactly twice. Crossing once, three times, or more is rejected. Inner rings (holes) can be crossed; their arcs are promoted into the outer rings of the two output pieces automatically.
For polyline targets, the cut line must cross the polyline at exactly one point.
The Reset button clears the cut-line buffer back to empty. Cancel exits split mode entirely and restores the regular edit toolbar.
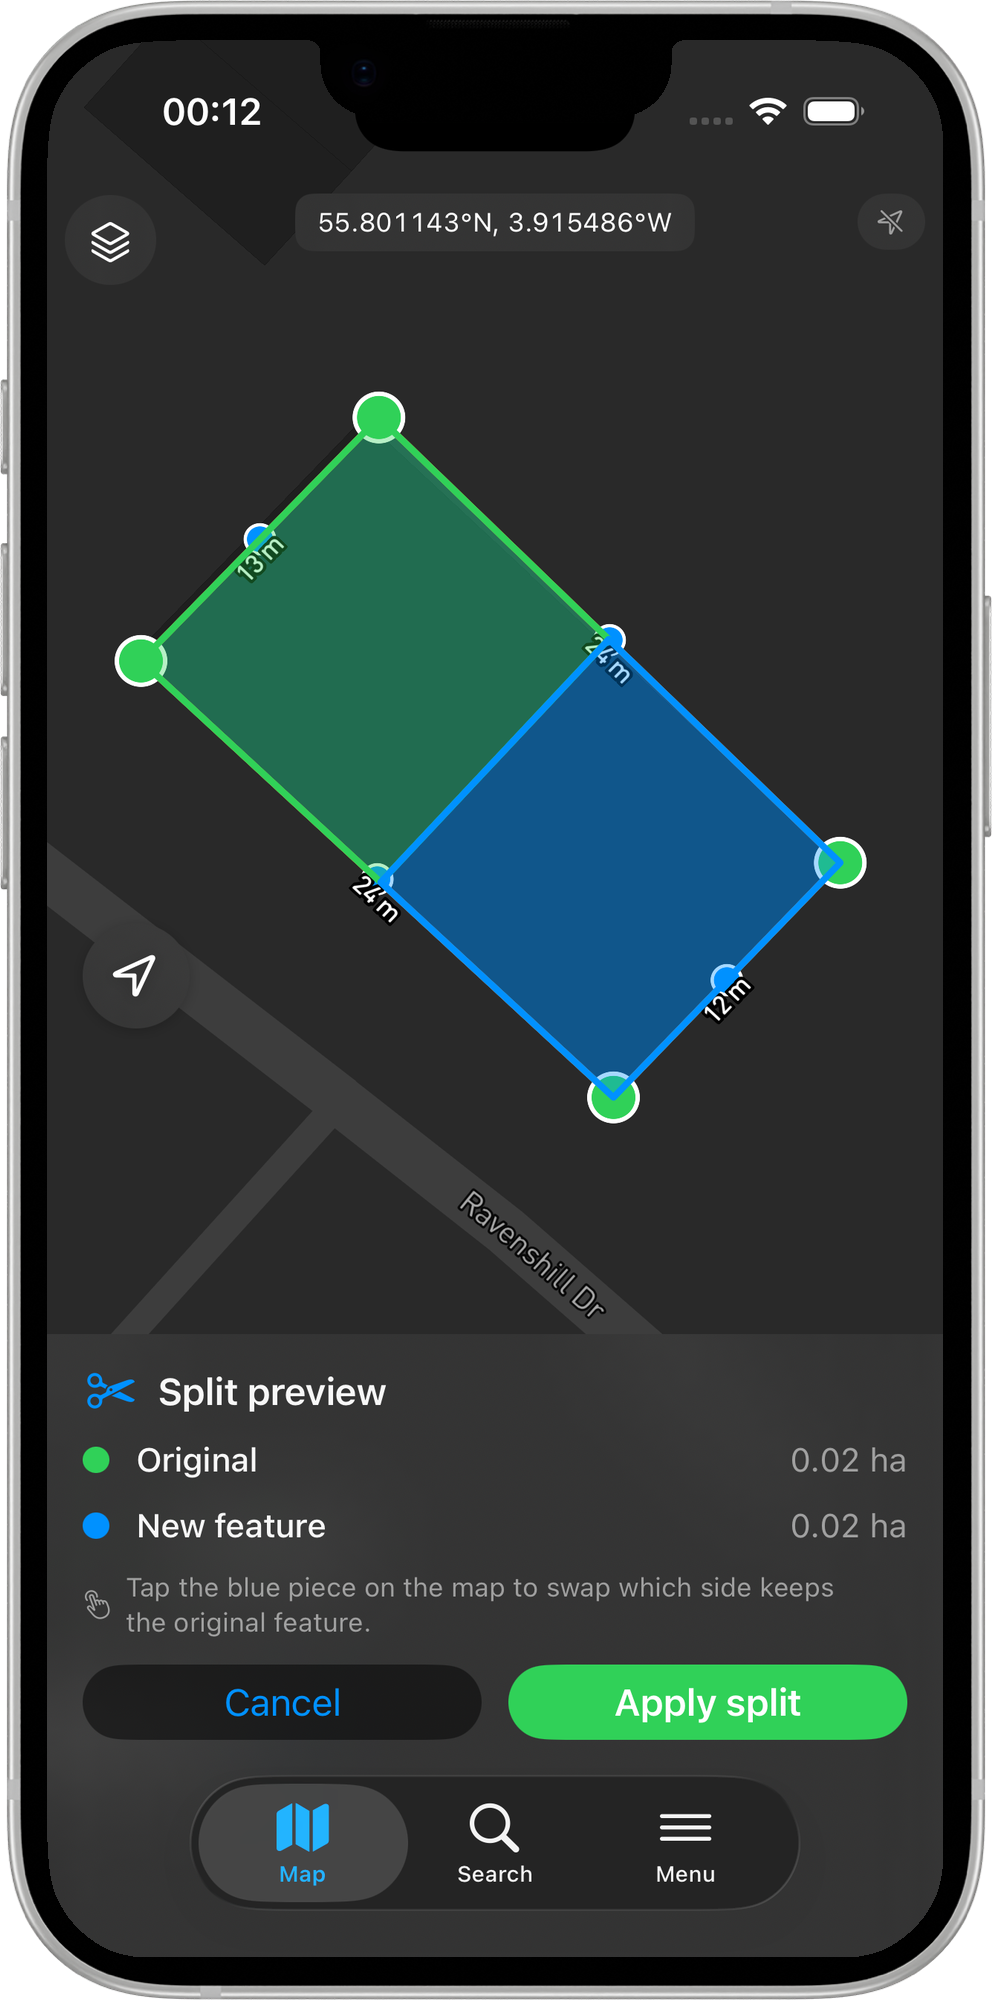
5. Apply the cut
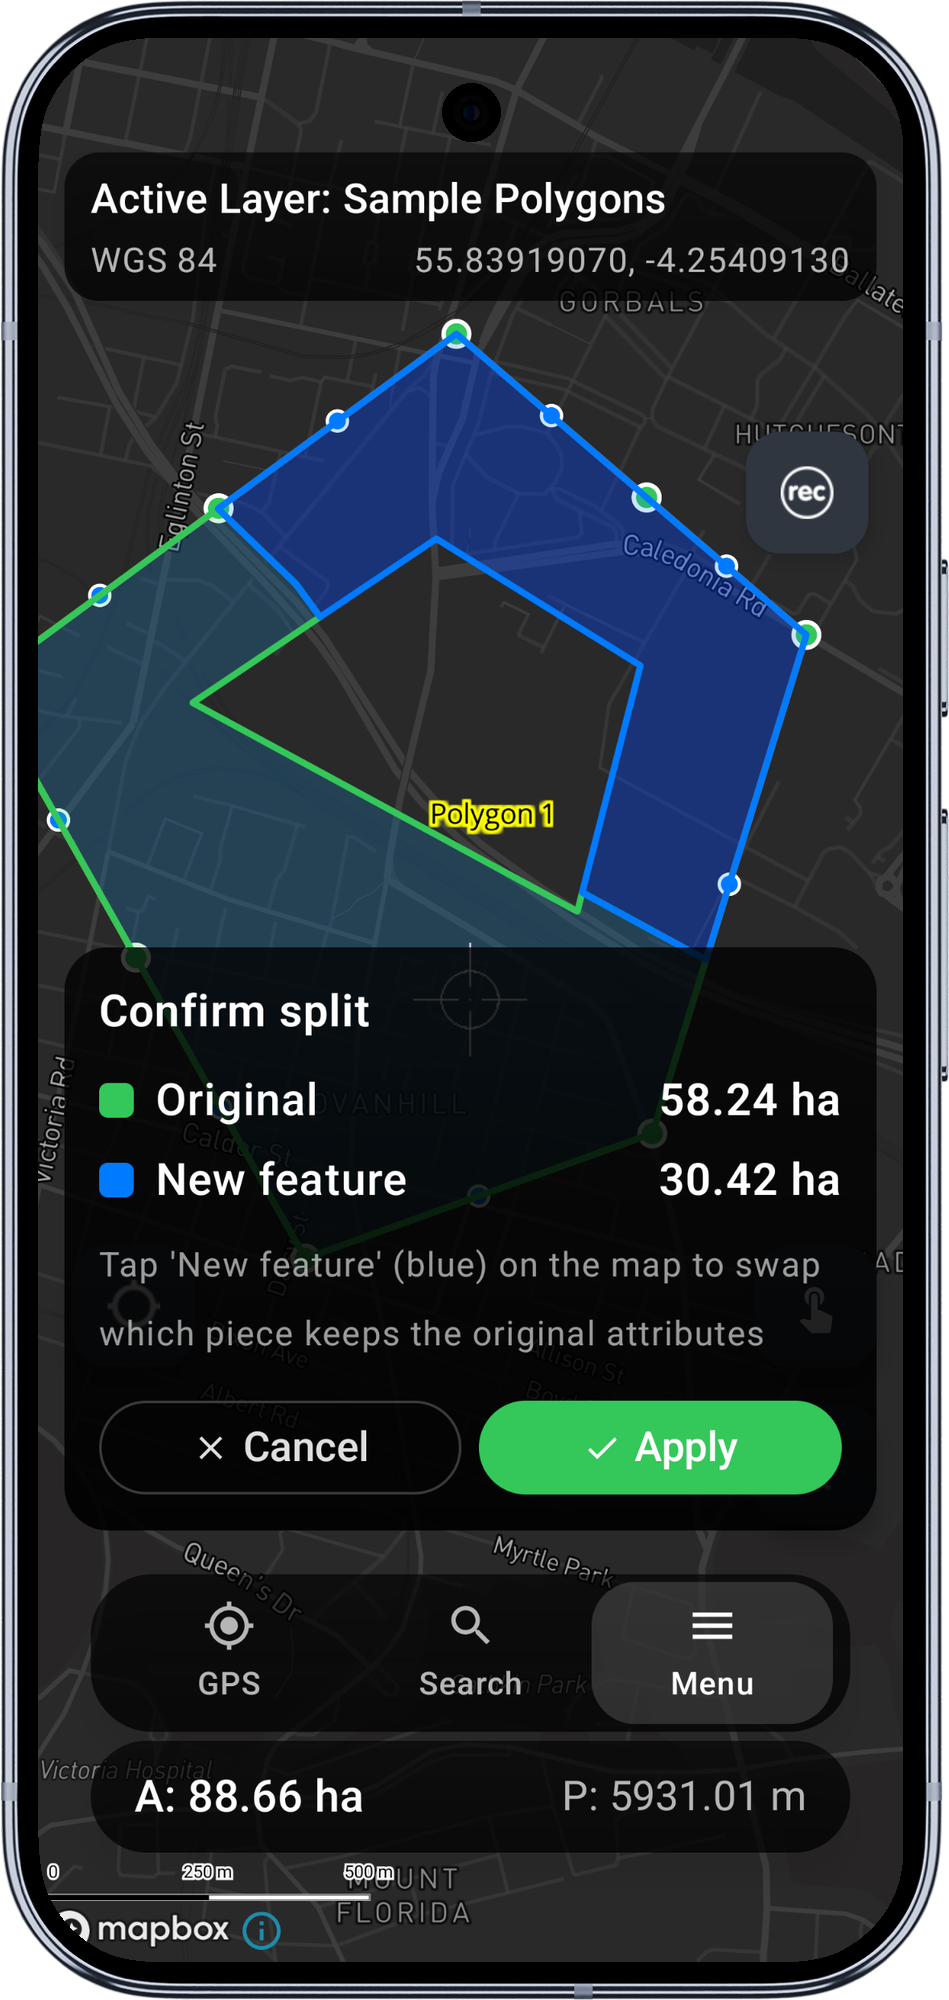
Tap Apply when the line is green. The cut runs and the screen switches to the preview: the two resulting pieces are rendered with distinct fills - green for the side that will keep the original feature ID and attributes, blue for the side that will become a new feature.
A confirmation card appears above the bottom navigation showing the area (or length, for polylines) of each side and a hint: Tap 'New feature' (blue) on the map to swap which piece keeps the original attributes.
6. Pick which side keeps the original ID
By default the larger piece is the original (configurable in Settings > Advanced Editing). If you want the other side to be the original, tap the blue piece on the map - the colour-coding flips and the card updates.
When you are happy with the assignment:
- Apply writes both rows to the GeoPackage atomically: the original row gets the chosen "original" piece's geometry; a new row is inserted with the other piece's geometry. Attributes for the new row are copied from the original by default (or left blank if you turned on Wipe attributes on new feature in settings).
- Cancel discards the preview without writing. The cut line is also discarded; you start over from step 4 if you want to try again.
The map redraws after a successful Apply so both rows appear immediately. The edit session closes; tap one of the new pieces to continue editing.
Inner rings (holes)
When the cut line passes through an inner ring (a hole in the polygon), the hole's arcs are automatically promoted into the outer rings of the two output pieces. The hole effectively disappears, and its boundary becomes part of the new polygon boundaries.
When the cut line does not cross a hole, the hole stays attached to whichever output piece geometrically contains it.
This is computed by JTS Polygonizer with no manual hole-tracking on our side - the result is correct for arbitrary numbers of inner rings.
Z-values
If the source polygon has Z values (3D vertices), cut-line vertices inherit Z values via linear interpolation between the two outer-ring crossing points. Disable Interpolate Z values along cut line in Settings > Advanced Editing to leave cut-line Z at zero instead.
Limitations in v1
- Multipolygon / multilinestring features are not supported - Split is hidden for them.
- WFS layers never see Split - they are read-only and never enter the edit session.
- Single cut only - one line, two pieces. Multiple cuts in one go is not supported.
- Undo after Confirm is not supported. Once committed, the only way back is to merge the two features manually (re-edit and redraw).
Requirements
- A Mapit Pro Plus subscription (Android).
- Advanced Editing master toggle on in Settings > Advanced Editing.
When to use Split
- Splitting a parcel along a new boundary (cadastral subdivision).
- Cutting a forestry stand into two management units.
- Dividing a long line feature (cable, pipeline, road centerline) into two segments at a chosen point.
- Trimming a polygon along a road or river that newly bisects it.
Before you start
To use Split you need:
- A Mapit Pro Plus subscription.
- The Advanced Editing master toggle on in Settings > Advanced Editing.
- An existing polygon or polyline feature to split. Multipart features (MultiPolygon, MultiLineString) are not supported in v1 — the Split entry is hidden for them.
The flow
1. Open the feature for editing
Tap an existing polygon or polyline feature on the map, then tap Edit geometry from the feature info menu. The right-side toolbar shows the usual edit FABs (Save, Cancel, Add Vertex, mode cycle, etc.) plus a new Tools chip near the top of the stack.
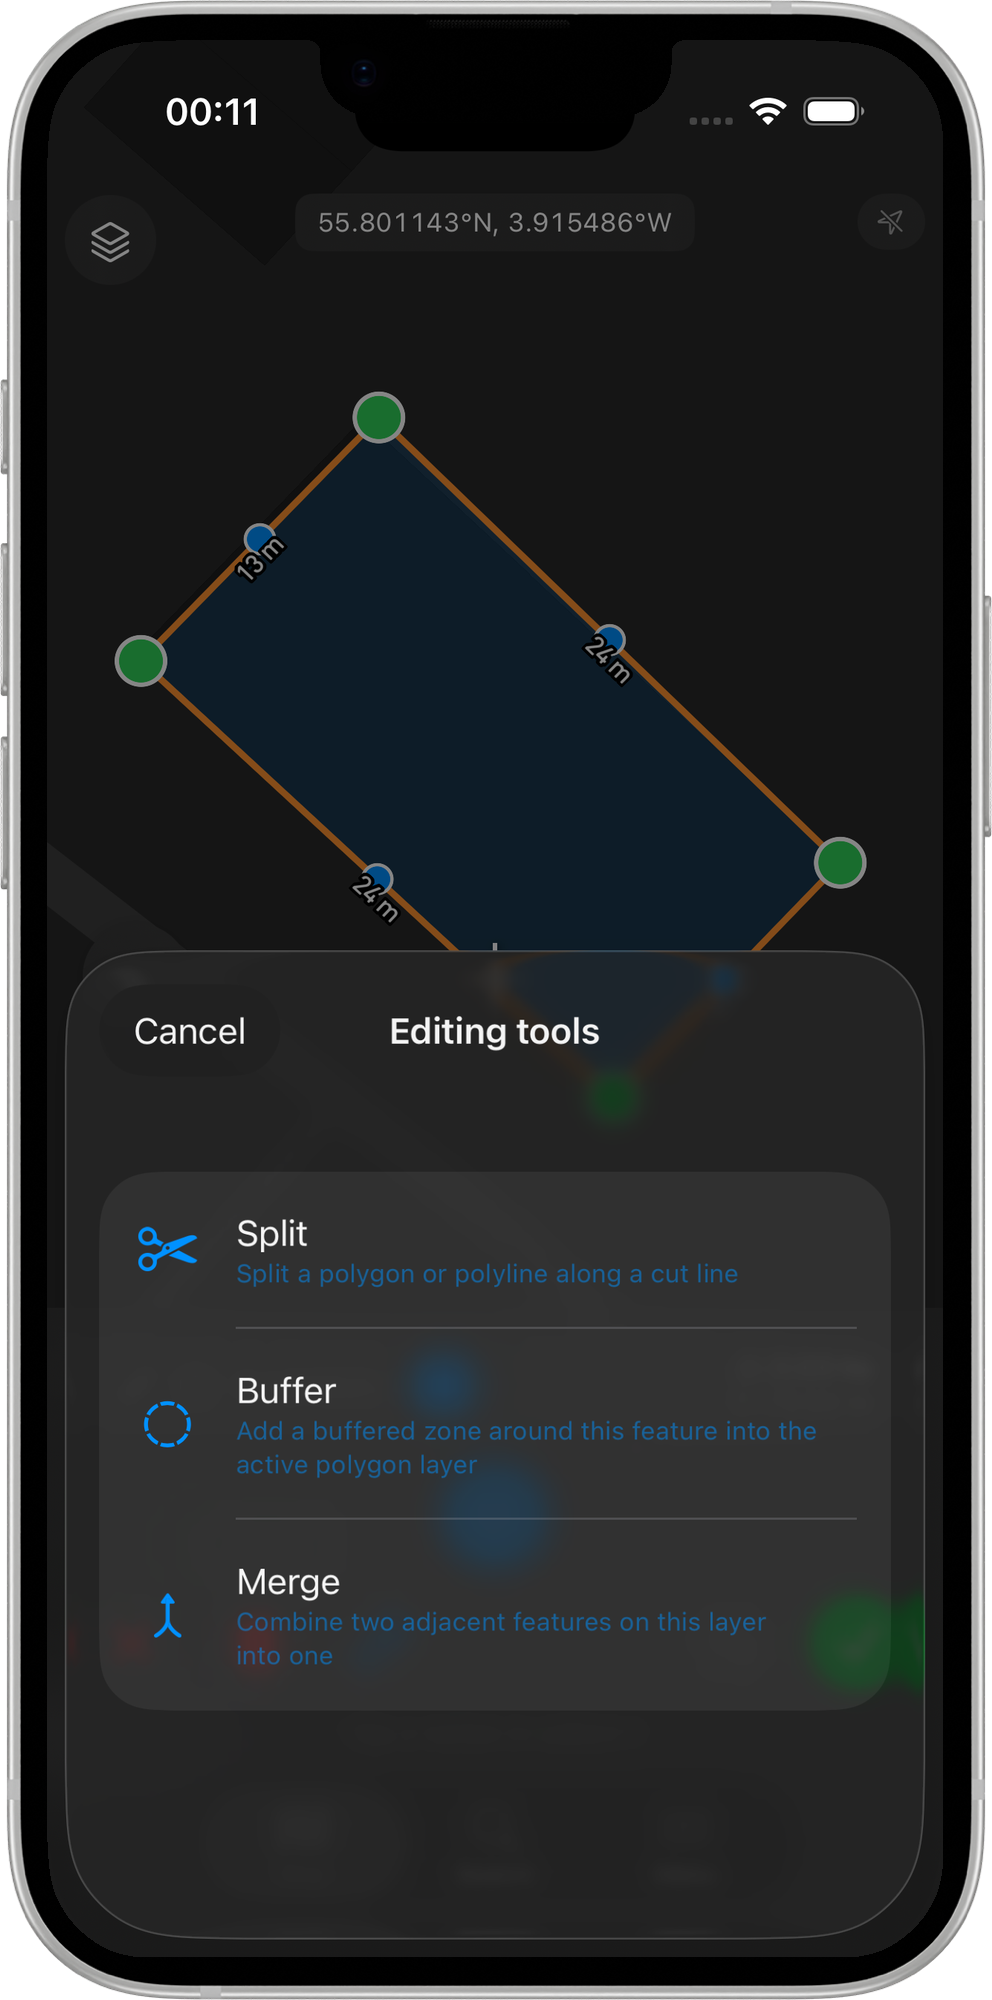
2. Open the editing-tools sheet
Tap the Tools chip. A bottom sheet slides up listing the available advanced editing tools. With v1 the entries are Split, Buffer, and Merge.
Tap Split.
3. Draw the cut line
The regular edit FABs disappear, replaced by a compact card above the bottom safe area with three buttons: Cancel, Reset, and Apply. The cut line is drawn using the same vertex input modes as a polygon — crosshair (pan the map, tap Add Vertex) or tap on the map (each tap places a cut-line vertex).
The line tints itself live as you add vertices:
- Orange while drawing — fewer than two vertices, or simply not yet finished.
- Green once the cut line is currently a valid input — the Apply button enables.
- Red if the line breaks one of the validation rules below. The prompt text above the toolbar explains why.
Validation rules
For polygon targets, the cut line must:
- Have at least two vertices.
- Not cross itself (no figure-of-eight or back-tracking).
- Start outside the polygon's outer ring.
- Cross the outer ring exactly twice. Crossing once, three times, or more is rejected. Inner rings (holes) can be crossed; their arcs are promoted into the outer rings of the two output pieces automatically.
For polyline targets, the cut line must cross the polyline at exactly one point.
The Reset button clears the cut-line buffer back to empty. Cancel exits split mode entirely and restores the regular edit toolbar.
4. Apply the cut
Tap Apply when the line is green. The cut runs and the screen switches to the preview: the two resulting pieces are rendered with distinct fills — green for the side that will keep the original feature ID and attributes, blue for the side that will become a new feature.
A confirmation card above the bottom safe area shows the area (or length, for polylines) of each side and a hint: Tap the new-feature (blue) piece on the map to swap which side keeps the original attributes.
5. Pick which side keeps the original ID
By default the larger piece is the original (configurable in Settings > Advanced Editing). If you want the other side to be the original, tap the blue piece on the map — the colour-coding flips and the card updates.
When you are happy with the assignment:
- Apply writes both rows to the GeoPackage atomically: the original row gets the chosen "original" piece's geometry; a new row is inserted with the other piece's geometry. Attributes for the new row are copied from the original by default (or left blank if you turned on Wipe attributes on new feature in settings).
- Cancel discards the preview without writing. The cut line is also discarded; you start over from step 3 if you want to try again.
The map redraws after a successful Apply so both rows appear immediately. The edit session closes; tap one of the new pieces to continue editing.
Inner rings (holes)
When the cut line passes through an inner ring (a hole in the polygon), the hole's arcs are automatically promoted into the outer rings of the two output pieces. The hole effectively disappears, and its boundary becomes part of the new polygon boundaries.
When the cut line does not cross a hole, the hole stays attached to whichever output piece geometrically contains it.
This is computed by the GEOS Polygonizer with no manual hole-tracking on our side — the result is correct for arbitrary numbers of inner rings.
Z-values
Z-value interpolation along the cut line is on the iOS roadmap. The Interpolate Z values along cut line toggle ships with the same UI as Android so the preference can be set ahead of time, but cut-line Z is currently always 0 on iOS regardless of the setting.
Differences from Android
- Split on iOS does not yet ship a first-run tutorial sheet. The validation rules above describe everything the tutorial would walk you through.
- Distance & Bearing vertex input mode is gated inside Split mode (v1 limitation; matches Android).
Limitations in v1
- MultiPolygon / MultiLineString features are not supported — Split is hidden for them.
- WFS layers never see Split — they are read-only and never enter the edit session.
- Single cut only — one line, two pieces. Multiple cuts in one go is not supported.
- Undo after Apply is not supported. Once committed, the only way back is to manually re-edit the geometry.
Requirements
- A Mapit Pro Plus subscription (iOS).
- Advanced Editing master toggle on in Settings > Advanced Editing.
Related Topics
- Buffer Tool - Generate a buffer polygon around an existing feature.
- Merge Tool - The opposite operation: combine two adjacent features into one.
- Advanced Editing Settings - Configure split defaults (largest keeps original, wipe attributes, Z interpolation).
- Vertex Snapping - Use snapping to start the cut line exactly on an existing vertex.
- Mapit Pro Plus - What is included in the Pro+ subscription.