Merge Tool
The Merge tool combines two adjacent features on the same layer into a single feature. Pick a feature, tap a second feature on the same layer, choose which side keeps its row ID and attributes, confirm. The geometry is computed by JTS (Java Topology Suite); the kept row's geometry is updated to the union, the other row is deleted in the same step.
Merge is part of the Advanced Editing Pro+ feature set. Free and Pro users can see the master toggle in Settings > Advanced Editing but turning it on opens the subscription paywall.
- Android
- iOS
When to use Merge
- Cadastral consolidation - combining two adjacent parcels under a single owner.
- Forestry stand re-classification - dissolving two adjacent stands that have become a single management unit.
- Utility network simplification - joining two end-to-end pipe segments after a renumbering pass.
- Duplicate cleanup - removing a stray duplicate feature drawn over an existing one.
Before you start
To use Merge you need:
- A Mapit Pro Plus subscription.
- The Advanced Editing master toggle on in Settings > Advanced Editing.
- Two existing features on the same layer. Both must be single-part polygons or single-part polylines; multipart features (multipolygon, multilinestring) are not supported in v1.
The two features must be adjacent in a way that produces a clean single-part result. For polygons that means sharing at least an edge; for polylines that means sharing an endpoint. See Validity rules below.
The flow
1. Open the first feature for editing
Long-press an existing polygon or polyline feature to start an edit session on it. This becomes feature A - the visual reference for the merge.
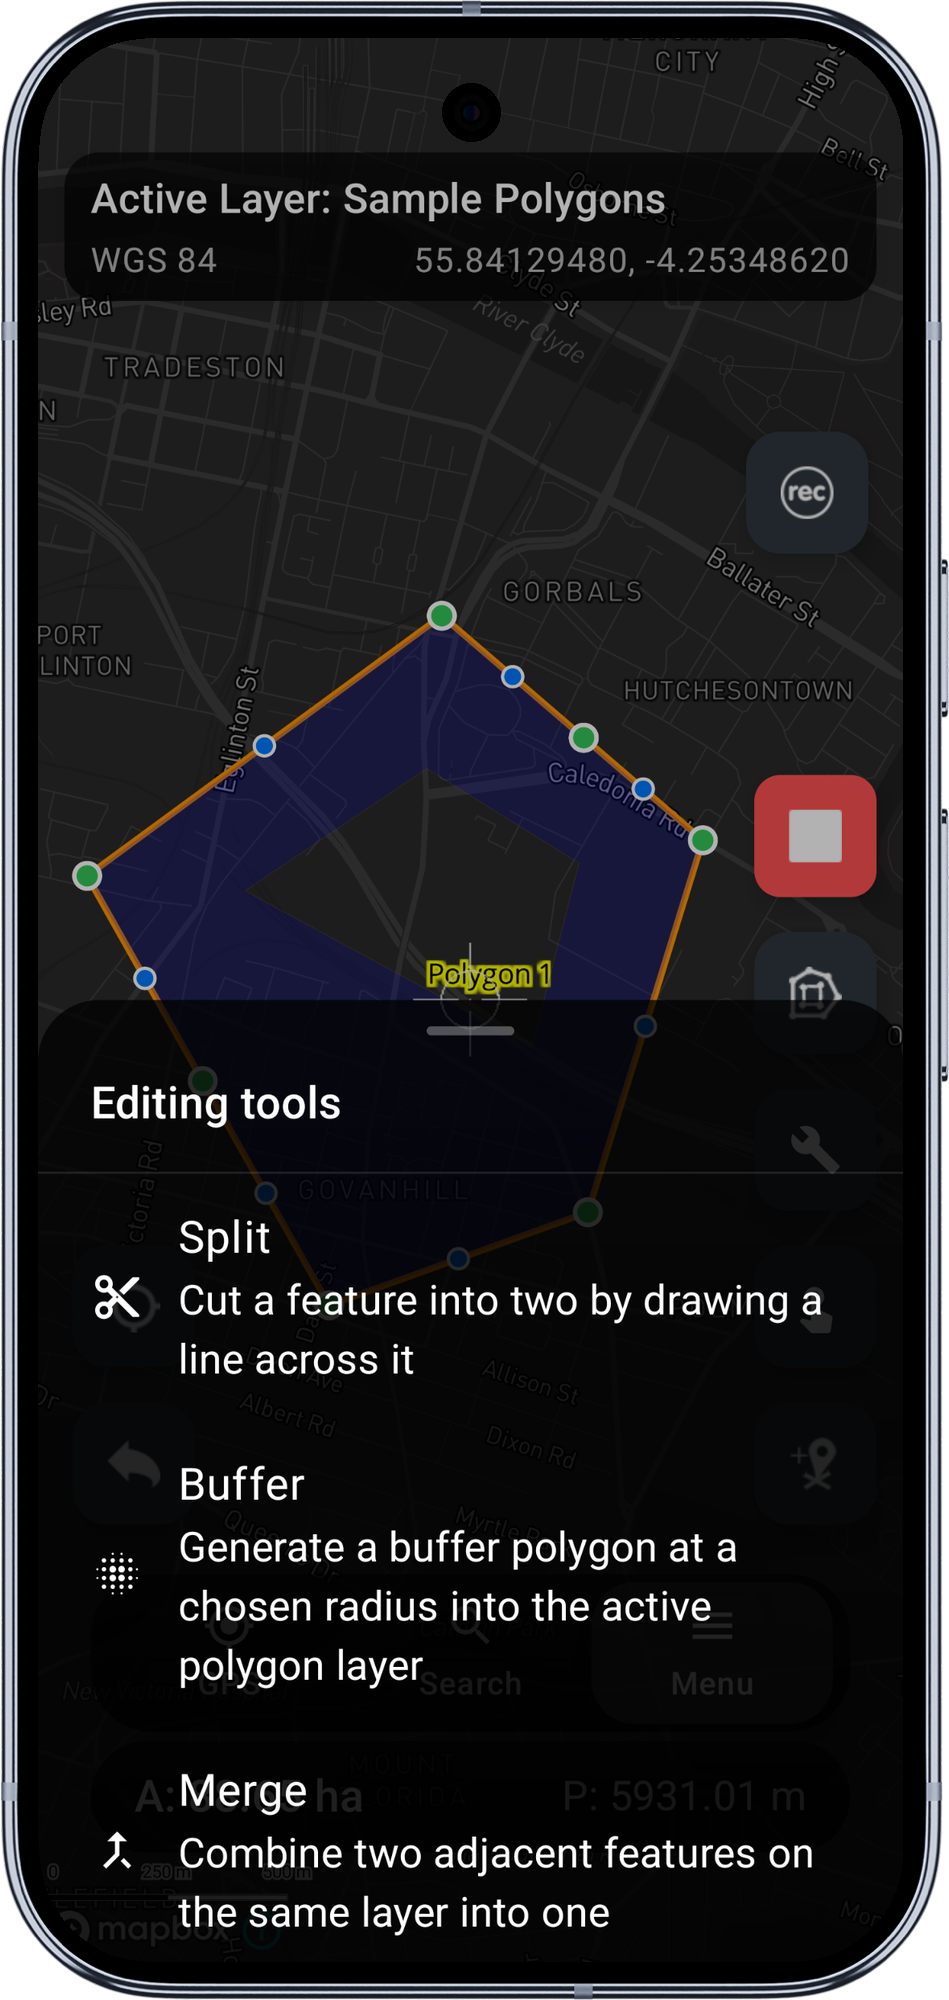
2. Open the editing-tools sheet
The right-side toolbar shows the usual edit FABs plus a Tools chip near the top. Tap Tools to open the editing-tools bottom sheet. The sheet lists Split, Buffer, and Merge. Tap Merge.
3. Pick feature B
The vertex handles and midpoint markers on feature A disappear; A is re-drawn in purple with the letter A at its centroid so you can see your starting feature. A compact bar appears above the bottom navigation: "Tap a feature to merge" with a Cancel button.
Tap a second feature on the same layer. Mapit looks up the full-precision GeoPackage geometry for the picked feature and validates the union:
- Tapping a feature on a different layer is silently ignored, with a brief "Same-layer features only" snackbar.
- Tapping feature A itself is silently ignored; the bar reads "Pick a different feature".
- Tapping a multipart feature is rejected with the same hint.
If validation passes, you advance to step 4. If validation fails for a geometric reason (disjoint polygons on a single-polygon table, T-junction polylines), a snackbar names the reason and you stay in pick mode so you can try another feature.
4. Pick which side keeps the row + attributes
A confirmation card slides up. The headline shows the merged area or length; below it two pills show A and B with their individual magnitudes. The merged geometry is drawn on the map in purple, and the A / B labels appear at the centroid of each input feature. The kept side's label renders larger with a thicker purple halo; the other side's label renders smaller and dimmer.
By default the larger piece keeps the row (configurable via the Largest piece keeps original attributes setting). Tap the other pill to swap. The kept-side highlight on the map flips to match.

5. Apply or Cancel
- Apply updates the kept row's geometry to the merged shape and deletes the other row in the same step. The full GeoPackage rendered layer is rebuilt so both row changes appear on the map at once. A toast confirms with "Merged".
- Cancel discards the preview without writing. Both rows are unchanged; the regular edit toolbar is restored on feature A so you can keep editing it.
Validity rules
The Merge tool refuses to write a merge result that would silently introduce a degenerate topology. In each rejection case a snackbar explains why and you stay in pick mode for another try.
| Reason | When | Surfaced message |
|---|---|---|
| Disjoint polygons | Two polygons that do not share any boundary, on a single-polygon table. The JTS union would be a multipolygon, but the destination table is declared as POLYGON. | "Cannot merge: features are not adjacent" |
| Vertex-touch only | Two polygons that share exactly one corner vertex (a "bowtie"). JTS union returns a self-touching polygon that is not a valid simple-features geometry. | "Cannot merge: features only touch at a point" |
| T-junction lines | Two polylines that touch at an interior point (a midpoint of one line meets the endpoint of the other). The lines are not end-to-end mergeable. | "Cannot merge: lines do not connect end-to-end" |
| Empty result | Defensive case: union returned no geometry. Should not happen in practice. | "Cannot merge: result is empty" |
For tables declared as MULTIPOLYGON or MULTILINESTRING, the disjoint / T-junction rules relax automatically: the merge succeeds and stores a multi-part geometry. Mapit reads the active layer's geometry-type declaration to decide.
Z values
JTS' union does not preserve Z (elevation) values along the merged boundary. Mapit writes the merged geometry as XY into the GeoPackage row, even when the source table declares XYZ. This matches the Buffer tool's behaviour. Z restoration along the merged boundary is on the roadmap.
Limitations in v1
- Multipart features (multipolygon, multilinestring) are not supported as inputs. The Merge entry stays visible in the tools sheet but the chosen pair must be single-part.
- Three-or-more feature dissolve is not supported in v1. Pick two features at a time. Multi-feature dissolve is on the roadmap as a follow-on.
- Cross-layer merge is not supported. Both features must be on the same layer (and so share schema and projection).
- Attribute conflict resolution is one-or-the-other. Field-by-field attribute merging is not in scope.
- Z restoration along the merged boundary is dropped to XY in v1.
- WFS layers as sources never see Merge - they are read-only.
Requirements
- A Mapit Pro Plus subscription (Android).
- Advanced Editing master toggle on in Settings > Advanced Editing.
- Two existing single-part features on the same polygon or polyline layer.
When to use Merge
- Cadastral consolidation — combining two adjacent parcels that have come under a single owner.
- Road network simplification — joining two end-to-end road segments after a renumbering pass.
- Stand re-classification — dissolving two adjacent forestry stands that are now a single management unit.
- Administrative boundary tidying — merging two boundary polygons that should have been one.
Before you start
To use Merge you need:
- A Mapit Pro Plus subscription.
- The Advanced Editing master toggle on in Settings > Advanced Editing.
- Two existing features on the same layer. Both must be single-part polygons or single-part polylines. Points are not supported — Merge is a geometry operation, not a duplicate-cleanup tool.
The two features must be adjacent in a way that produces a clean single-part result. For polygons that means sharing at least an edge; for polylines that means sharing an endpoint end-to-end. See Rejection reasons below.
On tables declared as MultiPolygon or MultiLineString, the adjacency requirement is relaxed: the merge succeeds and stores a multi-part geometry.
The flow
1. Open the first feature for editing
Tap an existing polygon or polyline feature on the map, then tap Edit geometry from the feature info menu. This becomes feature A — the visual reference for the merge. The edit toolbar appears on the right side of the screen.
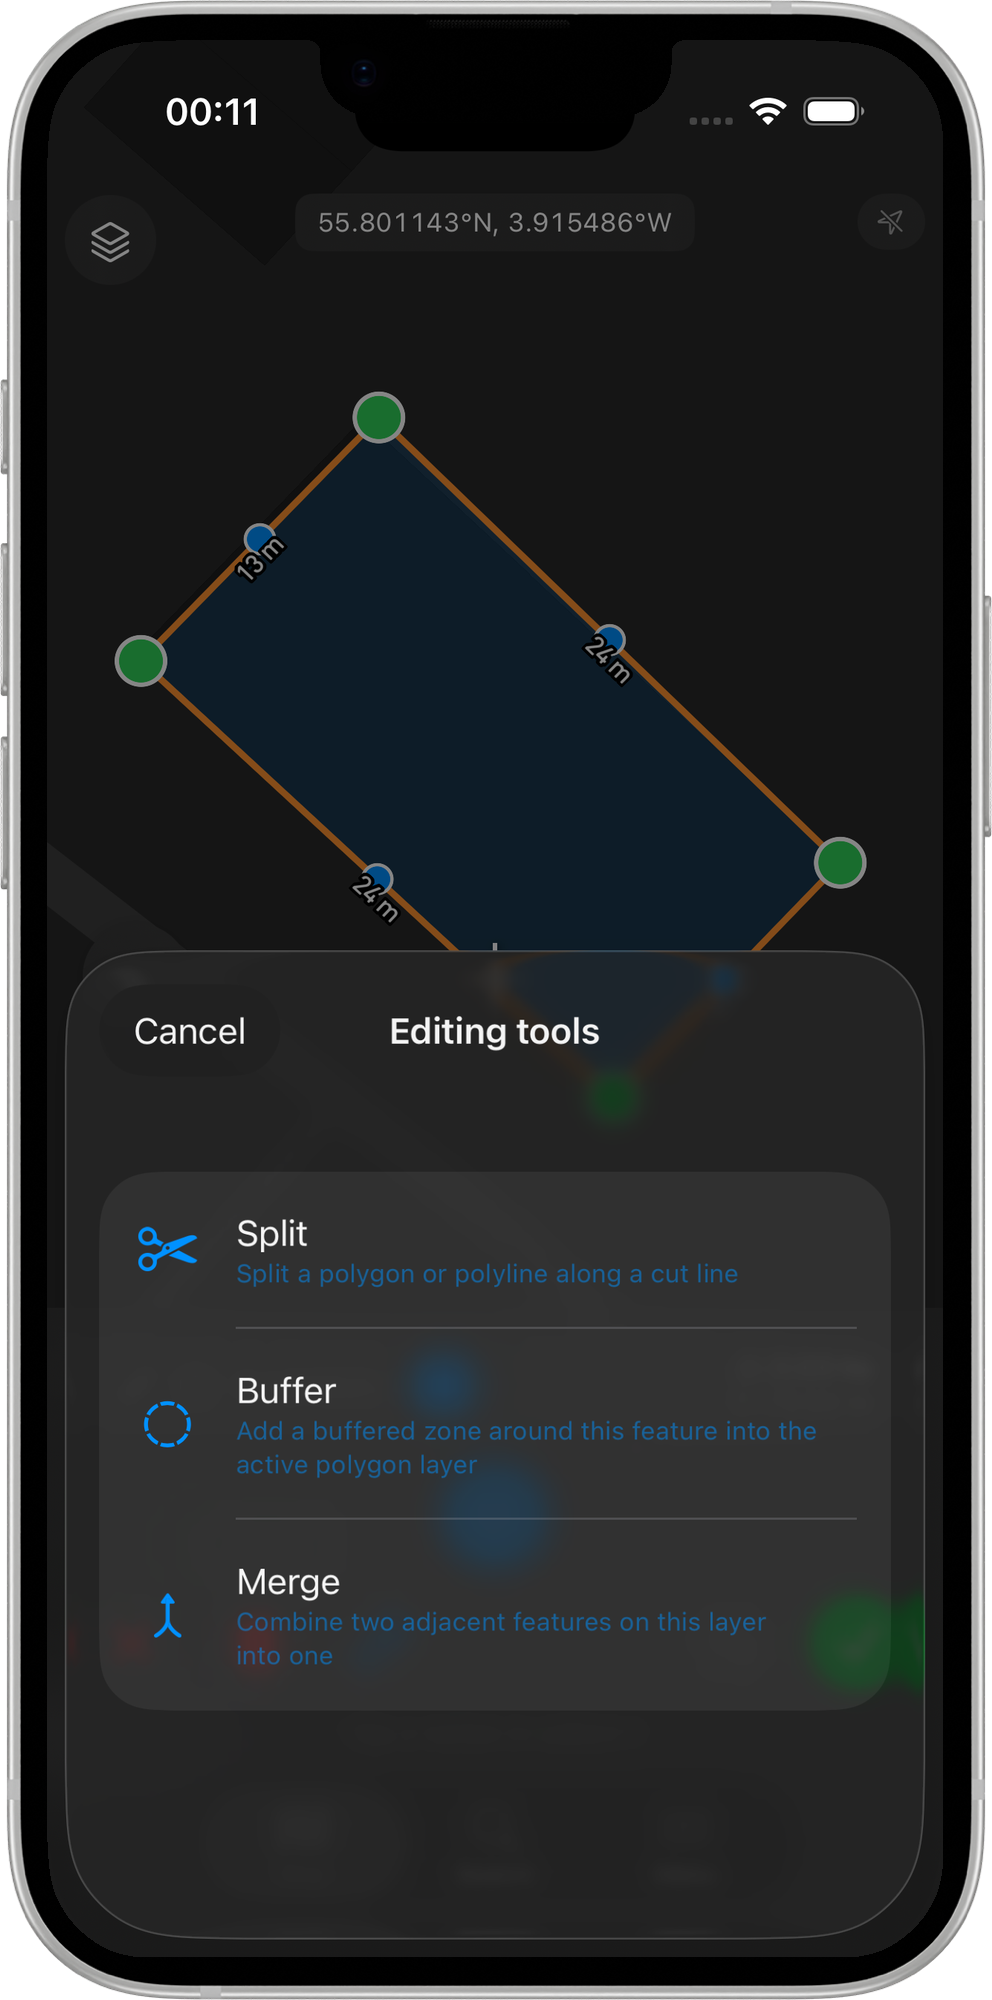
2. Open the editing-tools sheet
Tap the Tools chip on the edit toolbar. A bottom sheet slides up listing the available advanced editing tools: Split, Buffer, and Merge. Tap Merge.
3. Pick feature B
The vertex handles and edit FABs disappear. Feature A is re-drawn in purple and a banner appears at the bottom of the screen reading "Tap a feature on this layer to merge".
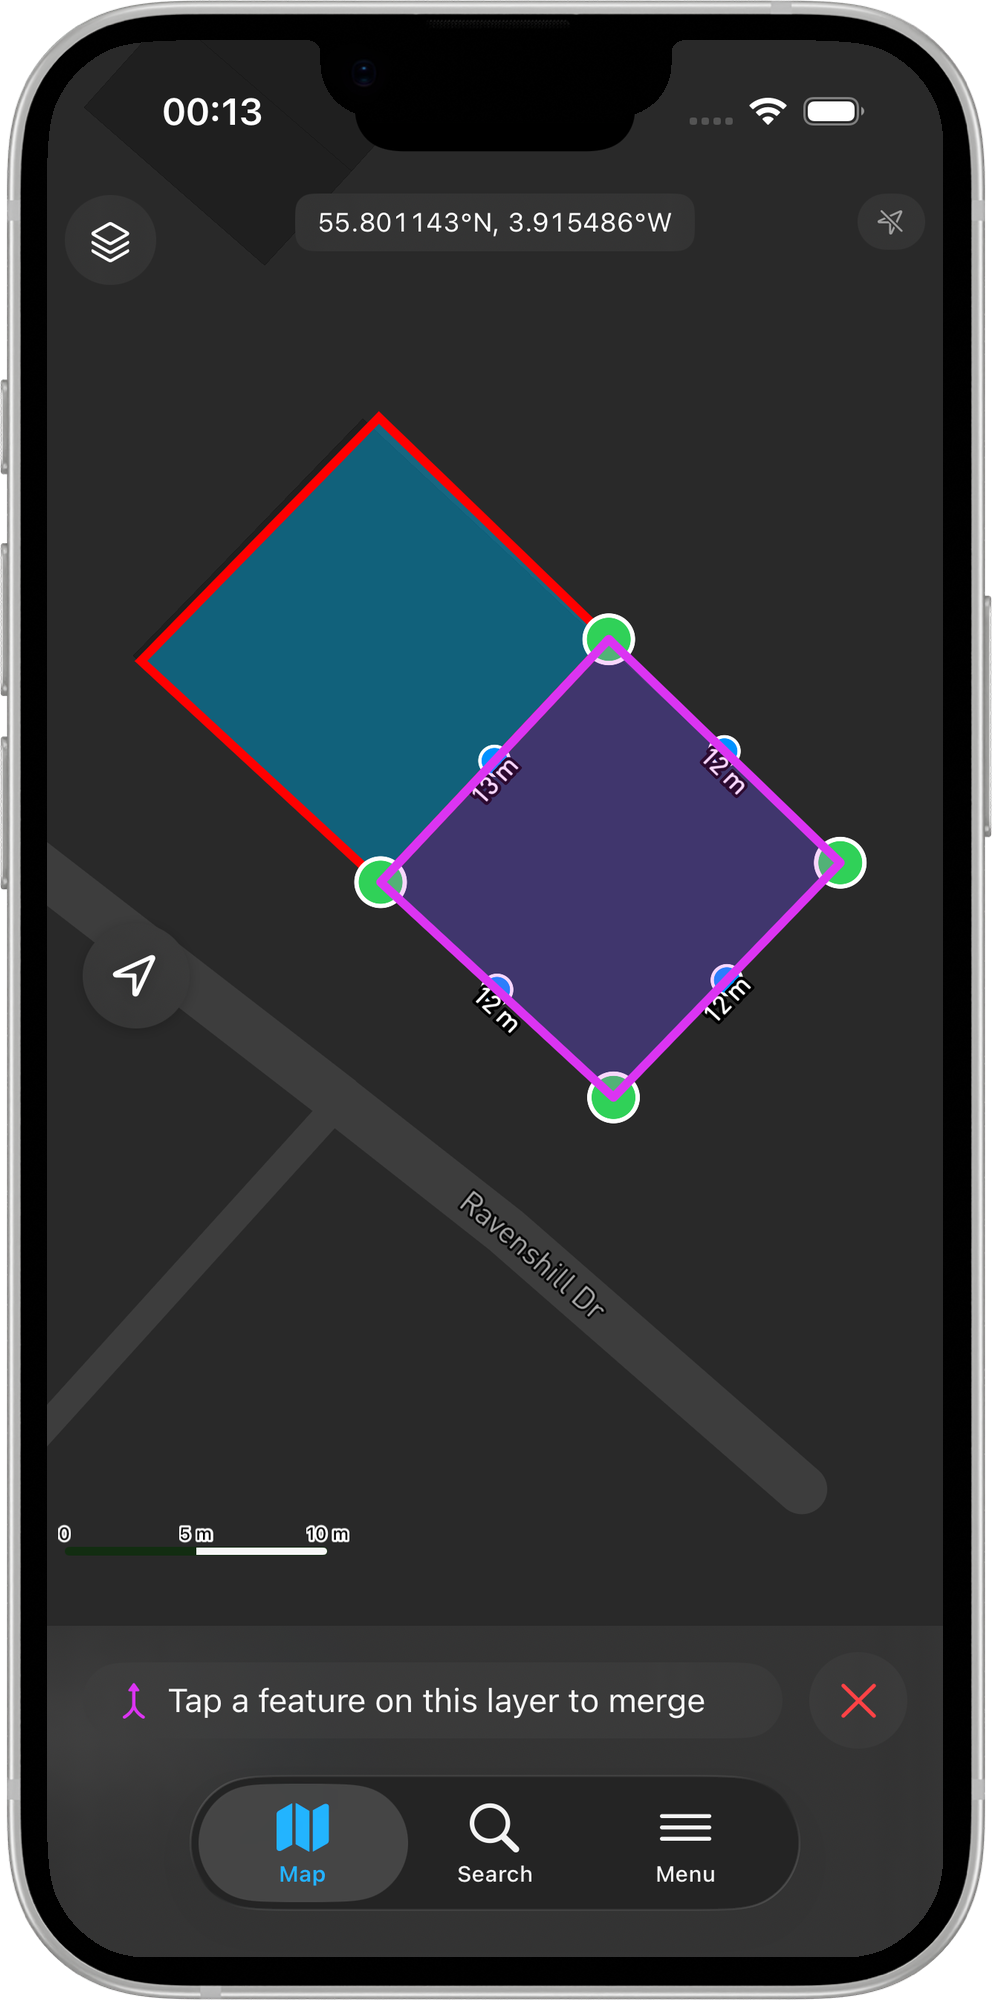
Tap a second feature on the same layer. Mapit validates the selection:
- Tapping a feature on a different layer shows a brief "Same-layer features only" message; the banner remains so you can try again.
- Tapping feature A itself is silently ignored.
- Tapping a point feature is rejected — Merge does not support point geometry.
- Tapping a MultiPolygon or MultiLineString feature is rejected — both inputs must be single-part.
If the selected pair fails a geometric check (see Rejection reasons), an inline message explains why and you remain in pick mode to try a different feature.
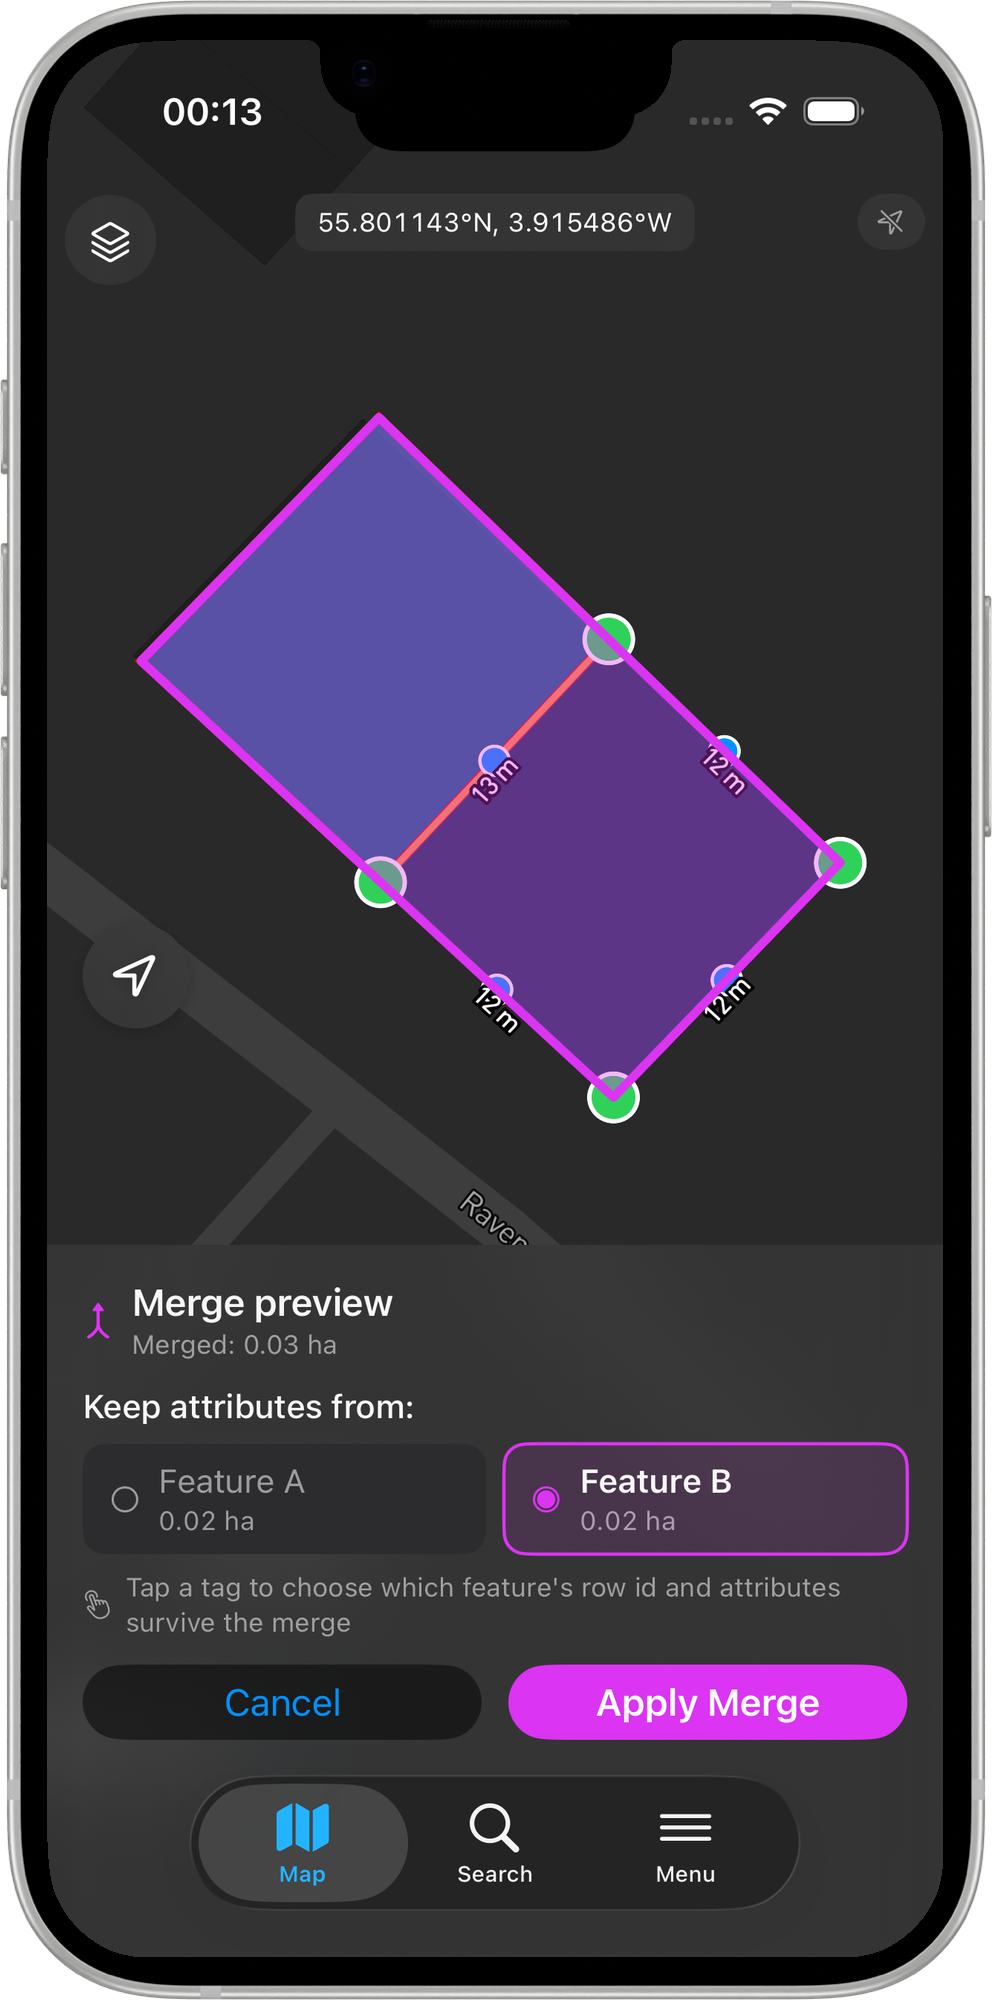
4. Review the preview and choose which side keeps its attributes
When feature B is accepted, the merged shape appears in purple on the map. A confirmation card slides up showing:
- The merged area (polygons) or merged length (lines).
- Two tags labelled Feature A and Feature B, each showing its individual magnitude.
- The currently-kept side is highlighted — its tag is bolder and the corresponding original feature outline on the map renders larger with a thicker purple halo.
By default the larger piece keeps its row ID and attributes (configurable via the Largest piece keeps attributes setting). Tap Feature B to swap which side's row survives; the on-map highlight flips to match.
Whether swapping also overwrites the kept row's attribute values depends on the Adopt attributes after swap setting (default off — attributes are unaffected by a swap).
5. Apply or Cancel
- Apply Merge — writes the merge in a single transaction: the kept row's geometry is updated to the union of A and B; the other row is deleted. The layer re-renders immediately. The edit session closes.
- Cancel — discards the preview without writing. Both rows are unchanged and the regular edit toolbar is restored on feature A.
Rejection reasons
| Reason | Geometry | Message shown |
|---|---|---|
| Same row tapped | Any | Silent (no message shown). |
| Different layer | Any | "Same-layer features only" |
| Disjoint polygons on a single-polygon table | Polygon | "Cannot merge: features do not share an edge" |
| Vertex-touch only | Polygon | "Cannot merge: features do not share an edge" |
| Lines that do not connect end-to-end on a single-line table | Polyline | "Cannot merge: lines do not connect end-to-end" |
For MultiPolygon and MultiLineString tables the adjacency and connectivity rules above do not apply — Mapit reads the active layer's geometry-type declaration and allows the merge, storing the result as a multi-part geometry.
Z values
GEOS' union does not preserve Z (elevation) values along the merged boundary. Mapit writes the merged geometry as XY into the GeoPackage row, even when the source table declares XYZ. This matches the Buffer tool's behaviour on iOS.
Limitations in v1
- MultiPolygon / MultiLineString features are not supported as inputs. Both features in the pair must be single-part.
- Three-or-more feature dissolve is not supported. Pick two features at a time.
- Cross-layer merge is not supported. Both features must be on the same layer and share the same schema and projection.
- Attribute conflict resolution is one-or-the-other. Field-by-field merging of attribute values is not in scope.
- Z restoration along the merged boundary is dropped to XY in v1.
- WFS layers never see Merge — they are read-only.
- Point layers are not supported.
Requirements
- A Mapit Pro Plus subscription (iOS).
- Advanced Editing master toggle on in Settings > Advanced Editing.
- Two existing single-part features on the same polygon or polyline layer.
Related Topics
- Split Operation - The opposite operation: cut a single feature into two.
- Buffer Tool - Generate a polygon buffer around a feature.
- Advanced Editing Settings - Configure the default kept side and the master Advanced Editing toggle.
- Mapit Pro Plus - What is included in the Pro+ subscription.