Georeferenced Images
Mapit GIS Professional can display georeferenced raster images as map overlays. This is ideal for drone orthophotos, scanned paper maps, historical aerial imagery, or any raster image that has been georeferenced to real-world coordinates.
Supported formats
GeoTIFF (.tif, .tiff)
GeoTIFF is the most common georeferenced image format. It embeds coordinate system information and geographic bounds directly in the TIFF file headers — no additional files are needed.
| Feature | Supported |
|---|---|
| Compression | Uncompressed, LZW, JPEG, Deflate, PackBits |
| Layout | Stripped and tiled TIFFs |
| Color | RGB, RGBA, grayscale, palette/indexed color, YCbCr |
| Bit depth | 8-bit |
| Coordinate systems | Any EPSG code + user-defined Transverse Mercator (auto-reprojected to WGS84 with quadrilateral placement) |
| Max file size | 50 MB (Android) / 200 MB (iOS, with confirmation prompt above 200 MB) |
JPEG with world file (.jpg + .jgw)
Standard JPEG images can be georeferenced using a companion world file. The world file is a small text file that defines the image's position and scale in map coordinates.
World file extensions for JPEG: .jgw, .jpgw, .wld
PNG with world file (.png + .pgw)
PNG images work the same way as JPEG, with their own world file extension.
World file extensions for PNG: .pgw, .pngw, .wld
TIFF with world file (.tif + .tfw)
Standard TIFF files (without embedded GeoTIFF tags) can also use a companion world file. If a TIFF file has both embedded GeoTIFF tags and a world file, the embedded tags take priority.
World file extensions for TIFF: .tfw, .tifw, .wld
GIF with world file (.gif + .gfw)
GIF images are also supported on iOS using the .gfw world file extension.
World file extensions for GIF: .gfw, .wld
What is a world file?
A world file is a plain text sidecar file that describes how an image maps to real-world coordinates. It contains six lines defining an affine transformation:
0.25          Line 1: pixel size in X direction (metres/pixel)
0.0           Line 2: rotation about Y axis (usually 0)
0.0           Line 3: rotation about X axis (usually 0)
-0.25         Line 4: pixel size in Y direction (usually negative)
311334.625    Line 5: X coordinate of the centre of the upper-left pixel
5523336.625   Line 6: Y coordinate of the centre of the upper-left pixel
The world file must:
- Be in the same folder as the image
- Have the same base filename as the image (e.g.
photo.jpg+photo.jgw)
World files do not contain coordinate system (CRS) information. When you import an image with a world file, Mapit GIS will check whether the coordinates are in WGS84 (latitude/longitude). If the coordinates are in a projected system (e.g. UTM), you will be prompted to enter the EPSG code so the image can be correctly placed on the map.
Common EPSG codes:
- 4326 - WGS 84 (latitude/longitude)
- 3857 - Web Mercator
- 326xx - WGS 84 / UTM Zone xxN (e.g. 32611 for Zone 11N)
- 269xx - NAD83 / UTM Zone xxN (e.g. 26911 for Zone 11N)
If you are unsure of the EPSG code, check the source software that produced the image or look for a .prj file alongside the world file. Mapit GIS will detect and apply a .prj file automatically if it is present.
Importing a georeferenced image
- Android
- iOS
GeoTIFF files
- Open Offline Maps from the main menu
- Switch to the Geo Images tab
- Tap the + button
- Browse to and select your
.tifor.tifffile - The image will be imported, decoded, and placed on the map using the embedded georeferencing
JPEG, PNG, or TIFF with world file
- Open Offline Maps from the main menu
- Switch to the Geo Images tab
- Tap the + button
- Select your image file (
.jpg,.jpeg,.png,.tif, or.tiff) - When prompted, select the companion world file (
.jgw,.pgw,.tfw, etc.) - If the coordinates are projected, enter the EPSG code when asked
- The image will be imported and placed on the map
Due to Android security restrictions, the file picker only grants access to the single file you select — it cannot automatically read other files in the same folder. This is why you need to select the world file separately after the image.
The Geo Images & PDFs tab and its import flow ship in Mapit GIS for iOS 1.6 and later.
Opening the Geo Images & PDFs tab
- Open Offline Maps from the main menu (tap the map icon, then Offline Maps)
- Switch to the Geo Images & PDFs tab
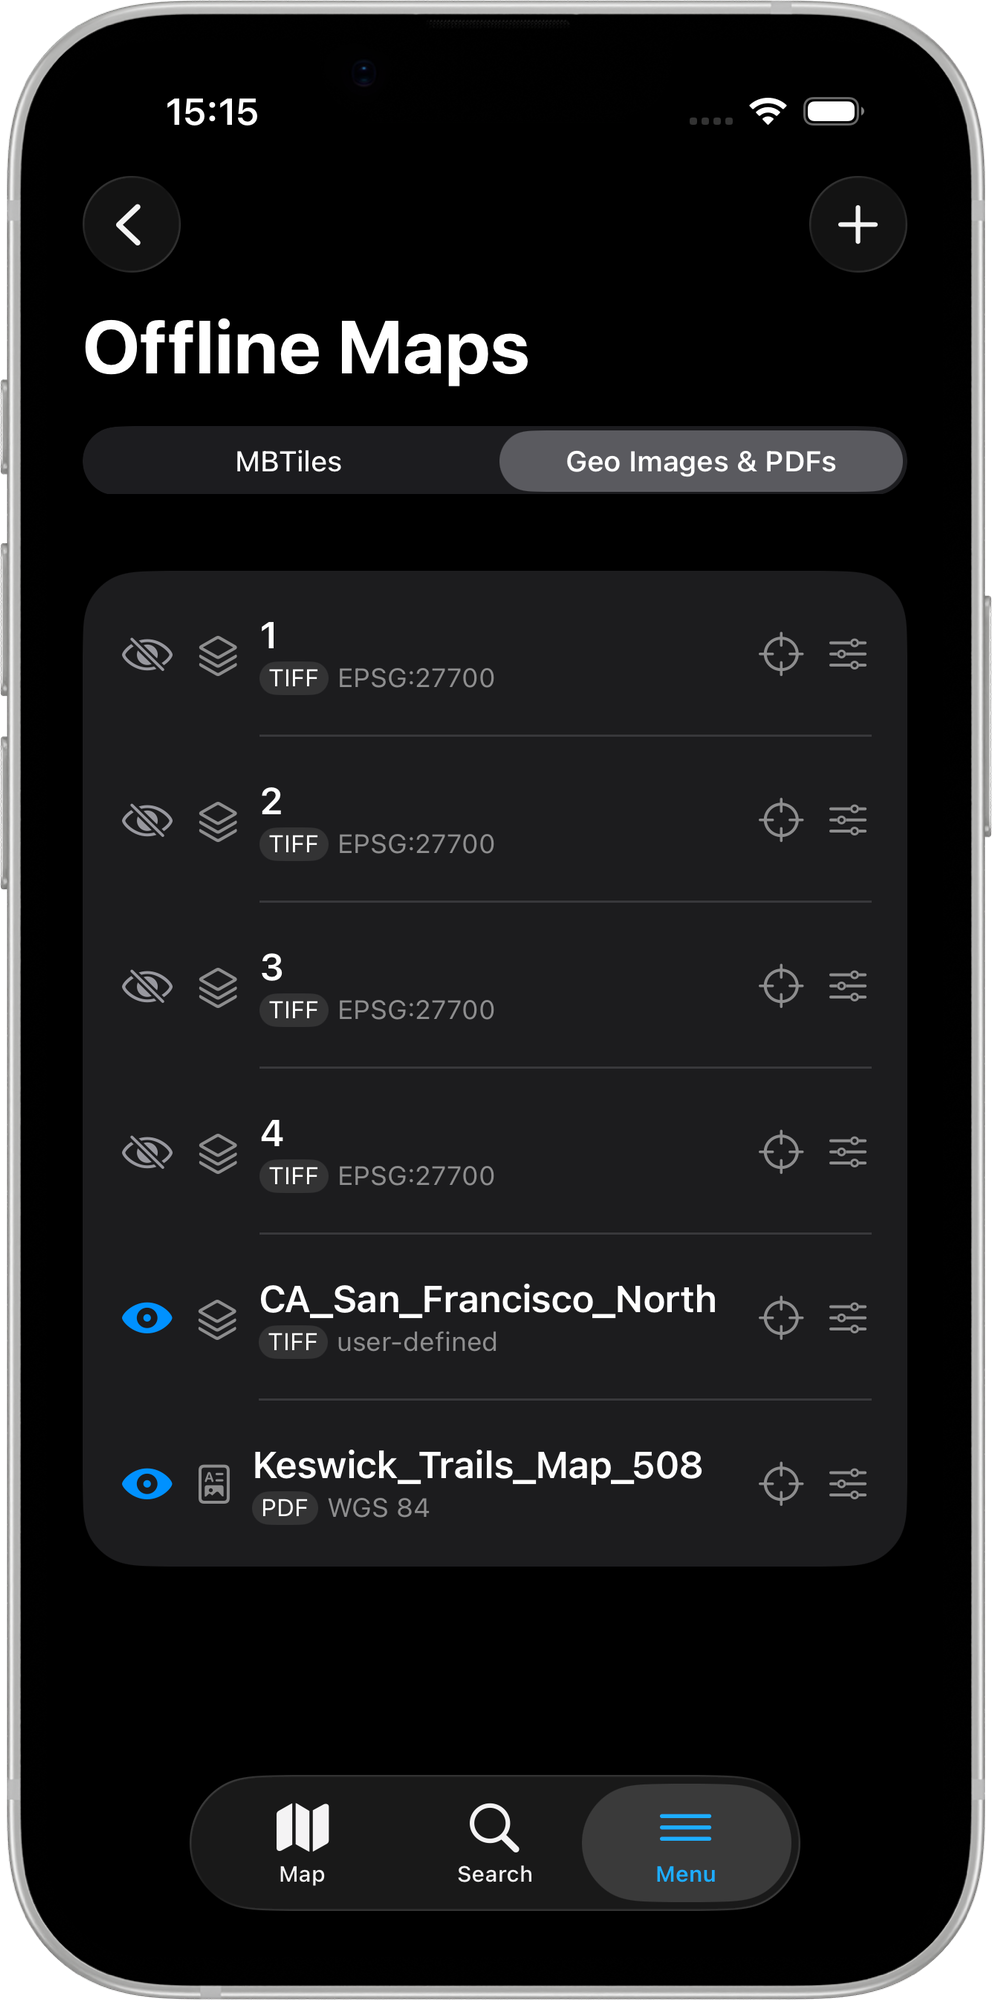
The Geo Images & PDFs tab is available to Pro subscribers and above. Free users do not see this tab.
GeoTIFF files
- Tap the + button on the Geo Images & PDFs tab
- The document picker opens, filtered to
.tifand.tifffiles (and other supported image types and.pdf) - Navigate to your GeoTIFF and tap to select it
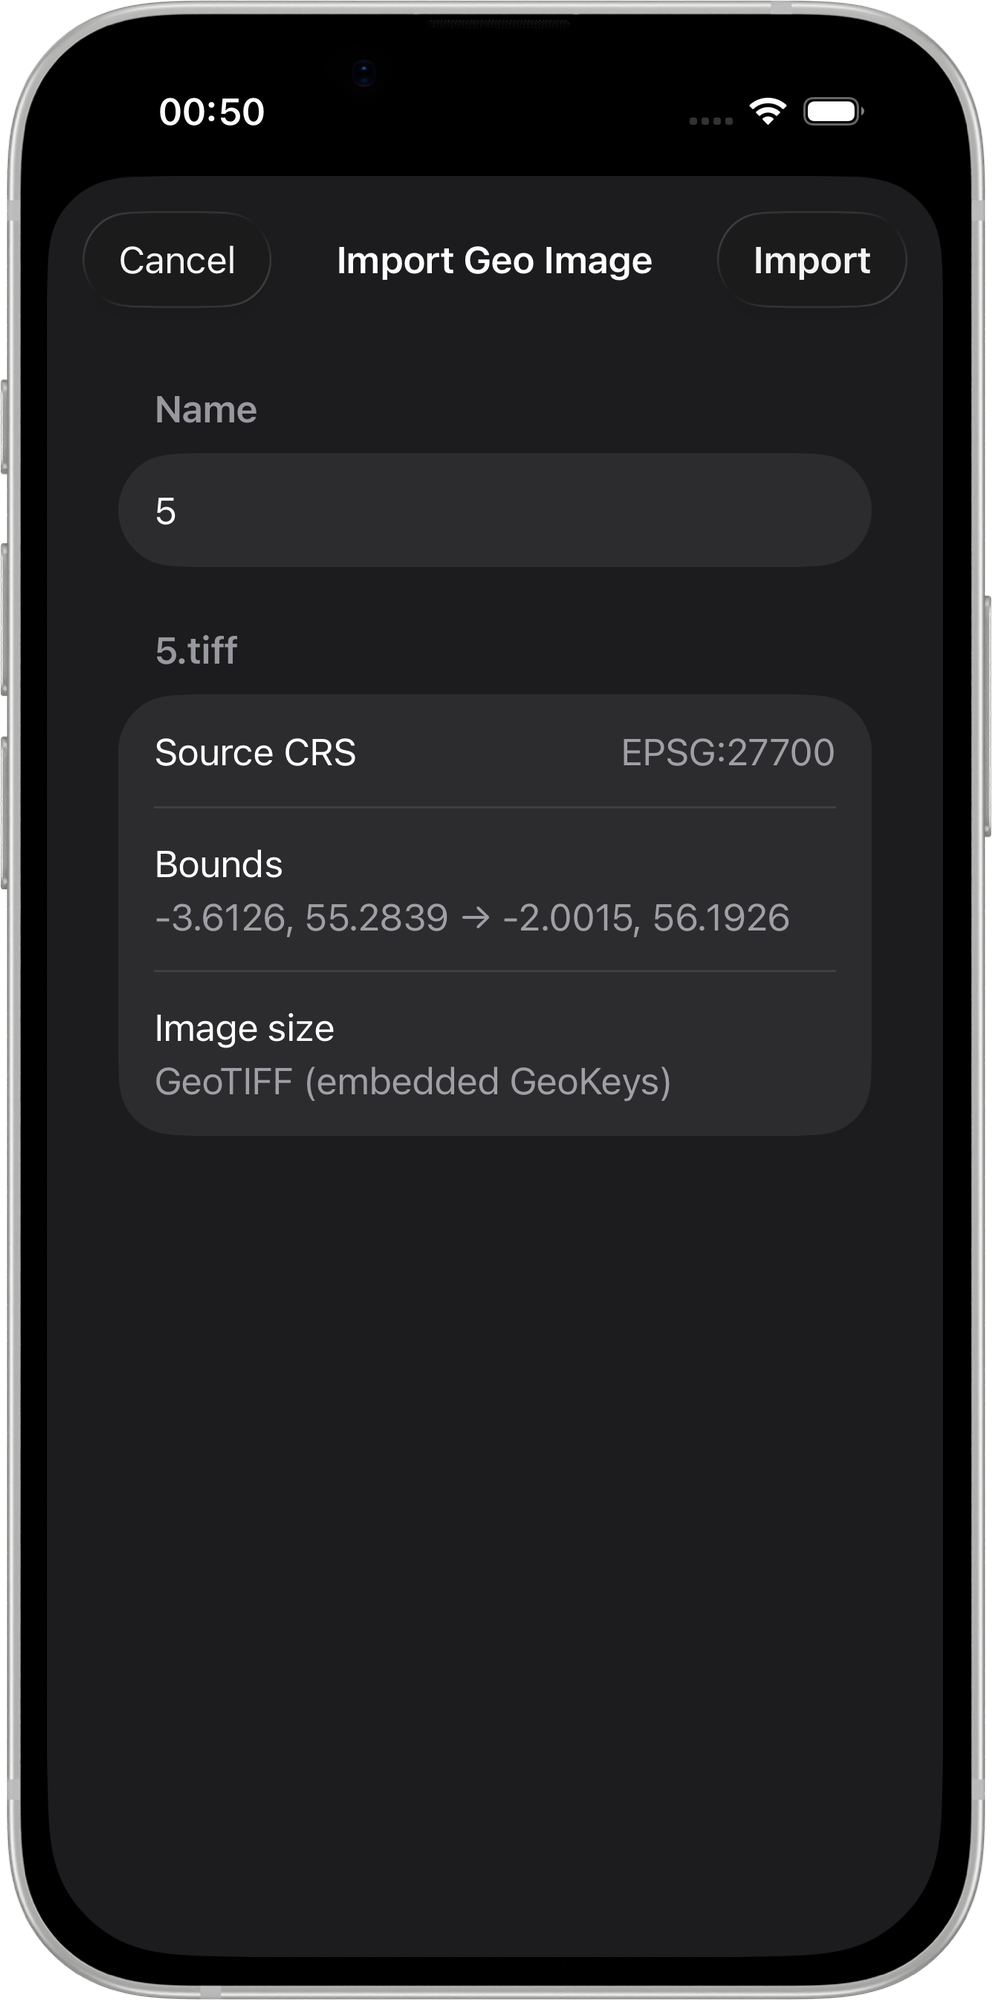
- The import sheet appears, showing:
- A preview of the image name and file size
- The detected coordinate system (auto-read from the GeoTIFF headers)
- The geographic bounds
- Tap Import to confirm
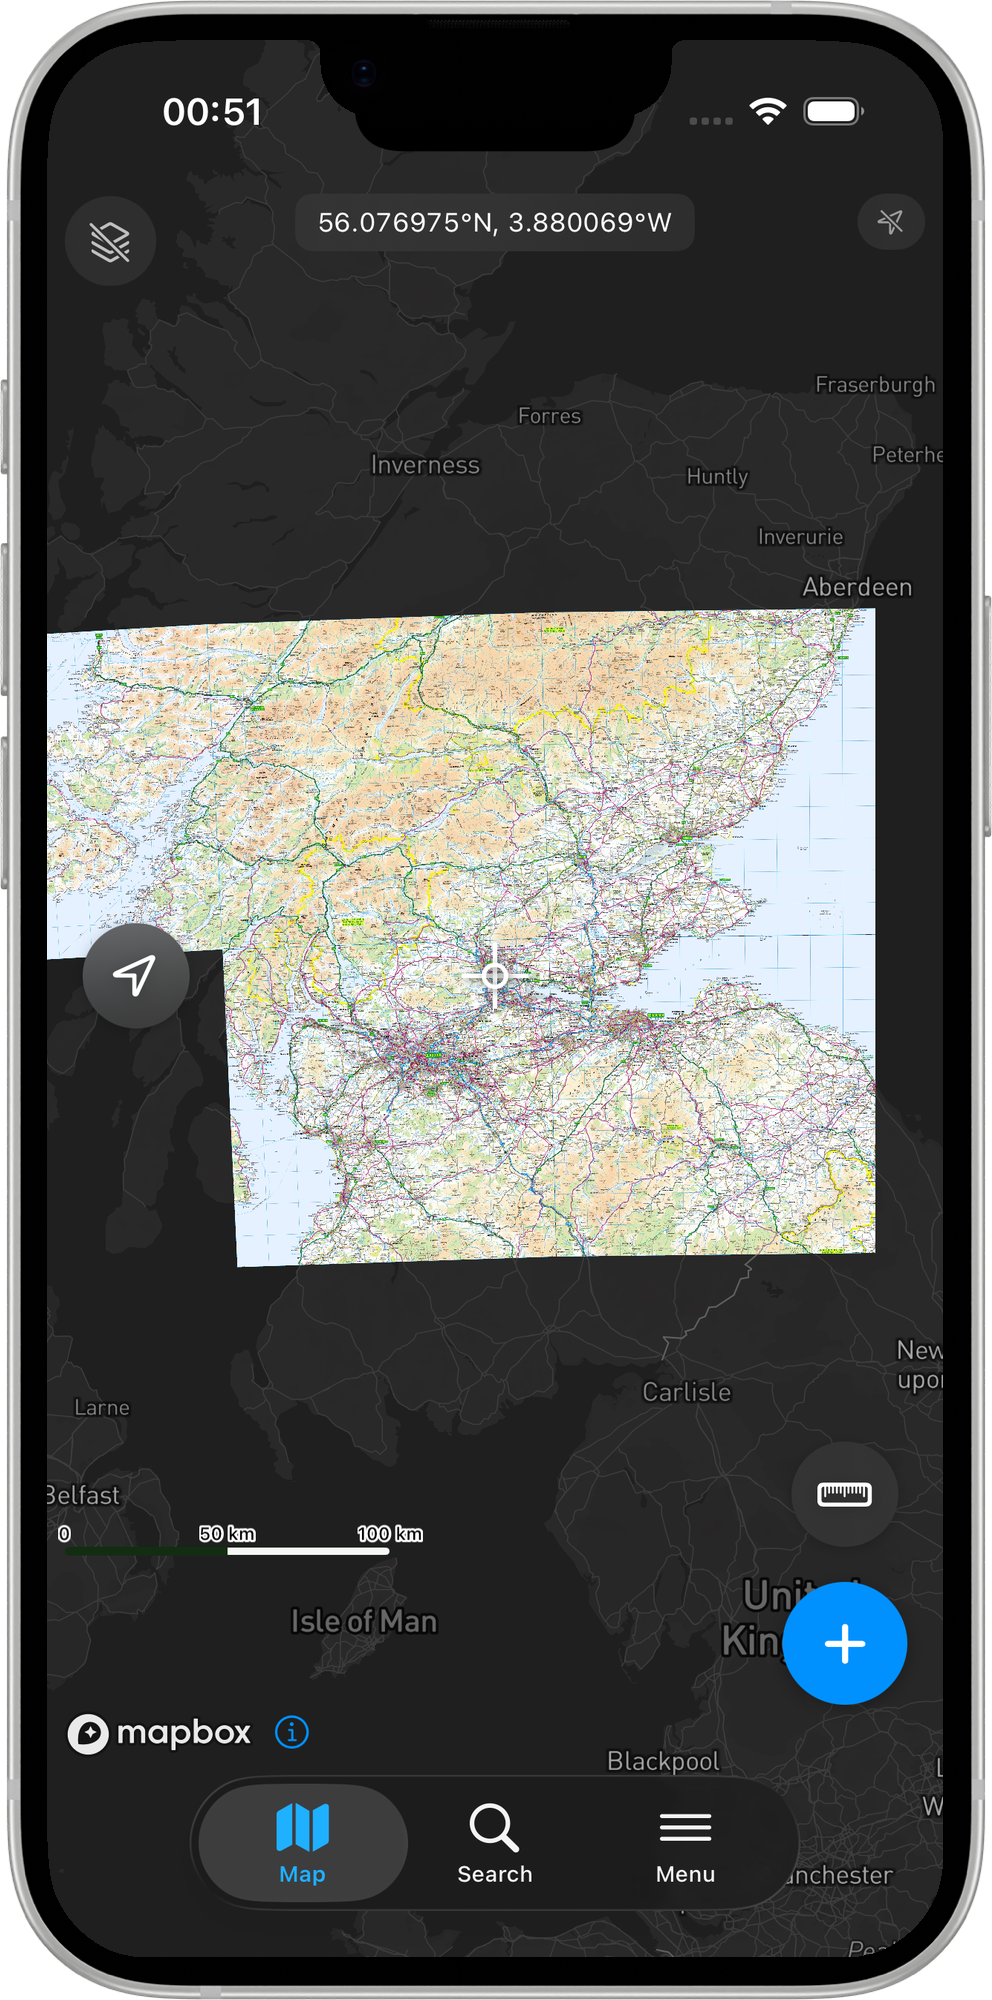
Once imported, the image appears as an overlay on the map.
Files larger than 200 MB trigger a confirmation prompt before import. The output JPEG is scaled to a maximum of 2048 pixels on its longest side to keep rendering smooth. For very large files, consider converting to MBTiles instead — see MBTiles Tile Maps.
JPEG, PNG, GIF, or TIFF with world file
- Tap the + button on the Geo Images & PDFs tab
- Select your image file (
.jpg,.jpeg,.png,.gif,.tif, or.tiff) - Mapit GIS automatically looks for a sidecar world file with a matching base name (
.jgw,.pgw,.gfw,.tfw, or.wld) in the same iCloud Drive or local folder - If no sidecar is found automatically, a Pick world file… prompt appears — select the world file manually
- The import sheet appears:
- If a
.prjfile is present alongside the image, the CRS is detected automatically - Otherwise, if the coordinates appear to be projected (not WGS84 latitude/longitude), a CRS picker appears so you can enter the EPSG code
- If a
- Tap Import to confirm
Imported files are stored in the app's Documents/GeoImages/ folder as <uuid>.jpg (a rasterised JPEG copy of the source).
Managing georeferenced images
- Android
- iOS
Once imported, georeferenced images appear in the Geo Images tab of the Offline Maps screen. You can:
- Toggle visibility — show or hide the image overlay
- Adjust transparency — blend the image with the base map (0–100%)
- Reorder layers — drag and drop to change stacking order
- Zoom to extent — jump to the area covered by the image
- Delete — remove the image from the list and delete the file
Once imported, georeferenced images appear in the Geo Images & PDFs list. You can:
- Toggle visibility — tap the eye icon to show or hide the overlay
- Adjust opacity — expand the row and use the opacity slider (0–100%)
- Reorder layers — drag the handle on the right to change the stacking order
- Zoom to extent — tap Zoom to to fly the map to the image's bounding box
- Delete — swipe left and tap Delete. This also removes the rasterised JPEG from
Documents/GeoImages/on disk.
Stale-file recovery
If an imported image file is missing when the app opens (for example, it was removed from iCloud Drive before import completed), the row is automatically pruned from the list and a one-time alert notifies you.
Cross-platform compatibility
The Geo Images & PDFs list is stored in a shared mapit_geo_images table inside each GeoPackage project. Rows created on Android open correctly on iOS and vice versa, so you can import images on either platform and share the project file.
Creating georeferenced images
From drone software
Most drone mapping software (DJI Terra, Pix4D, DroneDeploy, OpenDroneMap) exports orthomosaic results as GeoTIFF files. These can be imported directly into Mapit GIS.
From QGIS
To export a georeferenced image from QGIS:
- Load your raster layer in QGIS
- Right-click the layer > Export > Save As...
- Choose GeoTIFF as the format
- Set the CRS and extent
- Click OK to export
Alternatively, to create a world file:
- Right-click the raster layer > Export > Save As...
- Choose JPEG or PNG as the format
- Check Create world file in the export options
- This will produce both the image and its companion world file
Georeferencing scanned maps
To georeference a scanned paper map:
- Open QGIS and go to Layer > Georeferencer
- Load the scanned image
- Add ground control points (GCPs) by clicking known locations on the image and entering their real-world coordinates
- Run the georeferencing — QGIS will produce a GeoTIFF output
Limitations
- Android
- iOS
- 50 MB file size limit — larger files are rejected at import. For larger areas, consider converting to MBTiles instead
- 8-bit colour depth only — 16-bit or 32-bit GeoTIFFs are not supported
- No Cloud-Optimized GeoTIFF (COG) streaming — the entire file must be on the device
- No multi-band support — only RGB, RGBA, grayscale, and palette/indexed colour images
- Full resolution rendering — the image is loaded at full resolution at all zoom levels (no pyramids). Very large images may be slow to render
- 200 MB source file limit — files above this size trigger a confirmation prompt
- 2048 px output limit — the rasterised JPEG is scaled to a maximum of 2048 pixels on its longest side
- 8-bit colour depth only — 16-bit or 32-bit GeoTIFFs are not supported
- No Cloud-Optimized GeoTIFF (COG) streaming — the entire file must be accessible locally or via iCloud Drive
- Full resolution rendering at output size — very large source files may produce a lower-detail output JPEG due to the 2048 px cap
Example data sources
Ordnance Survey 1:250,000 Scale Colour Raster
The OS 250k Colour Raster is a free download from the Ordnance Survey Data Hub. It provides overview mapping of Great Britain at 1:250,000 scale as GeoTIFF tiles in British National Grid (EPSG:27700).
To use in Mapit GIS:
- Download the dataset from the OS Data Hub (free registration required)
- Extract the ZIP — each grid square is a separate
.tiffile (e.g.NN.tif,SU.tif) - Import individual tiles via the Geo Images tab
- Mapit GIS will automatically detect the EPSG:27700 coordinate system and reproject to WGS84
Each tile covers a 100 km × 100 km OS grid square. For fieldwork, import only the tiles covering your area of interest rather than the entire dataset.
USGS Topographic Maps (GeoTIFF)
The USGS provides free topographic map GeoTIFFs via the topoView website. These are high-quality 1:24,000 scale maps available for the entire United States.
To use in Mapit GIS:
- Visit topoView and navigate to your area
- Click on a map quad and download the GeoTIFF version (not the GeoPDF)
- Import the
.tiffile via the Geo Images tab - Mapit GIS will automatically detect the coordinate system and reproject to WGS84
USGS topo GeoTIFFs use a custom Transverse Mercator projection (not standard UTM). Mapit GIS handles this automatically by reading the projection parameters from the GeoTIFF metadata.