When the app is started you will be presented with the map screen which is the main window of the application. The map state is remembered when you leave the app and it always will be restored to the state of last session when the app starts. Below you can see description and location of the main elements of the map view.
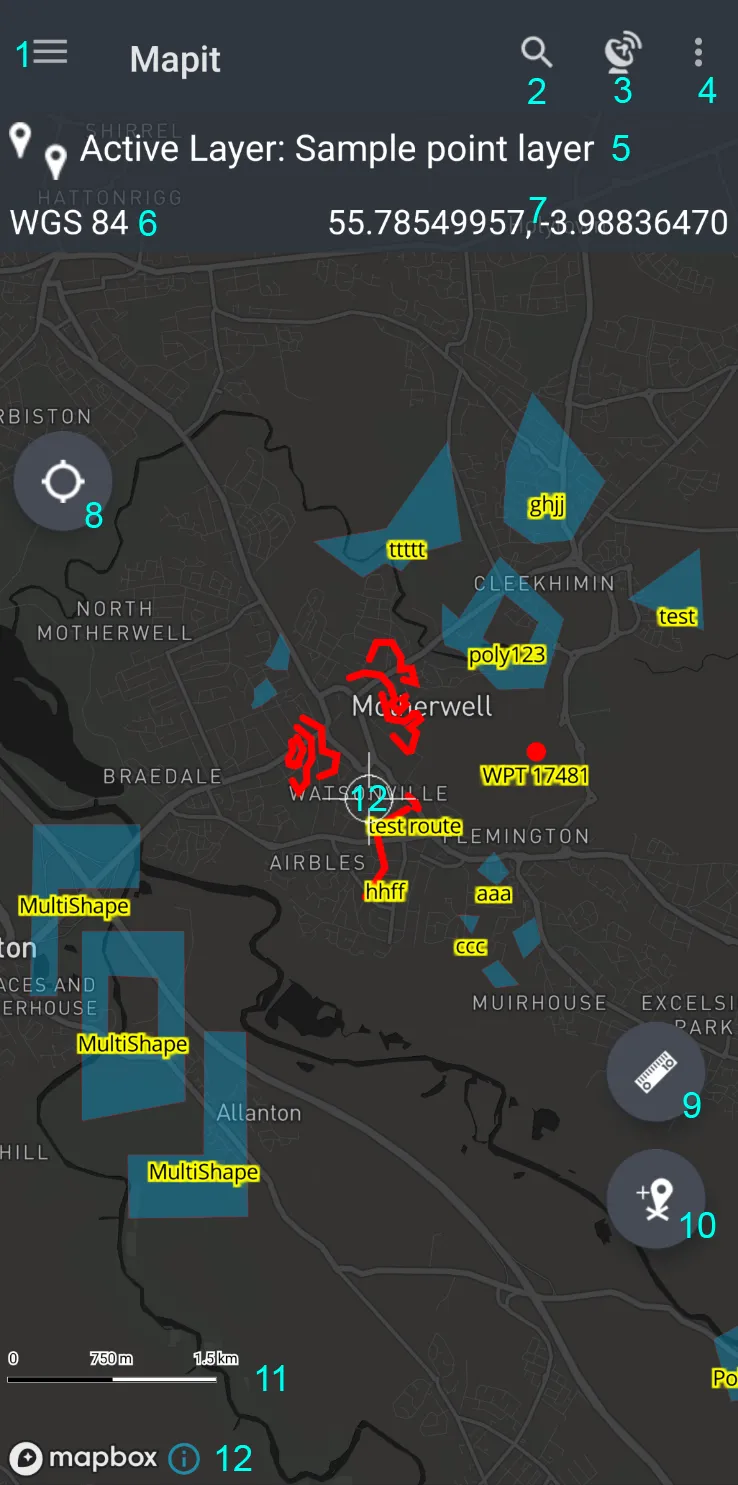
1 - [Navigation Drawer
Open or close the navigation drawer. Easy access to the main application modules. You can get more information about the navigation drawer here.
2 - Search
Search for a place or address. The search results will be displayed in a bottom sheet. Pickup the result to zoom to the location.
3 - Open or close GPS Info Screen
This function is only available when the GPS is enabled. The GPS Info Screen contains information about the current GPS position and the GPS status. The GPS Info Screen is a bottom sheet and can be opened or closed by tapping the GPS icon.
4 - Other Functions
Access the application settings or create a map screenshot. The screenshot will be saved in Mapit-Data -> Screenshots folder and can be shared with other apps as default.
5 - Active Map Layer
The active map layer is displayed here. Tap the layer name to open the map layer management actiivity. This is the layer new features will be added to by pressing ‘Add’ (10) button.
6 - CRS Info
Currently selected spatial reference system. The default CRS is WGS84 (EPSG:4326), this can be changed in the application settings.
7 - Coordinates Info
The coordinates of the center of the map view. The coordinates are displayed in the currently selected CRS and contain map cursor location or GPS position if center on GPS (8) is enabled.
8 - Center on GPS
Enable or disable centering the map view on the current GPS position. When enabled the map view will be centered on the current GPS position and the coordinates info (7) will display the GPS position. When disabled the map view will be centered on the map cursor location and the coordinates info (7) will display the map cursor location instead.
9 - Measurement Mode
Enable or disable measurement mode. When enabled the map view will be locked and the measurement tools will be displayed. When disabled the map view will be unlocked and the measurement tools will be hidden. Long press the measurement mode button to change measurement mode from Line to Polygon.
10 - Add Feature
Add a new feature to the active map layer. The active layer can be selected in the layer management activity. The icon will be changed to reflect the geometry type of active layer e.g. point, line or polygon.
11 - Scale Bar
The scale bar displays the current map scale.
12 - Map Cursor
The map cursor location is displayed in the coordinates info (7). Map cursor is centered on the map. When Center on GPS (8) is enabled the map will be automatically centered on the current GPS position.