ArduSimple RTK Handheld 2 and RTK Smart Antenna
This guide walks you through connecting an ArduSimple receiver to Mapit GIS, configuring NTRIP for RTK corrections, and verifying your setup in the field. It covers two receivers, which connect the same way:
| Receiver | GNSS | Connection | Status |
|---|---|---|---|
| RTK Handheld 2 Mapping Kit | u-blox ZED-F9P, L1/L2/E5b | USB or BLE (Android), BLE (iOS) | Tested with Mapit GIS |
| RTK Smart Antenna | u-blox ZED-F9P, L1/L2 | USB or BLE (Android), BLE (iOS) | Same connection as the Handheld 2 (confirmed by ArduSimple) |
Both receivers connect via USB (wired, most reliable) or Bluetooth Low Energy (wireless). Both methods support bidirectional communication, including RTCM corrections for RTK positioning.
- Power on: press and hold the button for 3 seconds. A tone confirms the change.
- BLE name: the receiver appears in the scan as SmartAnt, unless you renamed it in its web interface.
- Status LED: red = no fix, green blinking = RTK Float, green solid = RTK Fix.
- Antenna height: on a pole, ArduSimple recommends the pole height plus 81 mm. Enter it in Antenna height.
See ArduSimple's RTK Smart Antenna user guide for its own settings. Tested the Smart Antenna with Mapit GIS? Let us know.
What you need
- RTK Handheld 2 Mapping Kit or RTK Smart Antenna (or any ArduSimple receiver with USB or BLE support)
- USB OTG cable or adapter (for USB connection)
- Mapit GIS with a Pro Plus subscription (required for NTRIP)
- Access to an NTRIP caster (for RTK corrections)
- Android
- iOS
Requirements: Android 10 or later
Option A: USB Connection
USB provides the most reliable connection with no pairing required - just plug in and go.
1. Connect the receiver via USB
- Power on the ArduSimple receiver.
- Connect it to your Android device using a USB OTG cable or adapter.
- Android will prompt for USB permission - tap Allow.
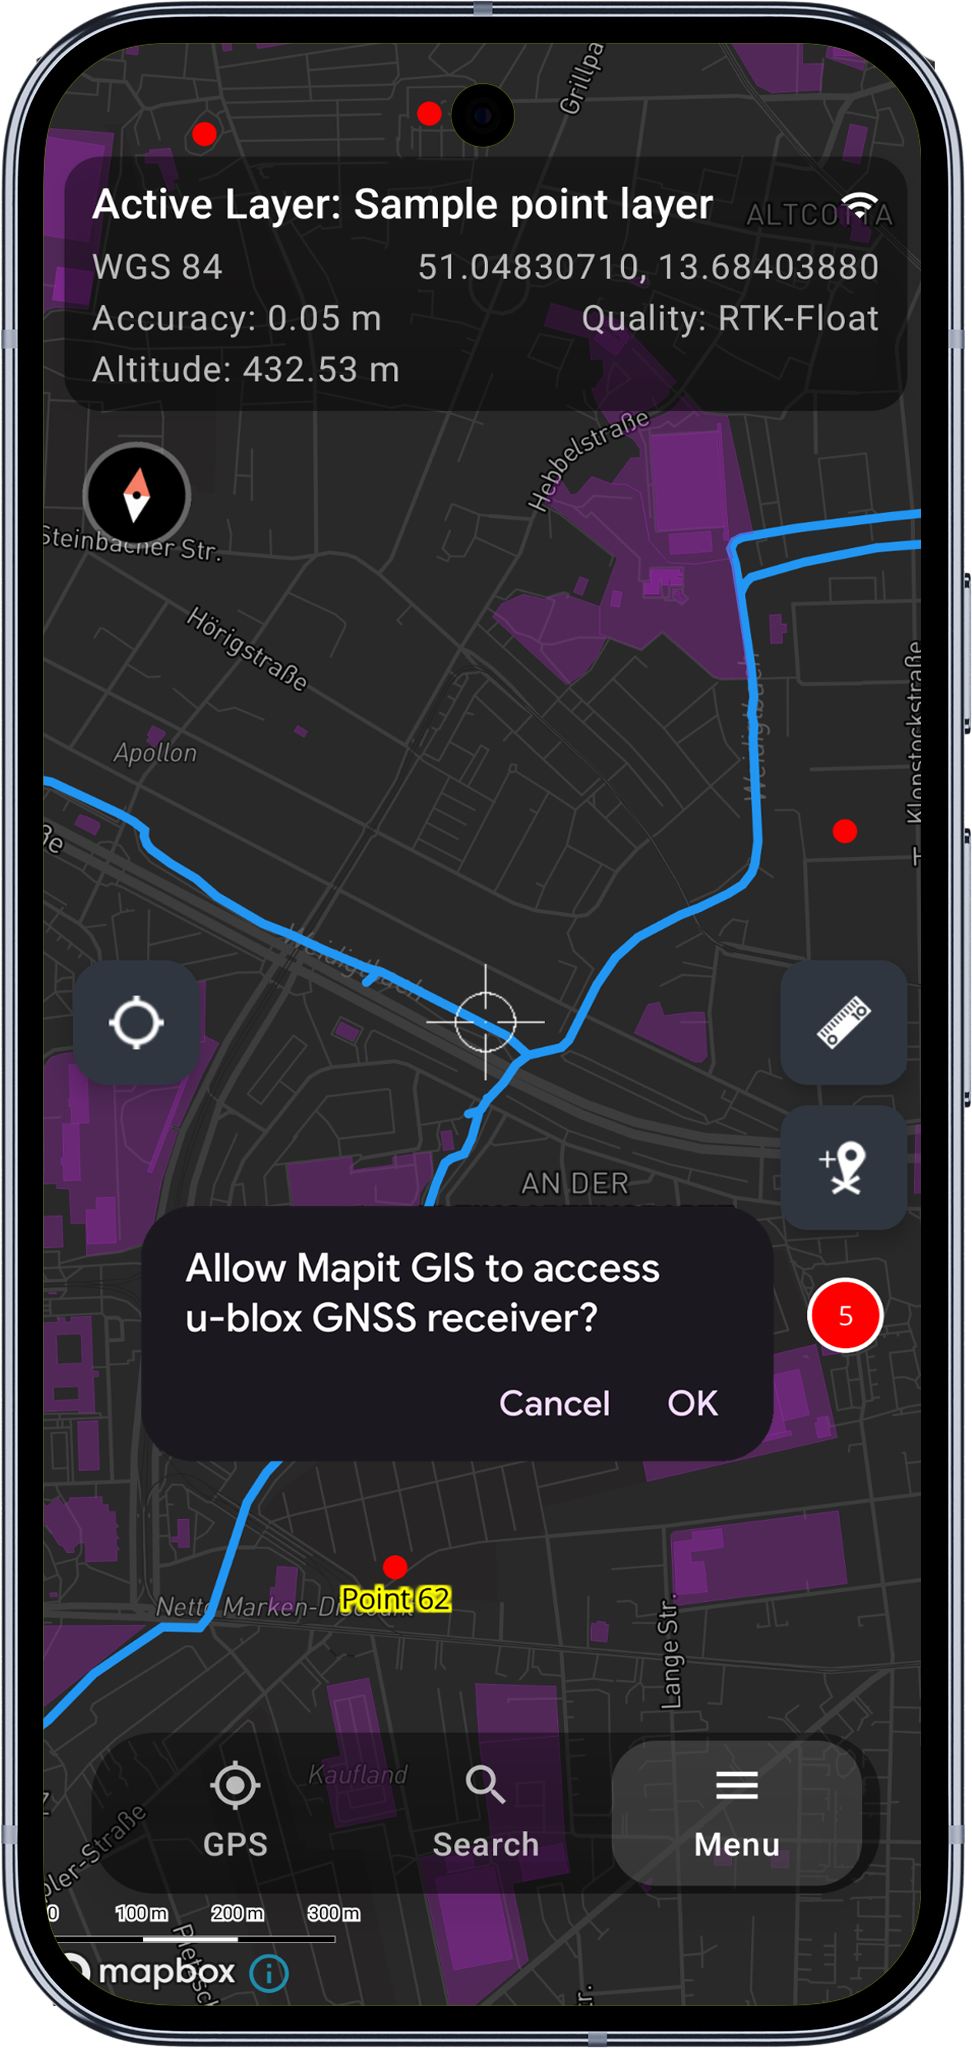
2. Enable USB Serial GPS
- In Mapit GIS, go to Settings > External GNSS.
- Toggle USB Serial GPS on.
- Select the baud rate that matches your receiver (default: 115200).
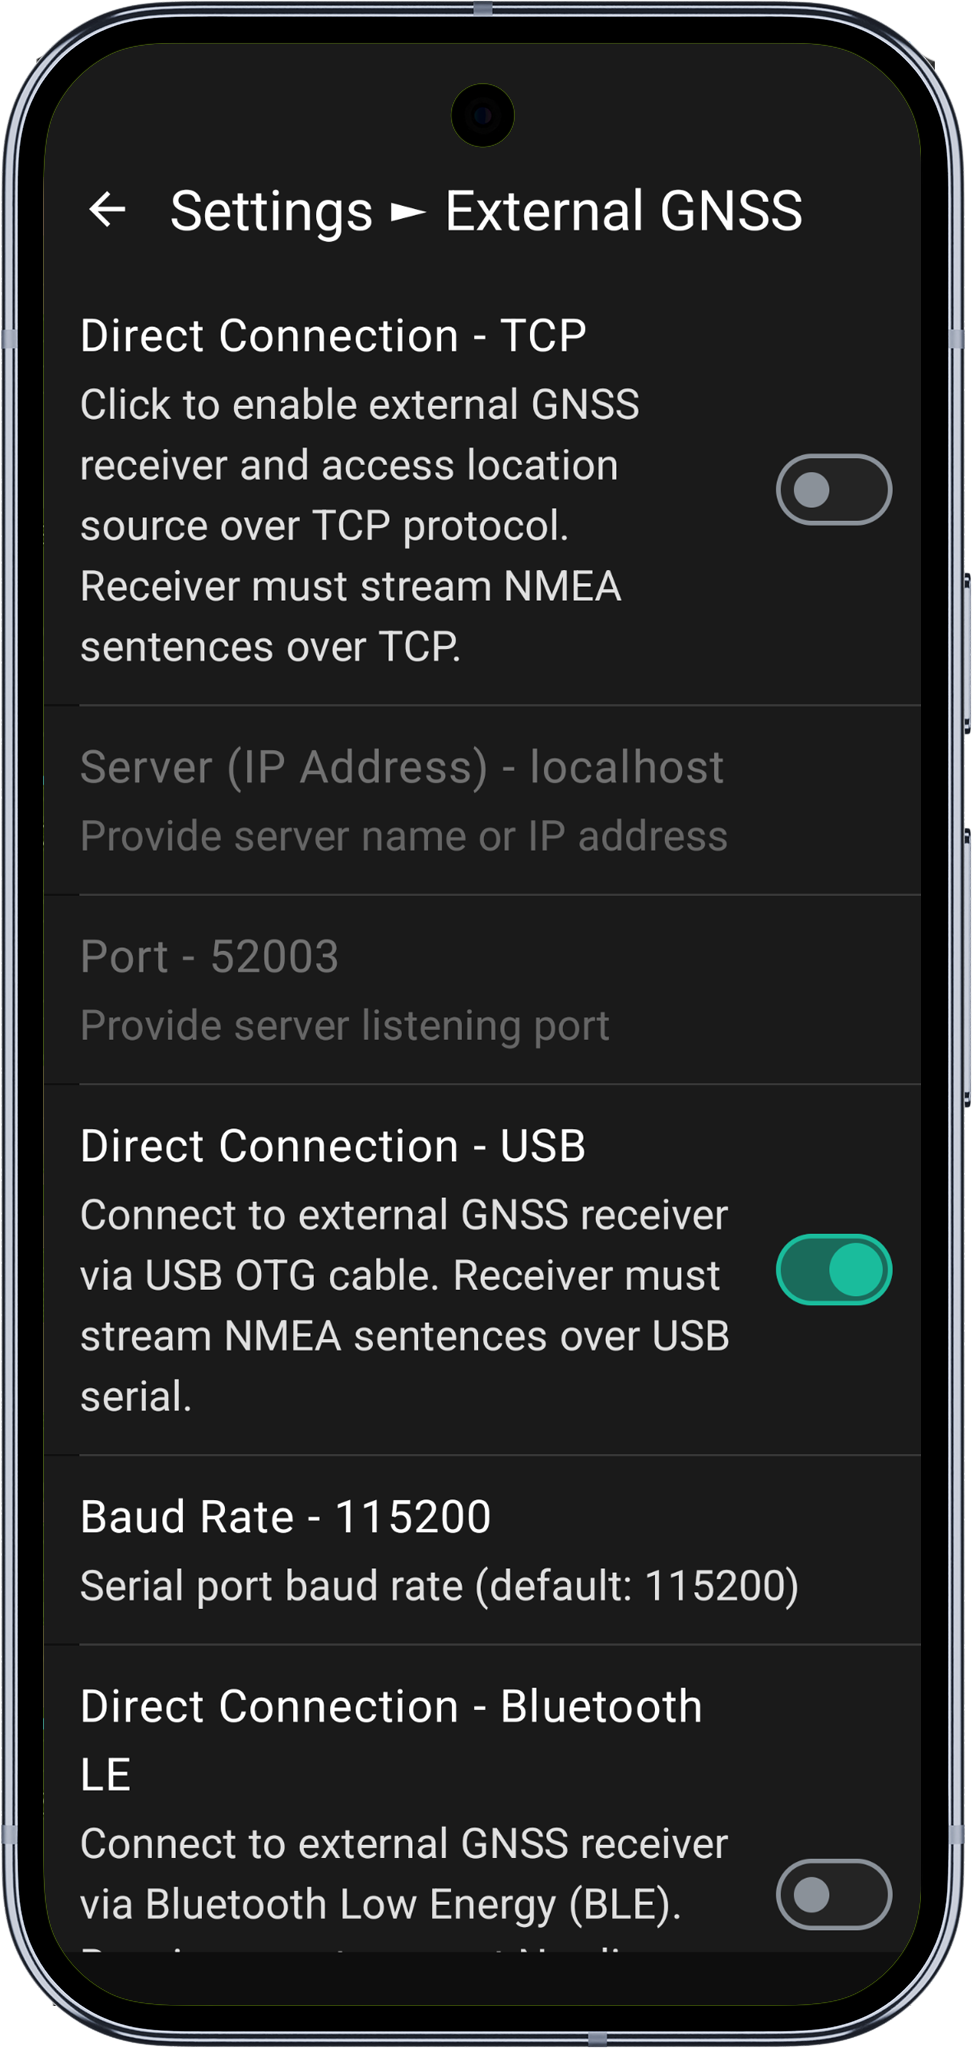
3. Verify USB connection
Return to the map and tap the GPS button. The info bar should show the USB connection indicator and coordinates should begin updating in the GPS info panel.
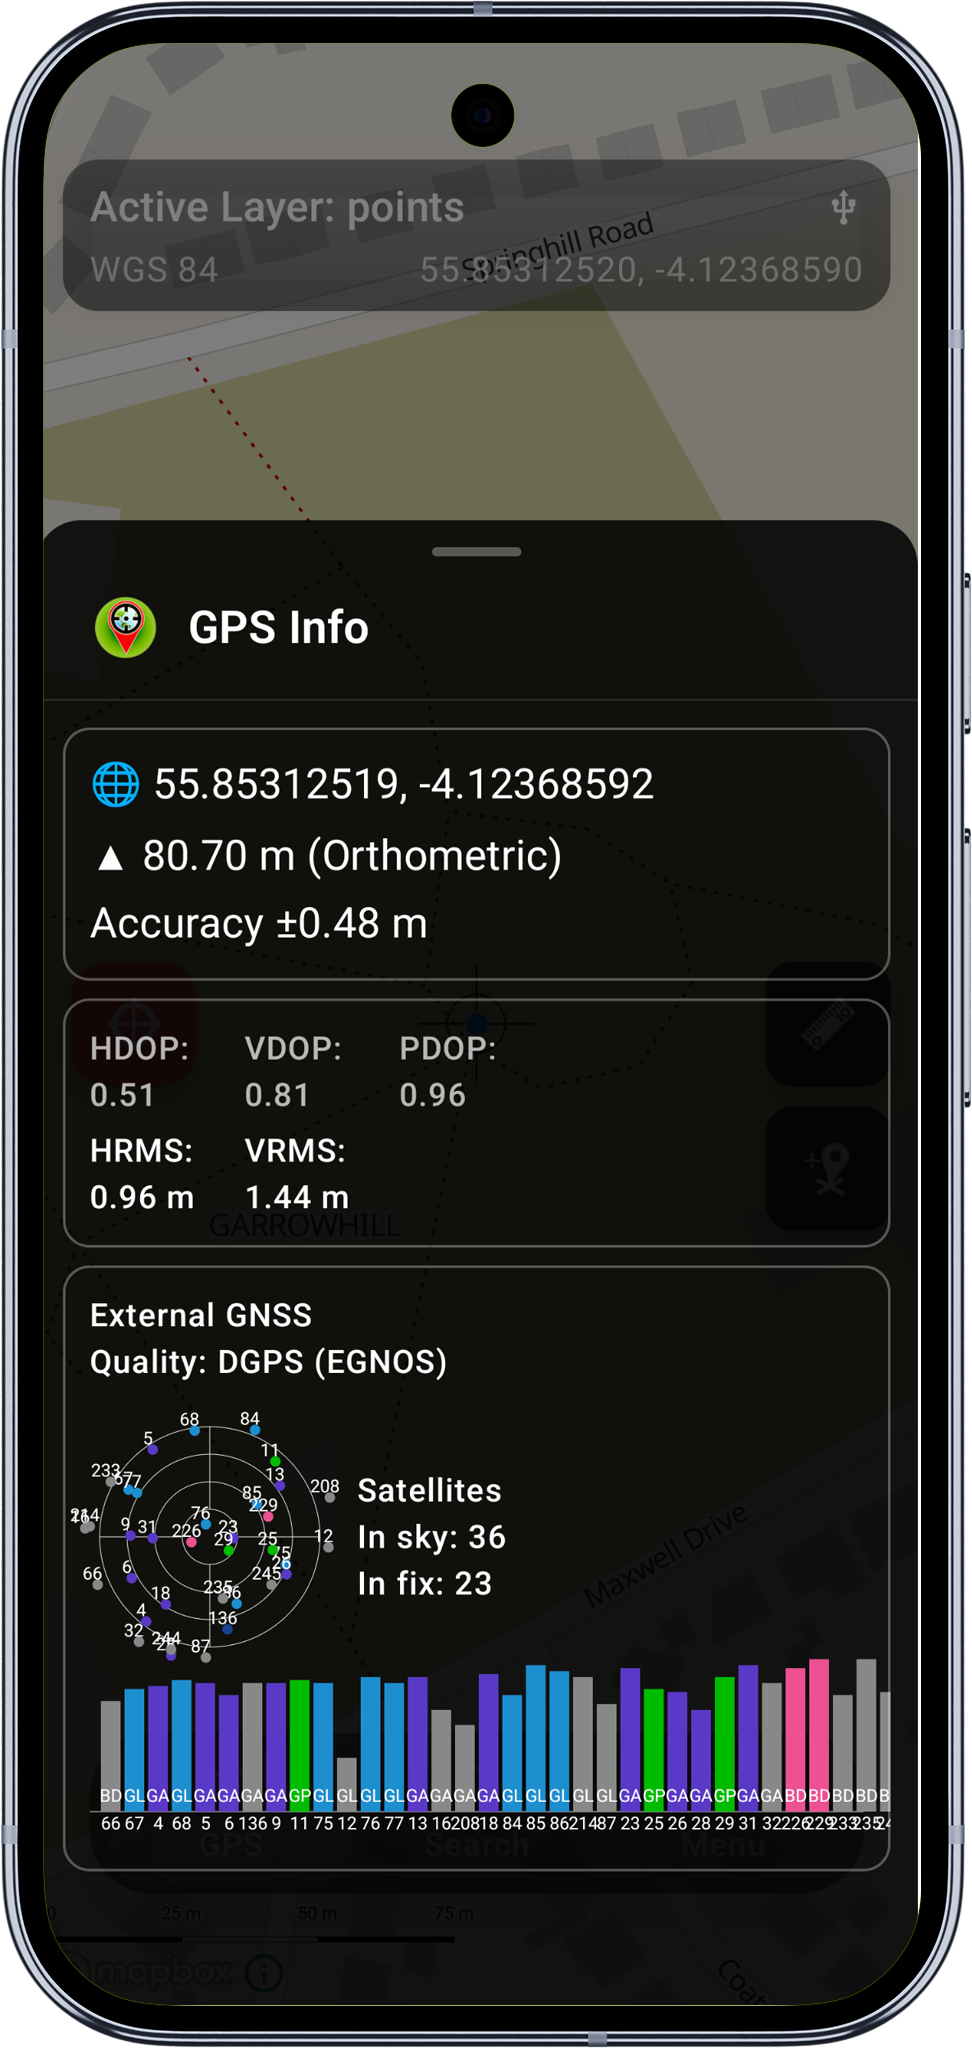
After short period of time you should achive sub-metres accuracy.
4. Configure NTRIP and start surveying
Follow the NTRIP and surveying steps below to enable RTK corrections over USB and begin collecting data.
Option B: BLE Connection
BLE provides a wireless connection without the need for classic Bluetooth pairing. This is convenient when a cable is impractical, though USB is recommended for longer sessions.
1. Power on the receiver
Turn on the ArduSimple receiver and wait for the LED indicators to confirm it is powered and searching for satellites. On the RTK Smart Antenna, hold the button for 3 seconds.
2. Enable BLE GPS
- In Mapit GIS, go to Settings > External GNSS.
- Toggle BLE GPS on. The app will request Bluetooth permissions if not already granted - tap Allow.
3. Scan and select your receiver
A scan dialog appears automatically and searches for nearby BLE devices advertising the Nordic UART Service (NUS). The ArduSimple receiver should appear within a few seconds. The RTK Smart Antenna is listed as SmartAnt.
Tap your receiver's name to select it.
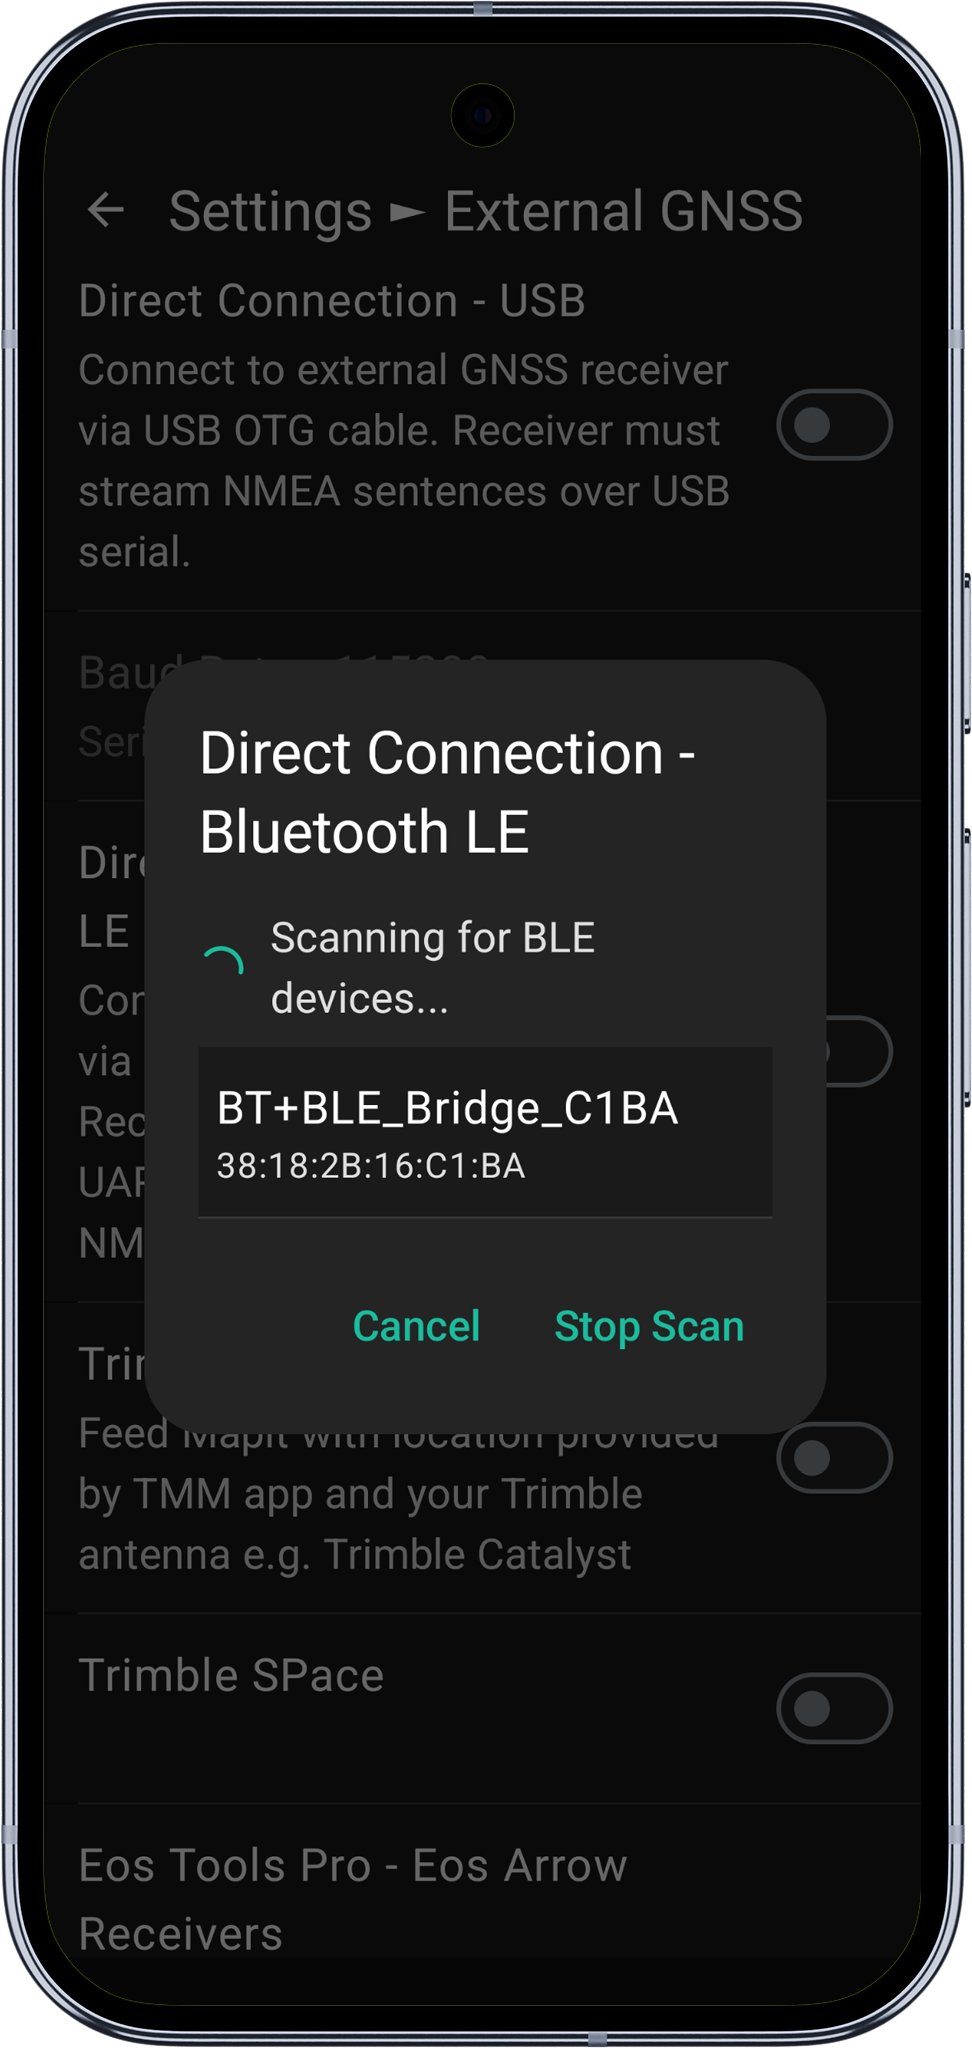
4. Verify BLE connection
Return to the map and tap the GPS button. The info bar should show the BLE connection indicator and your receiver's name. Coordinates should begin updating in the GPS info panel.
5. Configure NTRIP and start surveying
Follow the NTRIP and surveying steps below to enable RTK corrections over BLE and begin collecting data.
NTRIP configuration
These steps apply to both USB and BLE connections. RTCM correction data is sent to the receiver over whichever connection is active.
Configure NTRIP for RTK corrections
To achieve centimetre-level accuracy, you need to connect to an NTRIP caster that provides RTK corrections for your area.
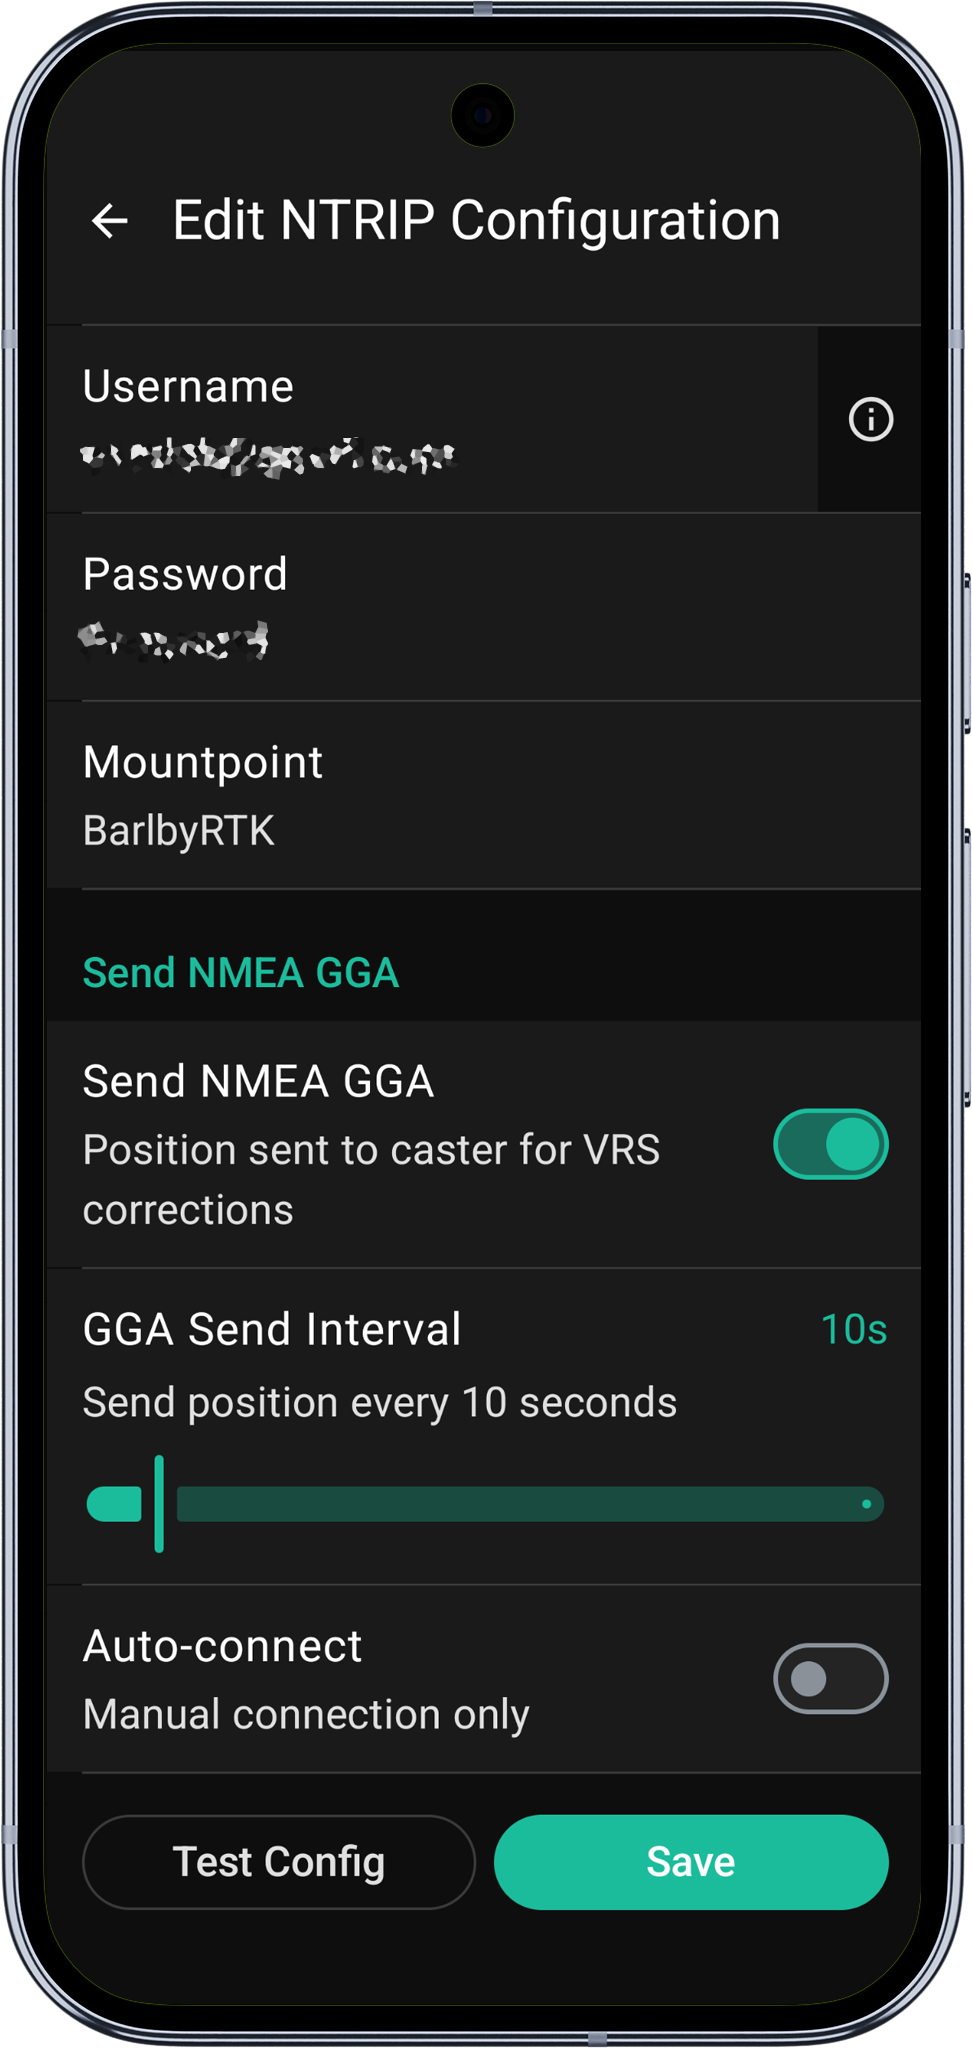
- Go to Settings > NTRIP Settings (Requires Pro+ subscription).
- Tap Add to create a new NTRIP profile.
- Enter your caster details:
- Host - your NTRIP caster address
- Port - typically
2101 - Username and Password - your caster credentials
- Tap Get Mountpoints to fetch available streams.
- Select the mountpoint closest to your location.
- Scroll to the bottom of the page and save the profile.
Start NTRIP and verify RTK fix
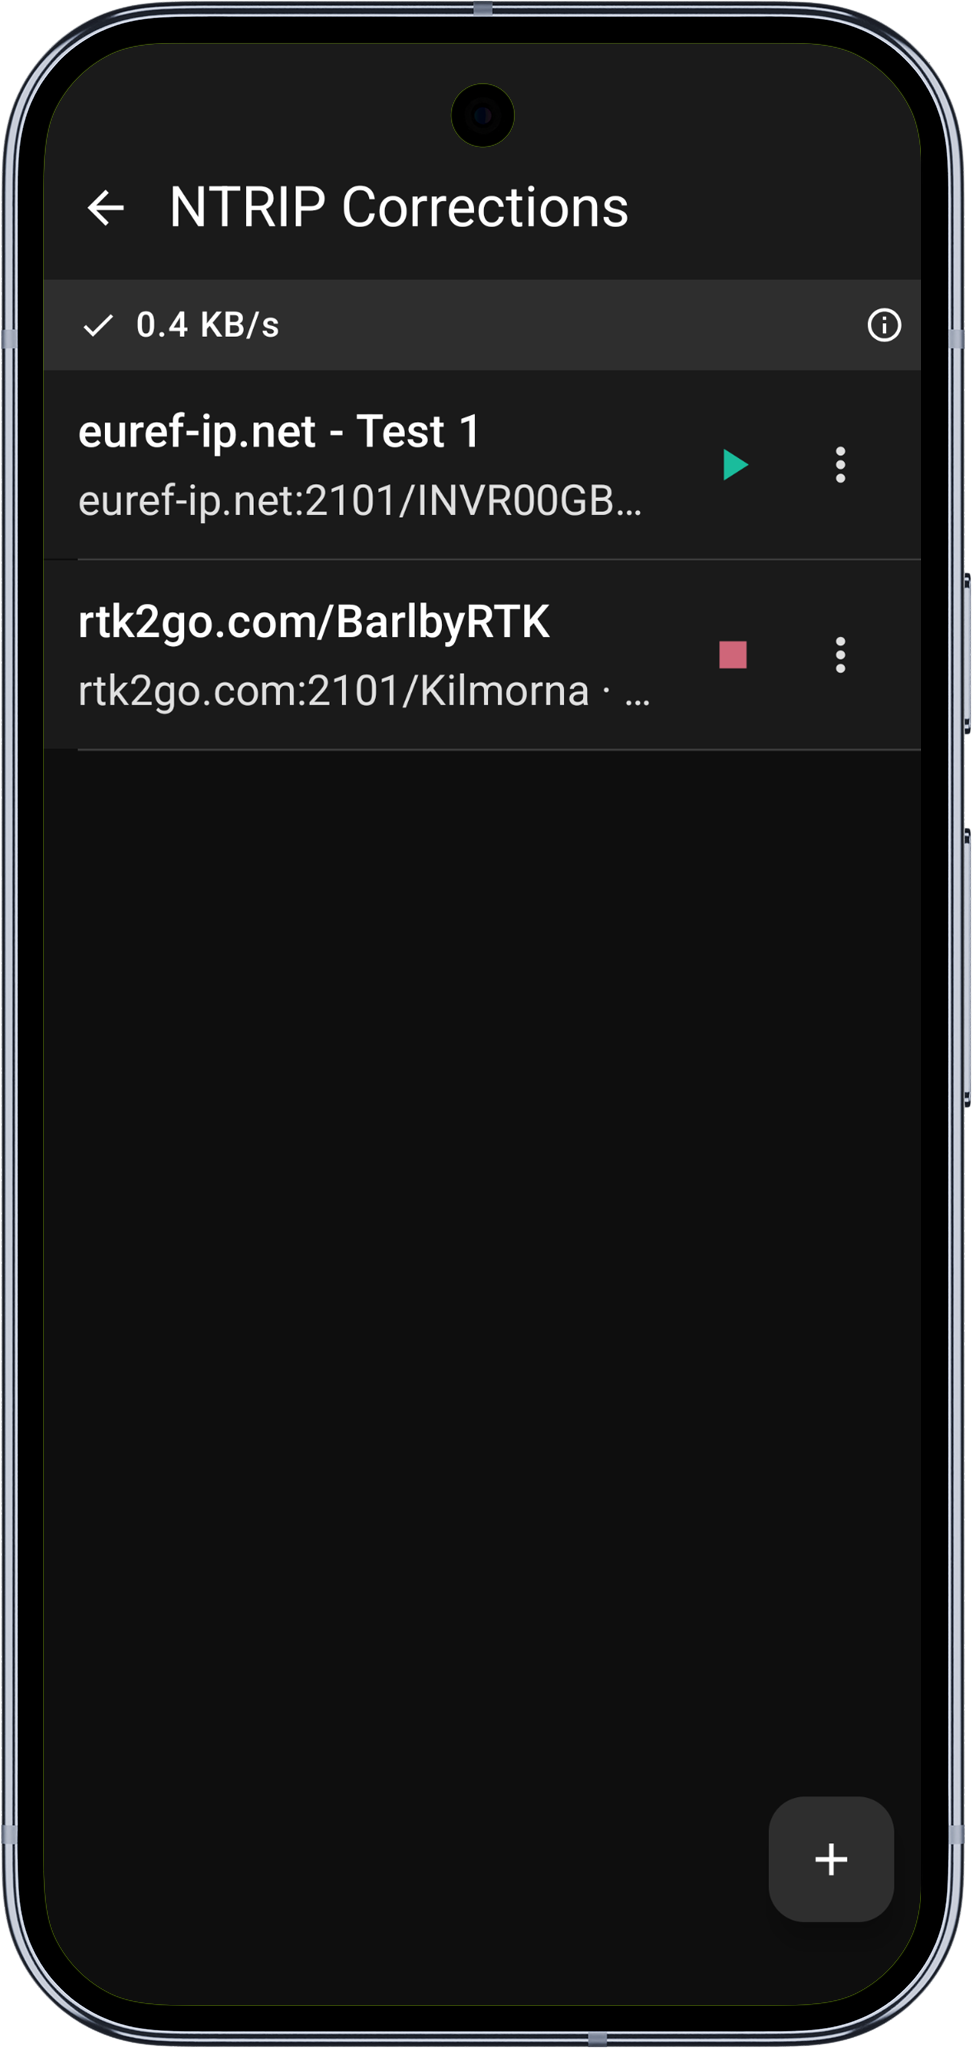
- Go to Settings > NTRIP Settings and start the correction service.
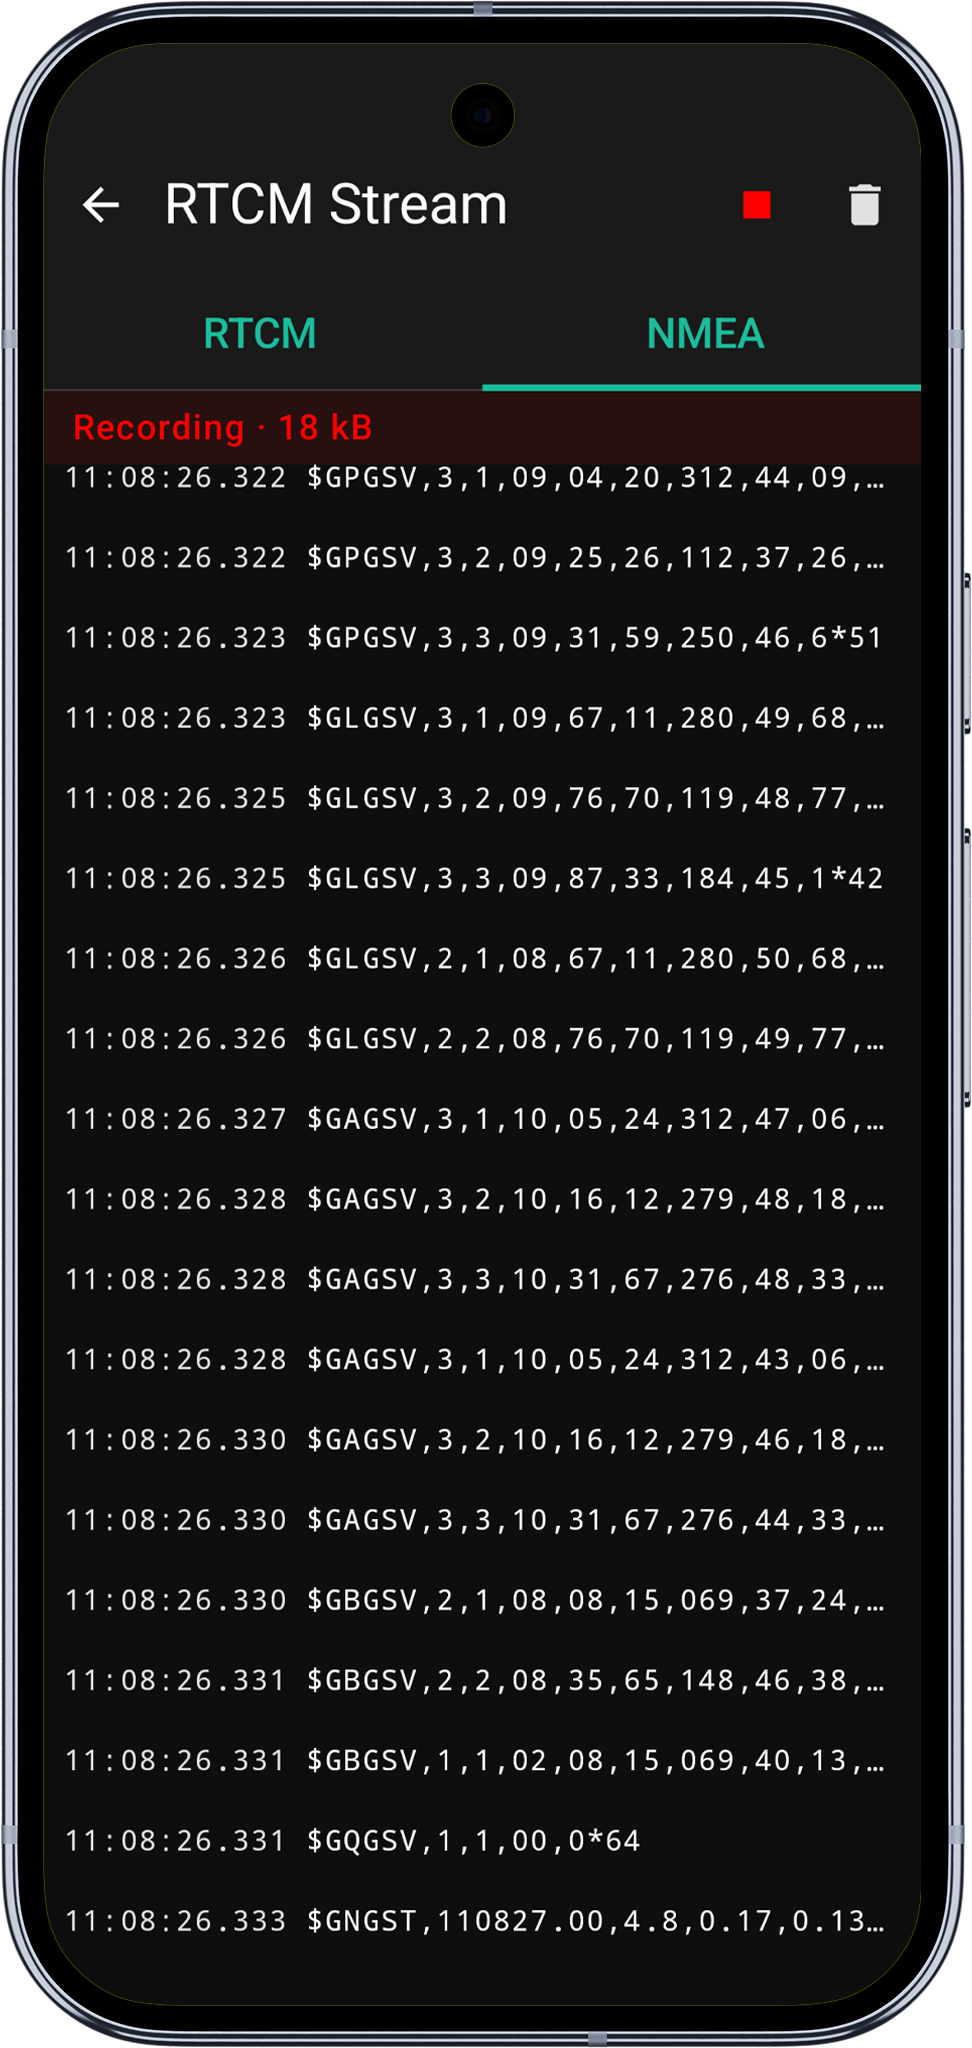
- Press the info button at the top of the screen to access RTCM and NMEA stream information, if needed you can start recording the streams. The data is saved into Mapit -> Logs folder.
RTCM correction data is automatically sent to the ArduSimple receiver over the active connection (USB or BLE). Within a few seconds to a few minutes (depending on conditions), the fix type in the GPS info panel should change from 3D Fix to RTK Float and then to RTK Fix.
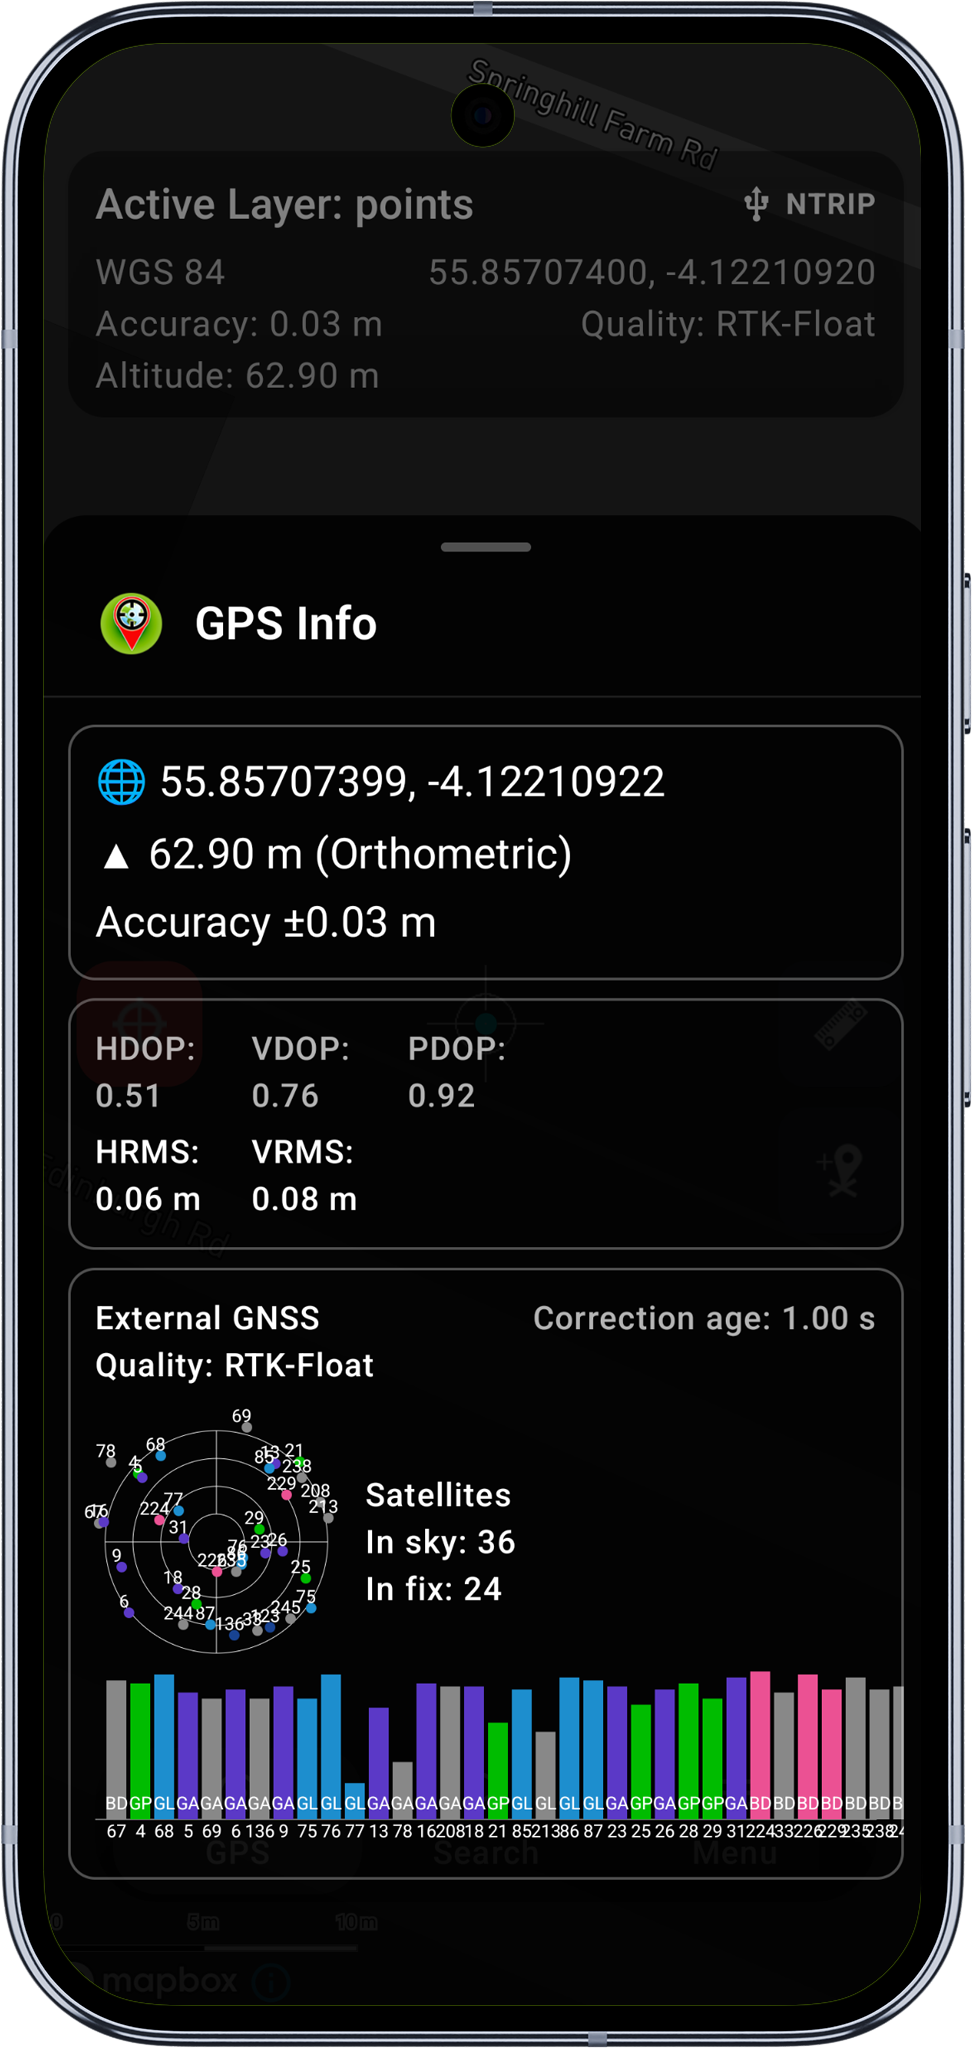
At this stage your accuracy shall be in a range of centimetres.
Start surveying
With an RTK Fix, you are now receiving centimetre-level positions. You can:
- Add points, lines, and polygons to your GeoPackage layers
- Use position averaging for even higher accuracy on individual points
- Record tracks with high-accuracy positioning
- View detailed satellite and accuracy information in the GPS Info panel
Troubleshooting
USB: Device not detected
- Ensure the USB OTG cable is properly connected and your Android device supports USB OTG.
- Try a different USB cable - some charge-only cables do not support data.
- Check that no other app is claiming the USB device.
USB: No NMEA data
- Verify the baud rate in Settings > External GNSS matches your receiver's configuration (default: 115200).
- Try disconnecting and reconnecting the USB cable.
BLE: Receiver not appearing in scan
- Make sure the receiver is powered on and the BLE module is active.
- Check that Bluetooth is enabled on your Android device.
- Ensure Mapit GIS has Bluetooth permissions granted (check Android Settings > Apps > Mapit GIS > Permissions).
- Try moving closer to the receiver - BLE range is typically 10-30 metres.
BLE: Connection drops frequently
- Keep the receiver within range of your Android device.
- Avoid placing the Android device in a pocket or bag where the BLE signal may be obstructed.
- If the connection drops and does not auto-reconnect within a few seconds, toggle BLE GPS off and on again in settings.
- For long sessions, consider using USB instead for a more stable connection.
NTRIP corrections not reaching the receiver
- Verify the NTRIP indicator is green (connected and receiving data).
- Check that your NTRIP credentials and mountpoint are correct.
- Ensure your Android device has an active internet connection (mobile data or Wi-Fi).
- RTCM data is sent over the active connection (USB or BLE) - if the receiver is connected, corrections should flow automatically.
Stuck on RTK Float
- RTK Float is normal during convergence - wait 1-2 minutes for conditions to improve.
- Ensure you have a clear view of the sky with no obstructions.
- Verify that the mountpoint you selected provides corrections for your GNSS constellation (GPS, GLONASS, Galileo, BeiDou).
- Check that the baseline distance to the nearest base station is within the recommended range (typically under 35 km).
Coming soon - available in version iOS App Version 1.1
Requirements: iOS 17.6 or later, iPhone or iPad with Bluetooth Low Energy support
BLE Connection
The ArduSimple RTK Handheld 2 Mapping Kit and RTK Smart Antenna connect to iOS via Bluetooth Low Energy (BLE) using the Nordic UART Service (NUS). USB connections are not supported on iOS.
1. Power on the receiver
Turn on the ArduSimple receiver and wait for the LED indicators to confirm it is powered and searching for satellites. On the RTK Smart Antenna, hold the button for 3 seconds.
2. Open GPS settings
In Mapit GIS, go to Settings > GPS Settings.
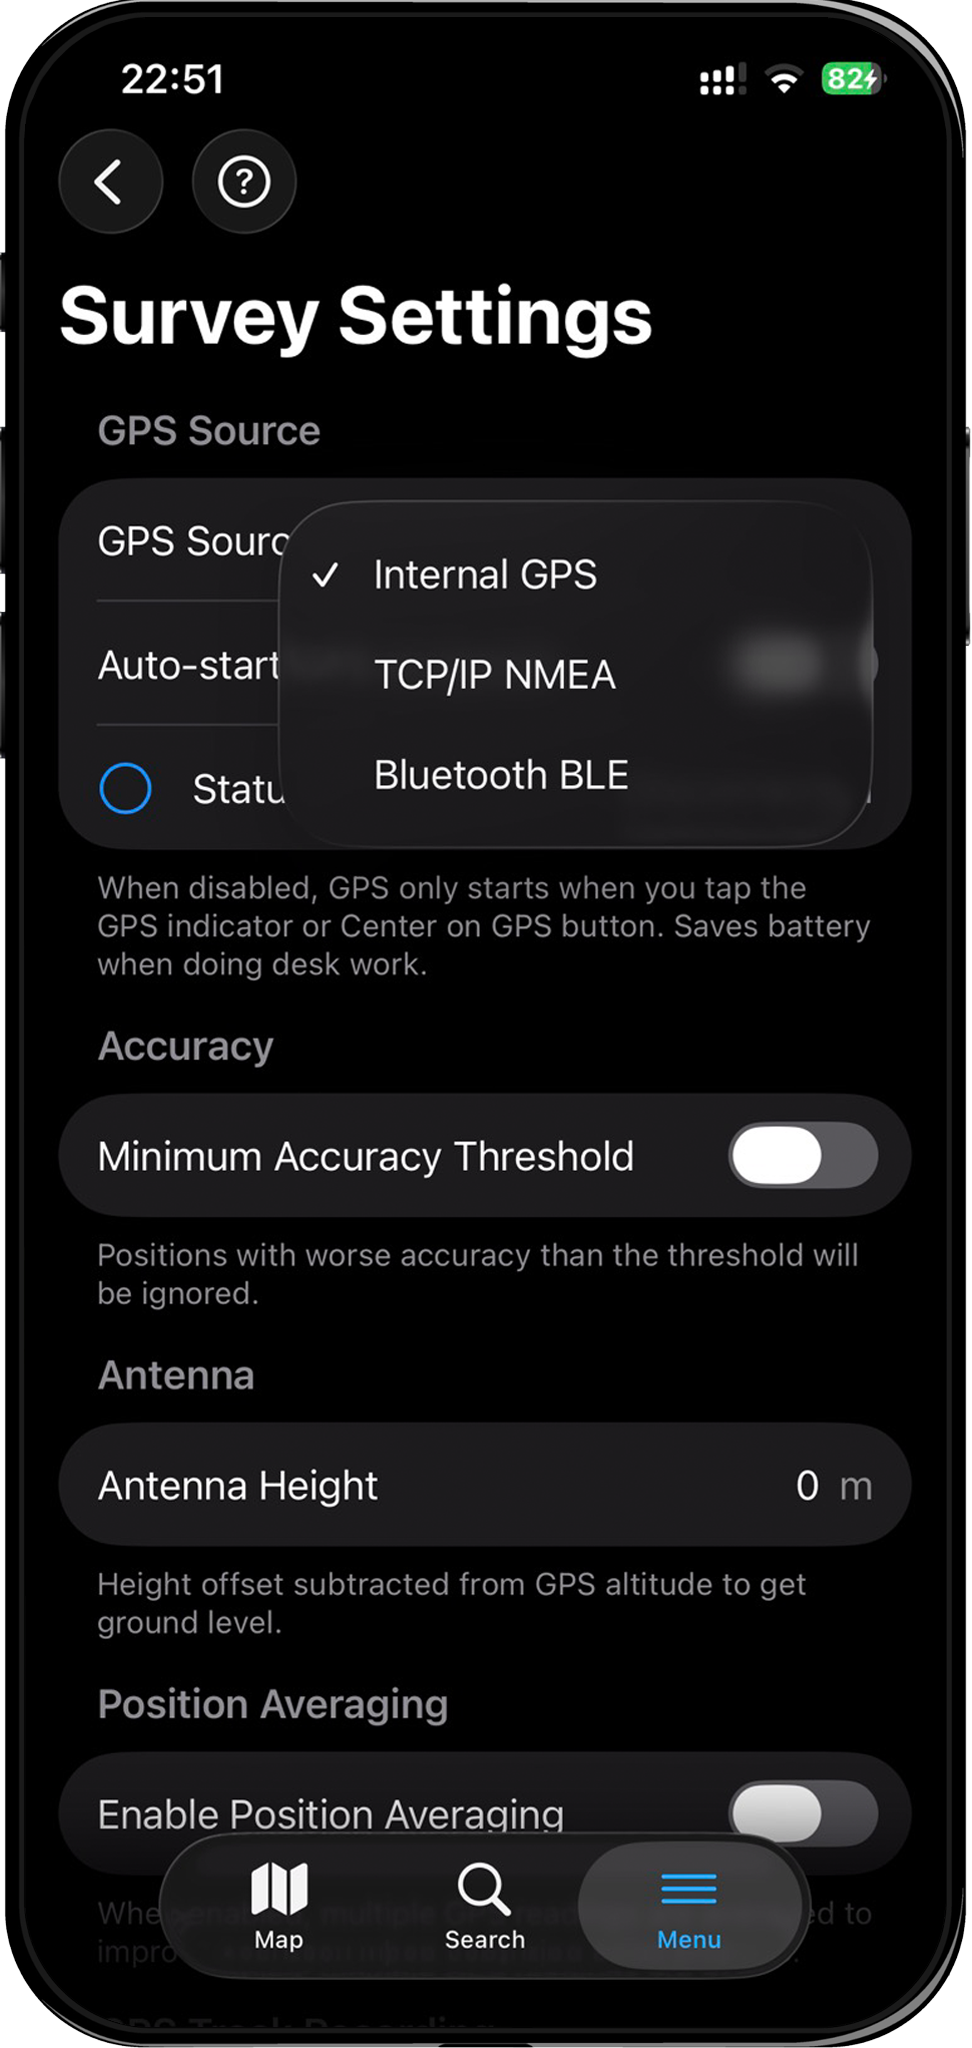
3. Select Bluetooth LE as GPS source
In the GPS Source picker, select Bluetooth LE. This reveals the BLE configuration section below.
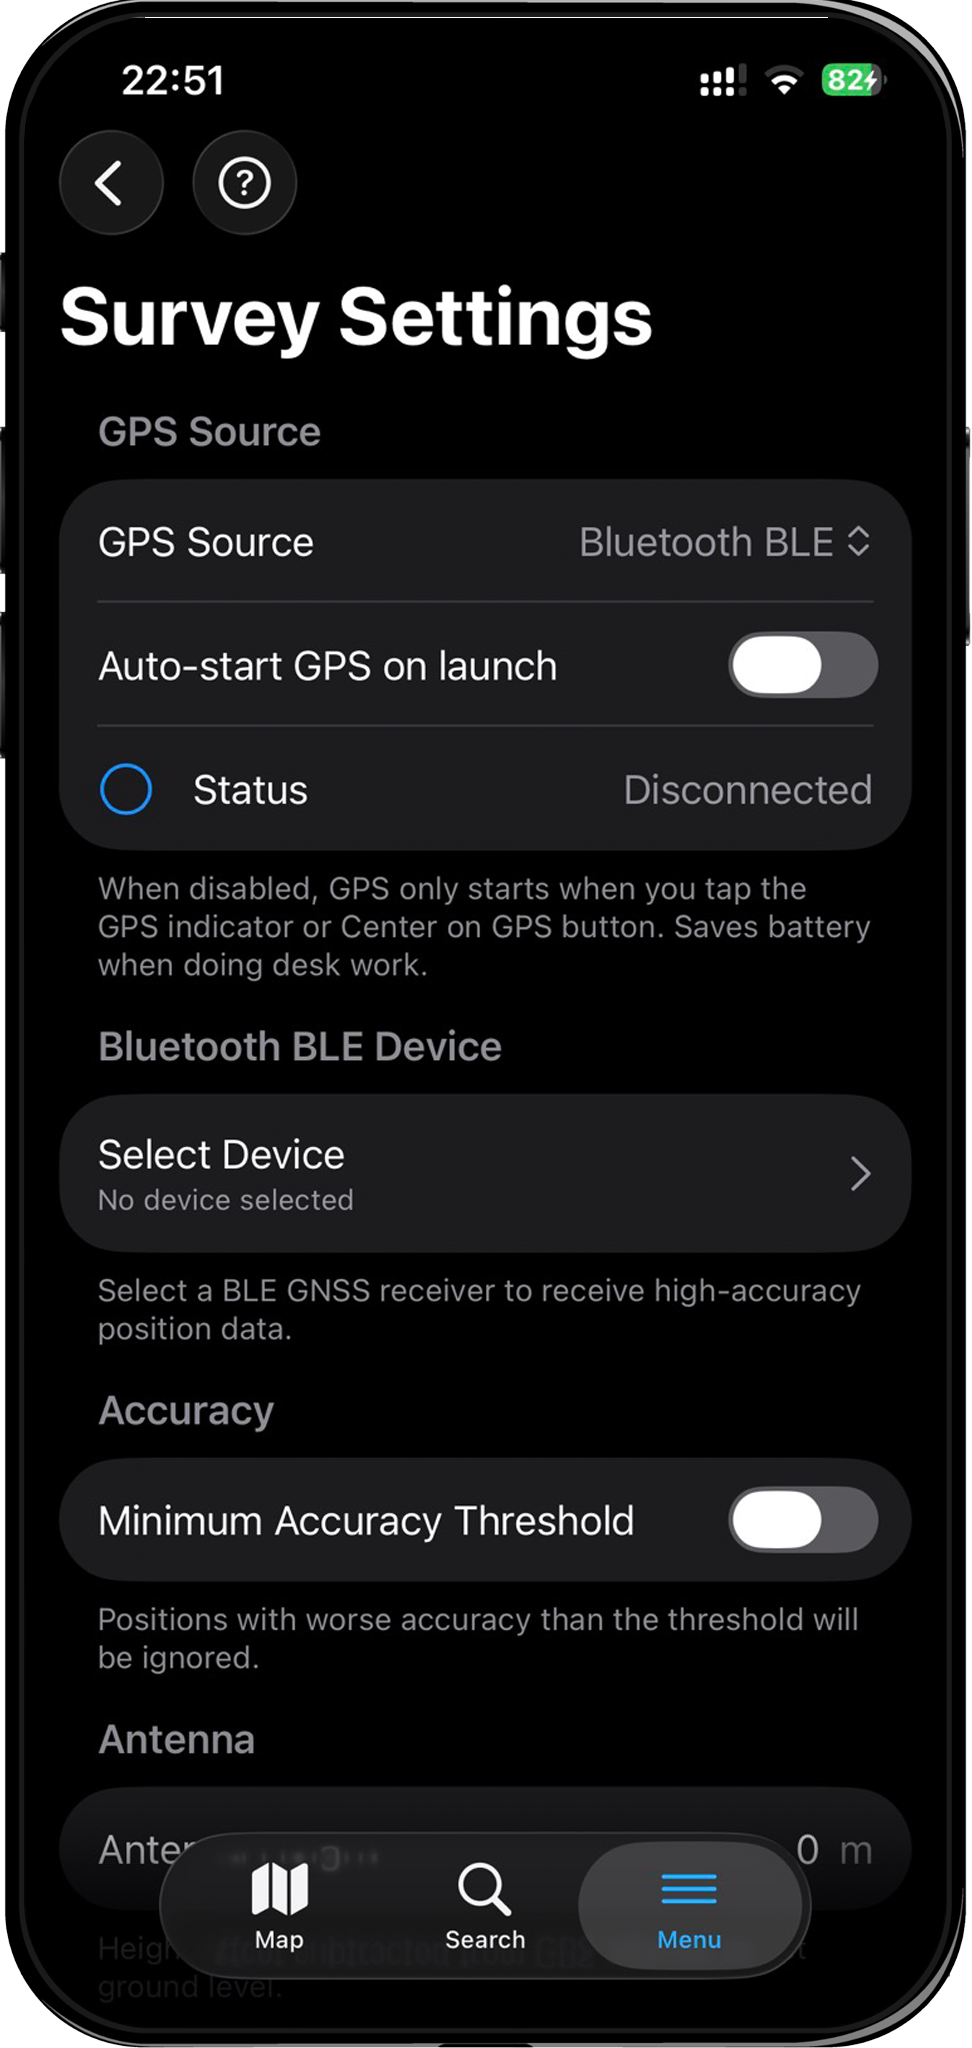
Bluetooth LE GPS requires a Mapit Pro or Mapit Pro Plus subscription. If you don't have one, a paywall will appear when selecting this option.
4. Select your receiver
- Tap Select Device to open the BLE device picker. You may need to accept the required iOS permission.
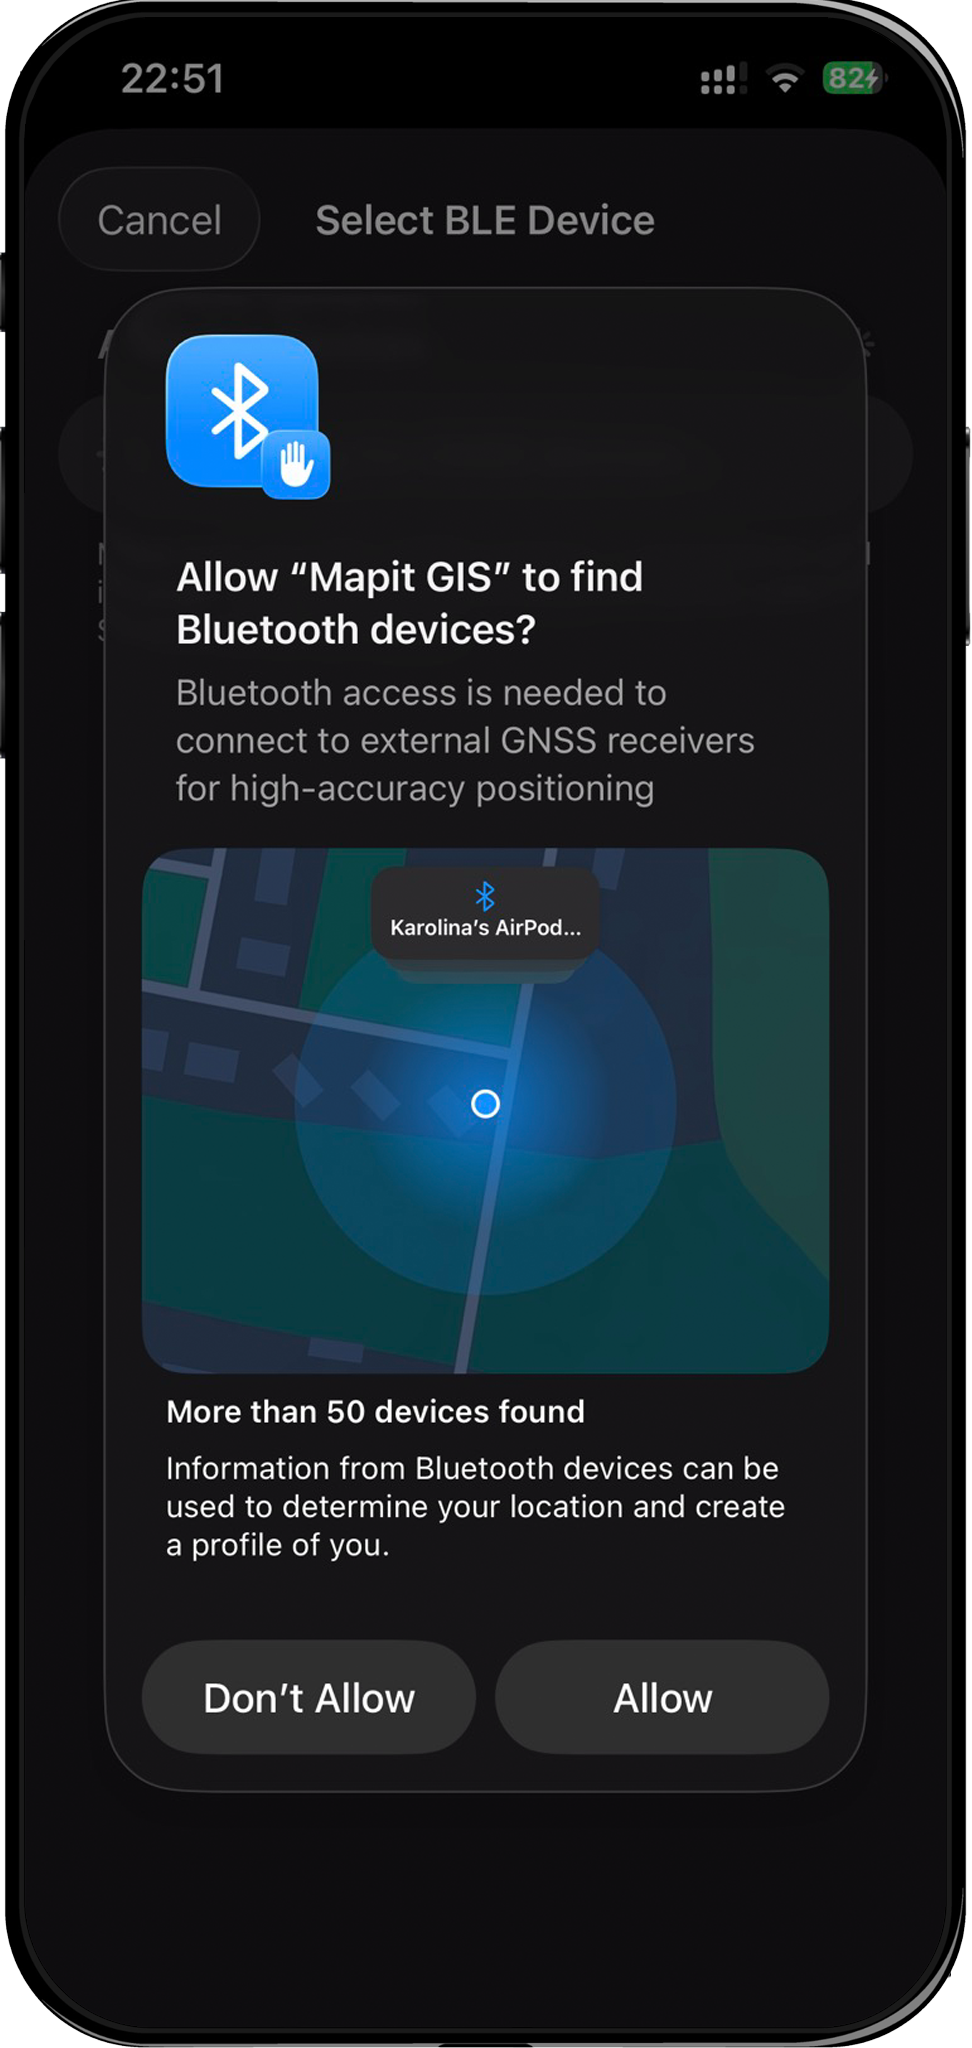
- The app starts scanning automatically — a spinner shows while searching.
- Your ArduSimple receiver should appear within a few seconds, listed by name with a signal strength indicator. The RTK Smart Antenna is listed as SmartAnt.
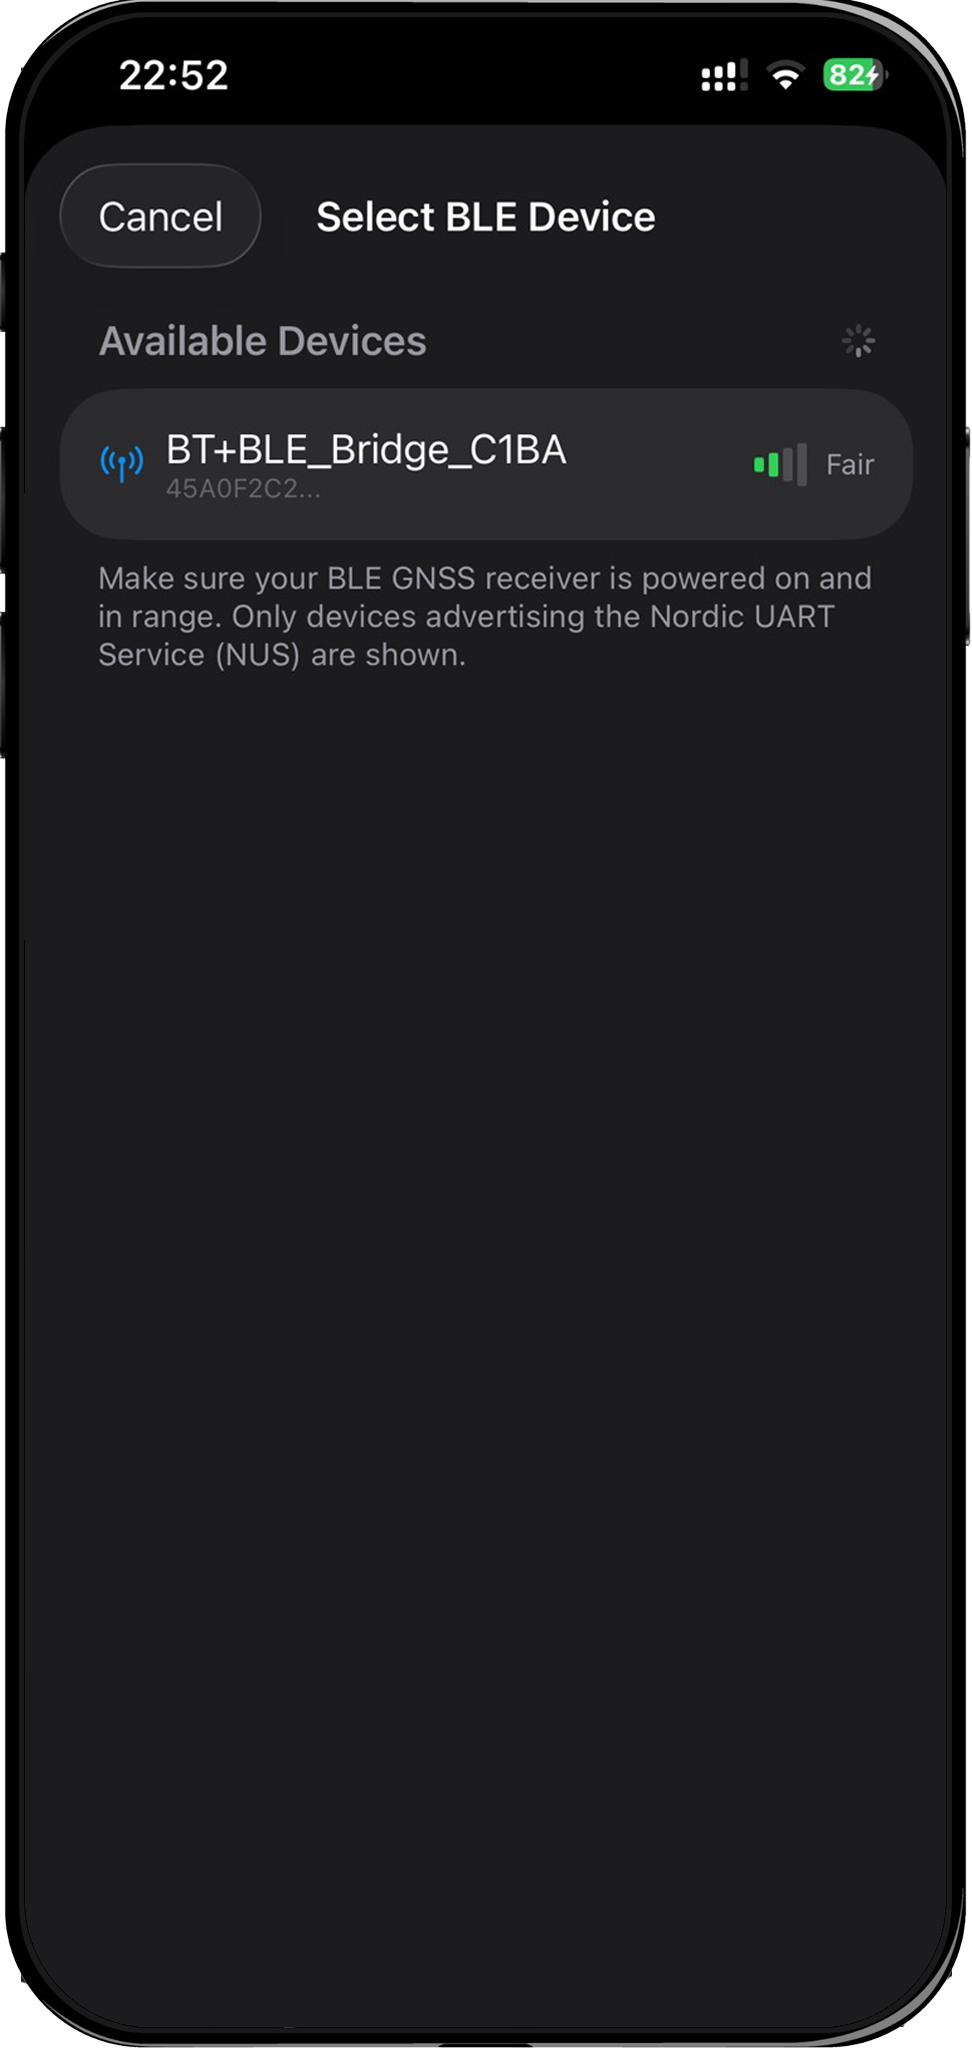
- Tap the receiver's name to select it.
If the receiver doesn't appear:
- Make sure Bluetooth is enabled on your iPhone/iPad.
- Ensure the receiver's BLE module is active (check LED indicators).
- Move closer to the receiver — BLE range is typically 10-30 metres.
- If you previously denied Bluetooth permission, go to iOS Settings > Privacy & Security > Bluetooth and enable it for Mapit GIS.
5. Connect to the receiver
After selecting the device, tap Connect. The status row shows the connection progress:
| Status | Meaning |
|---|---|
| Disconnected (grey) | Not connected |
| Connecting... (orange) | Establishing BLE link and discovering services |
| Connected (green) | Receiving NMEA data from the receiver |
6. Verify the connection on the map
Return to the map. The GPS status indicator (top of screen) changes to show:
- An antenna icon — indicating an external BLE receiver is active
- The fix quality badge — showing "3D" once the receiver has a satellite fix
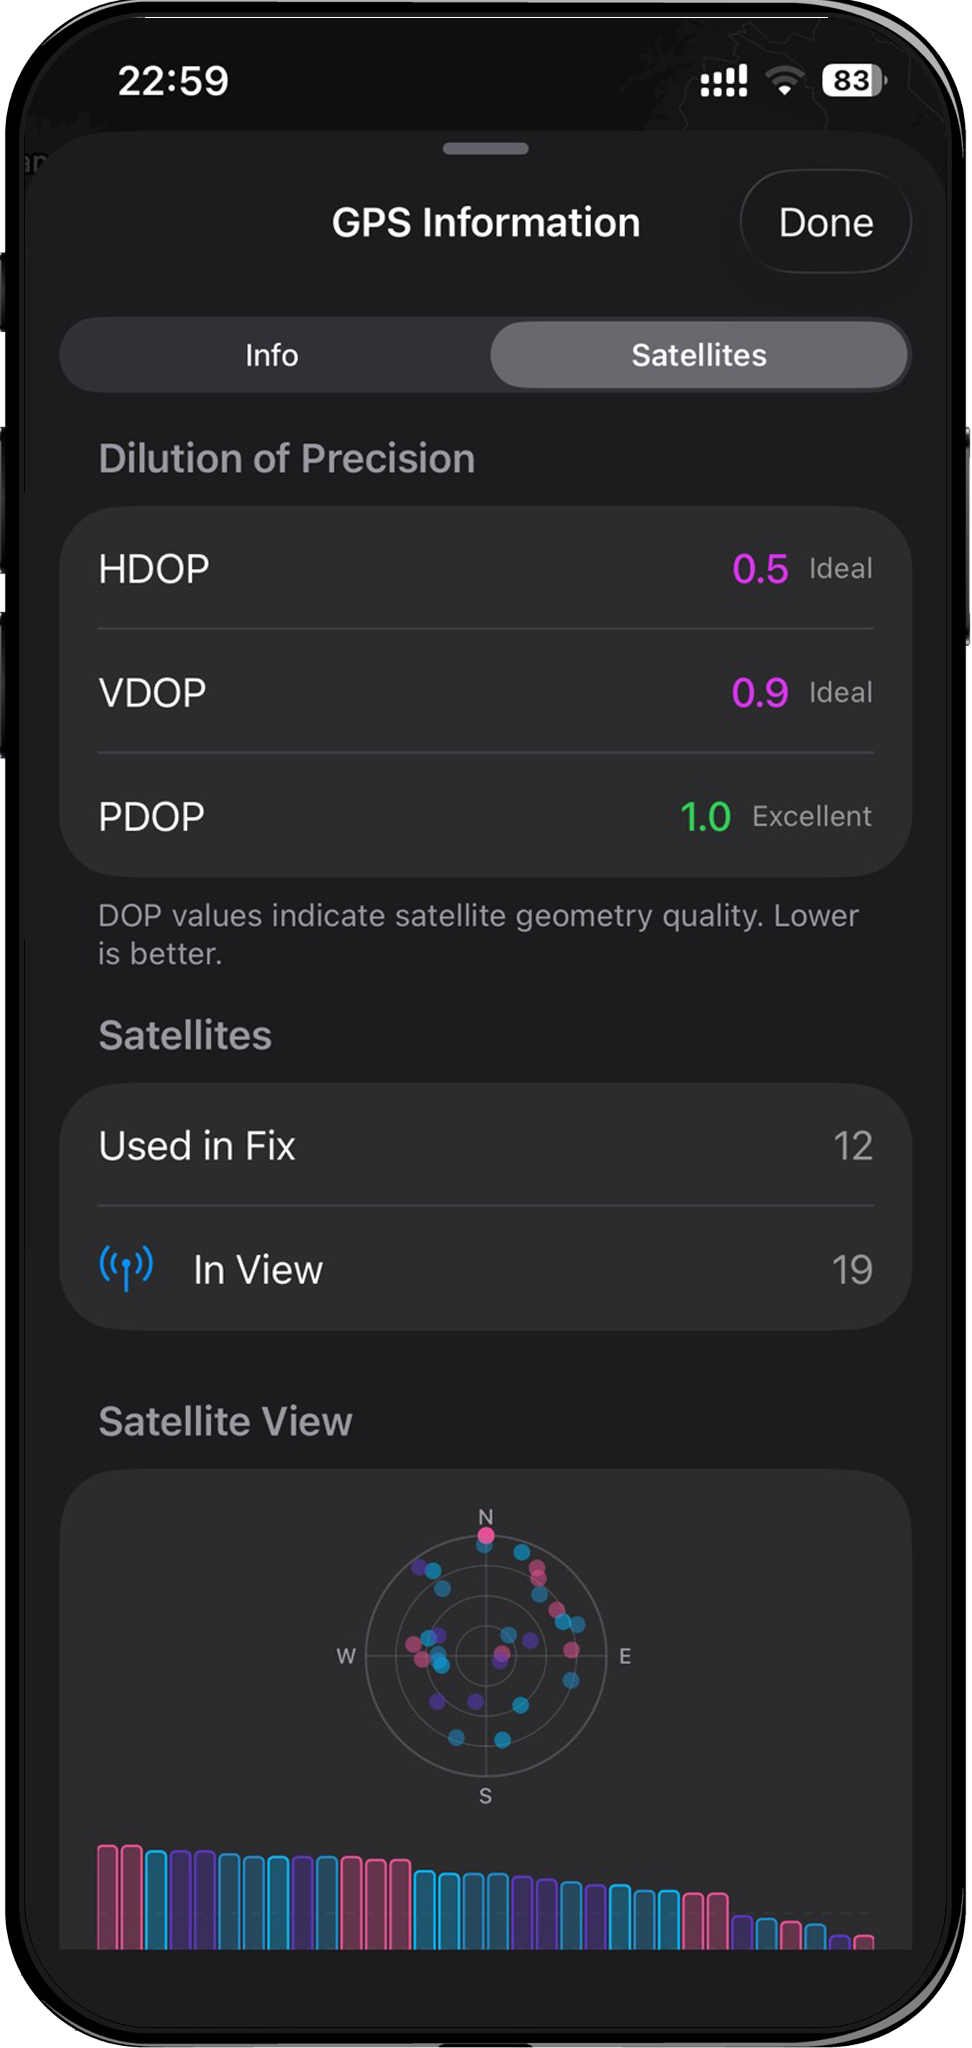
Tap the GPS status indicator to open the GPS info panel and verify coordinates are updating.
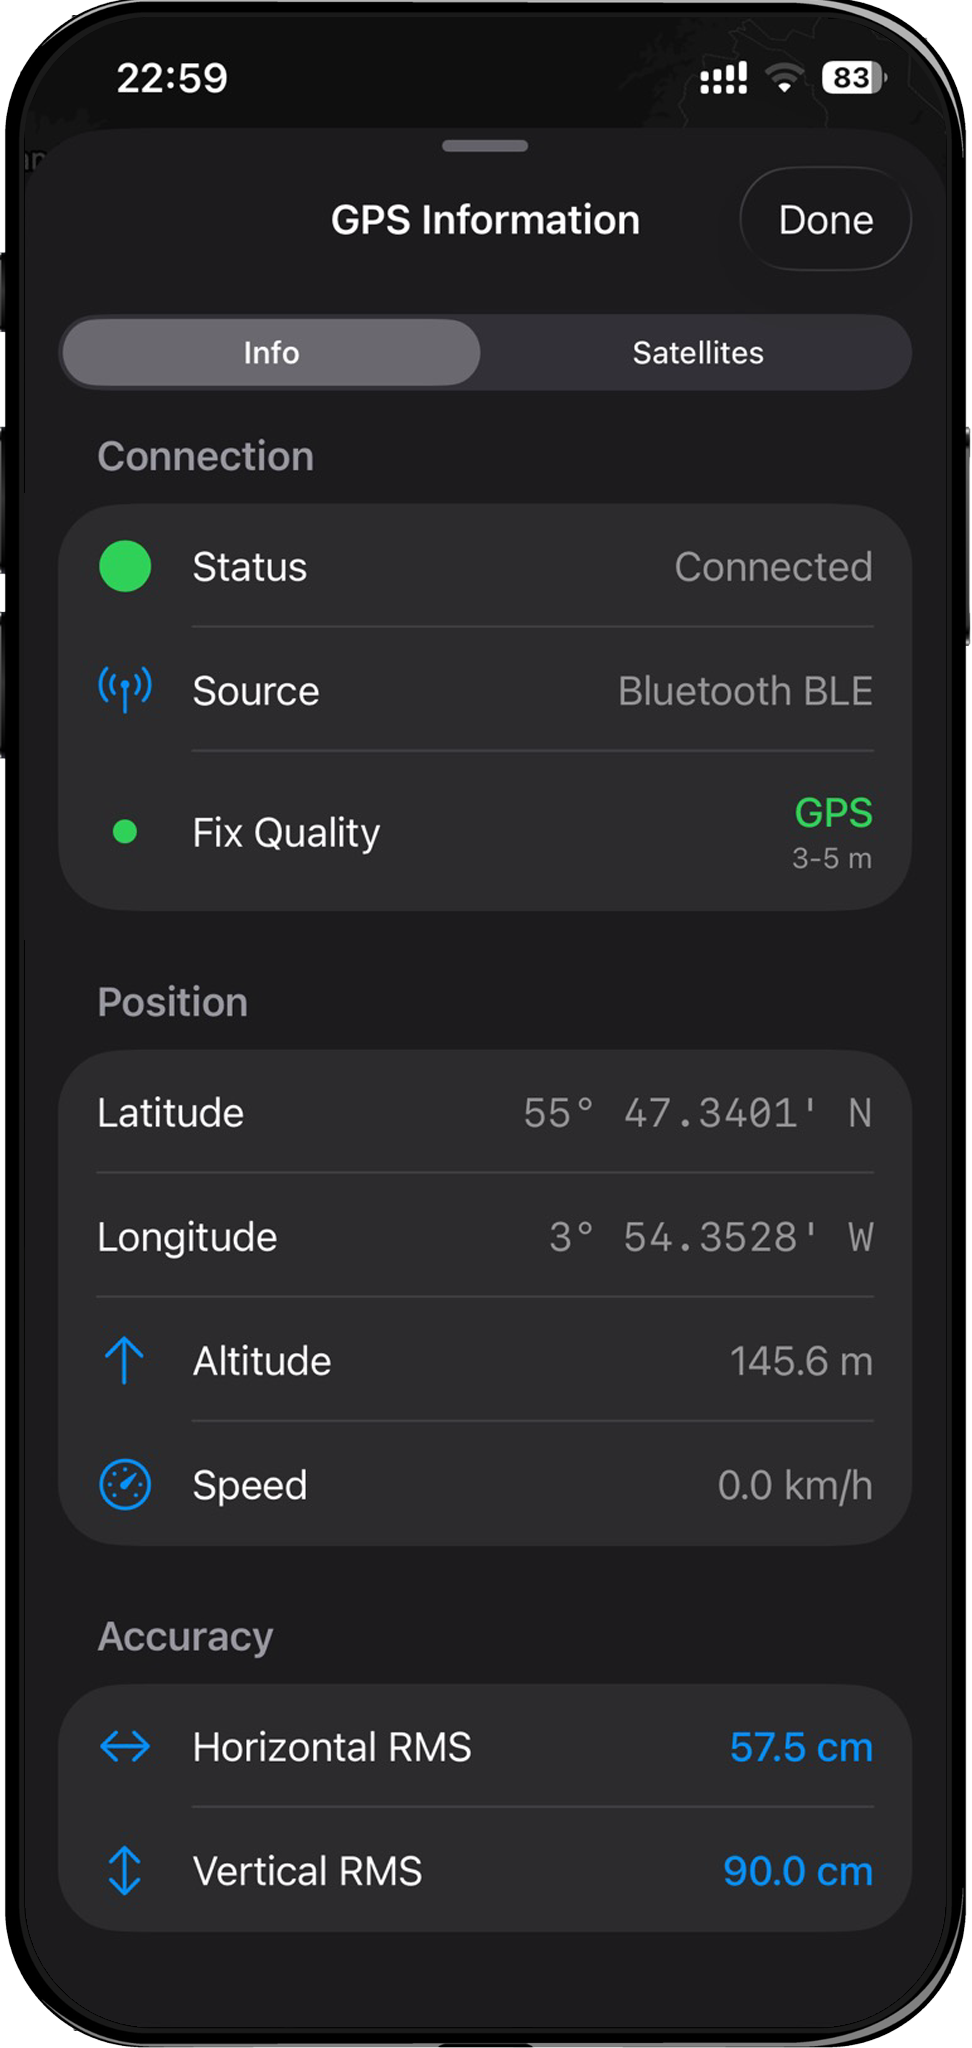
After a short period you should achieve sub-metre accuracy with the standalone receiver (no NTRIP corrections yet).
NTRIP Configuration
To achieve centimetre-level RTK accuracy, you need to connect to an NTRIP caster that provides corrections for your area. This requires a Pro Plus subscription.
1. Open NTRIP settings
Go to Settings > NTRIP Corrections. If you have a Pro Plus subscription, this opens the NTRIP configuration list. Otherwise, a paywall appears.
2. Create an NTRIP profile
- Tap the + button to add a new configuration.
- Enter your caster details:
| Field | Description | Example |
|---|---|---|
| Name | A label for this profile | RTK2go |
| Host | NTRIP caster address | rtk2go.com |
| Port | Caster port | 2101 |
| NTRIP Version | V1 or V2 | NTRIP v1 |
| Username | Your caster username | your@email.com |
| Password | Your caster password | none |
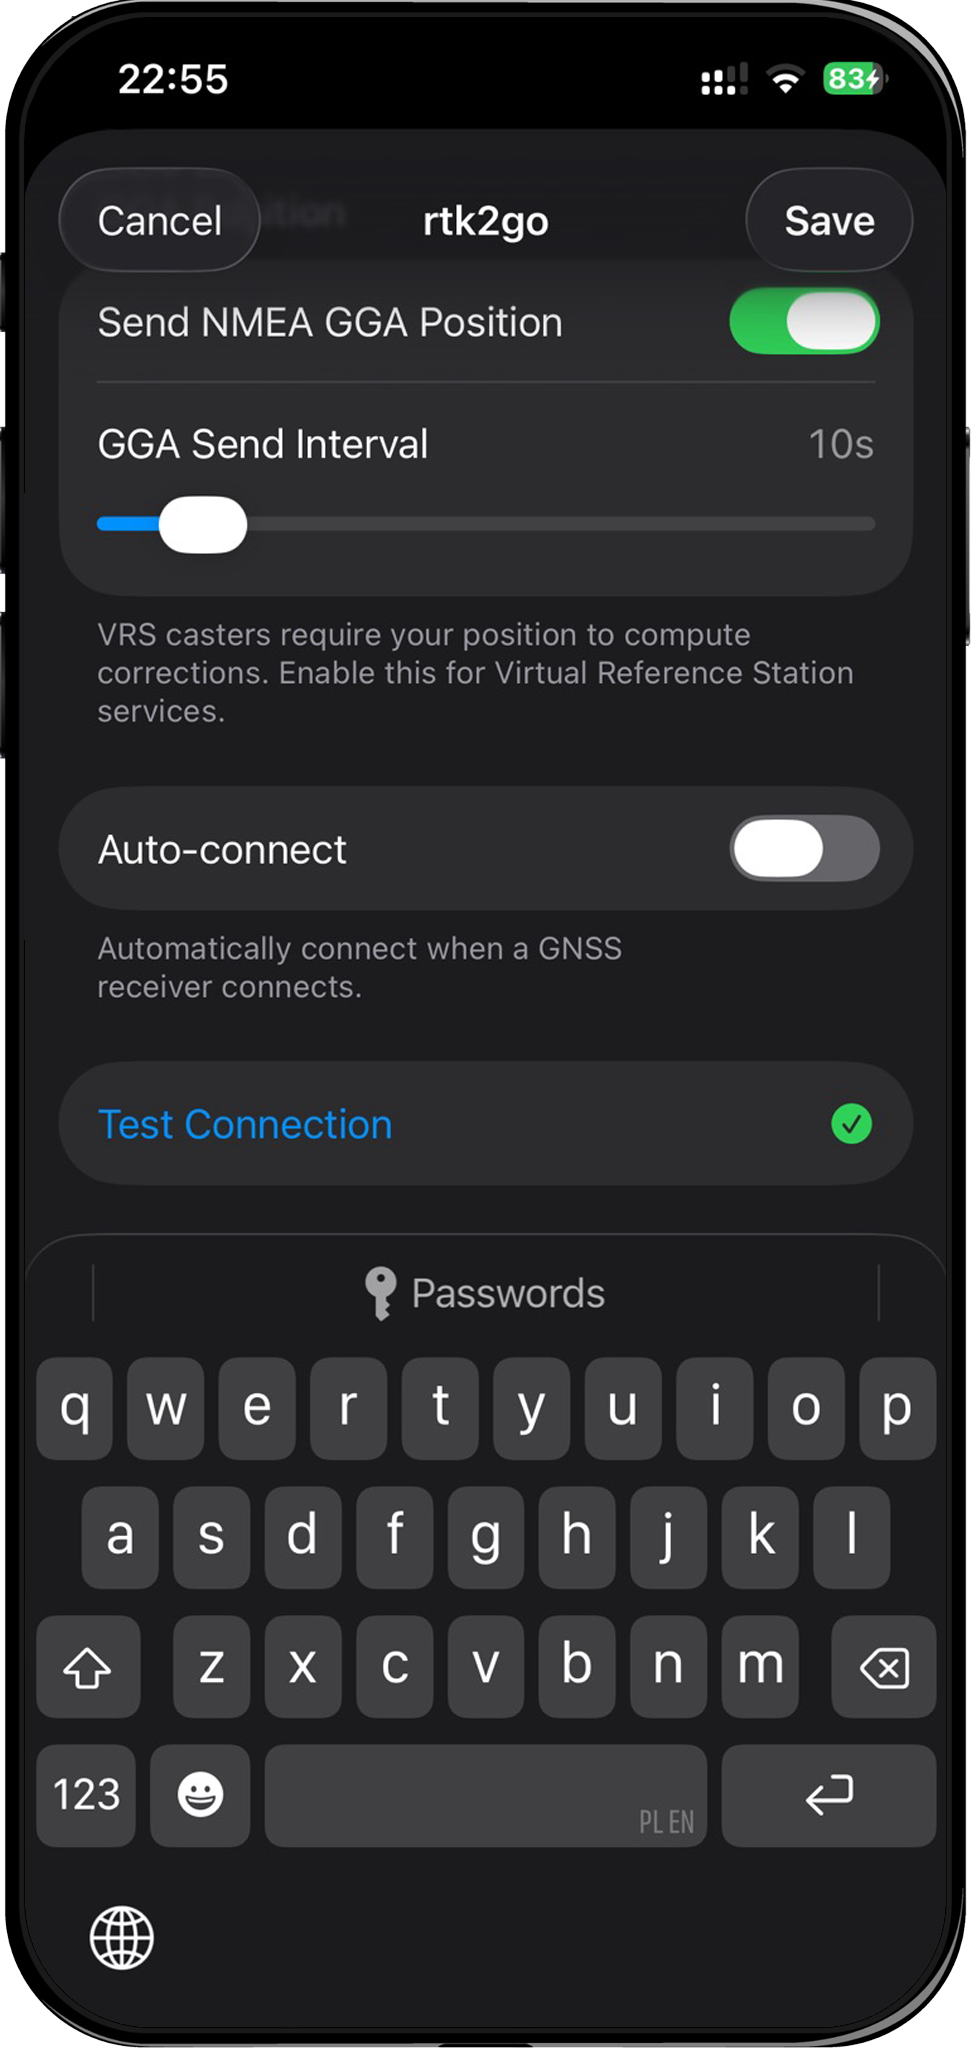
Test the configuration.
For RTK2go (free community caster), use your email address as the username and none as the password.
3. Set the receiver target
Under Receiver Target, select Bluetooth LE. This tells the NTRIP client to forward RTCM correction data to the ArduSimple receiver over the active BLE connection.
4. Select a mountpoint
- Tap Mountpoint to open the mountpoint picker.
- The app fetches the source table from the caster and lists all available streams.
- Mountpoints are sorted by distance from your current position — select the nearest one.
- Use the search bar to filter by name, country, or navigation system if needed.
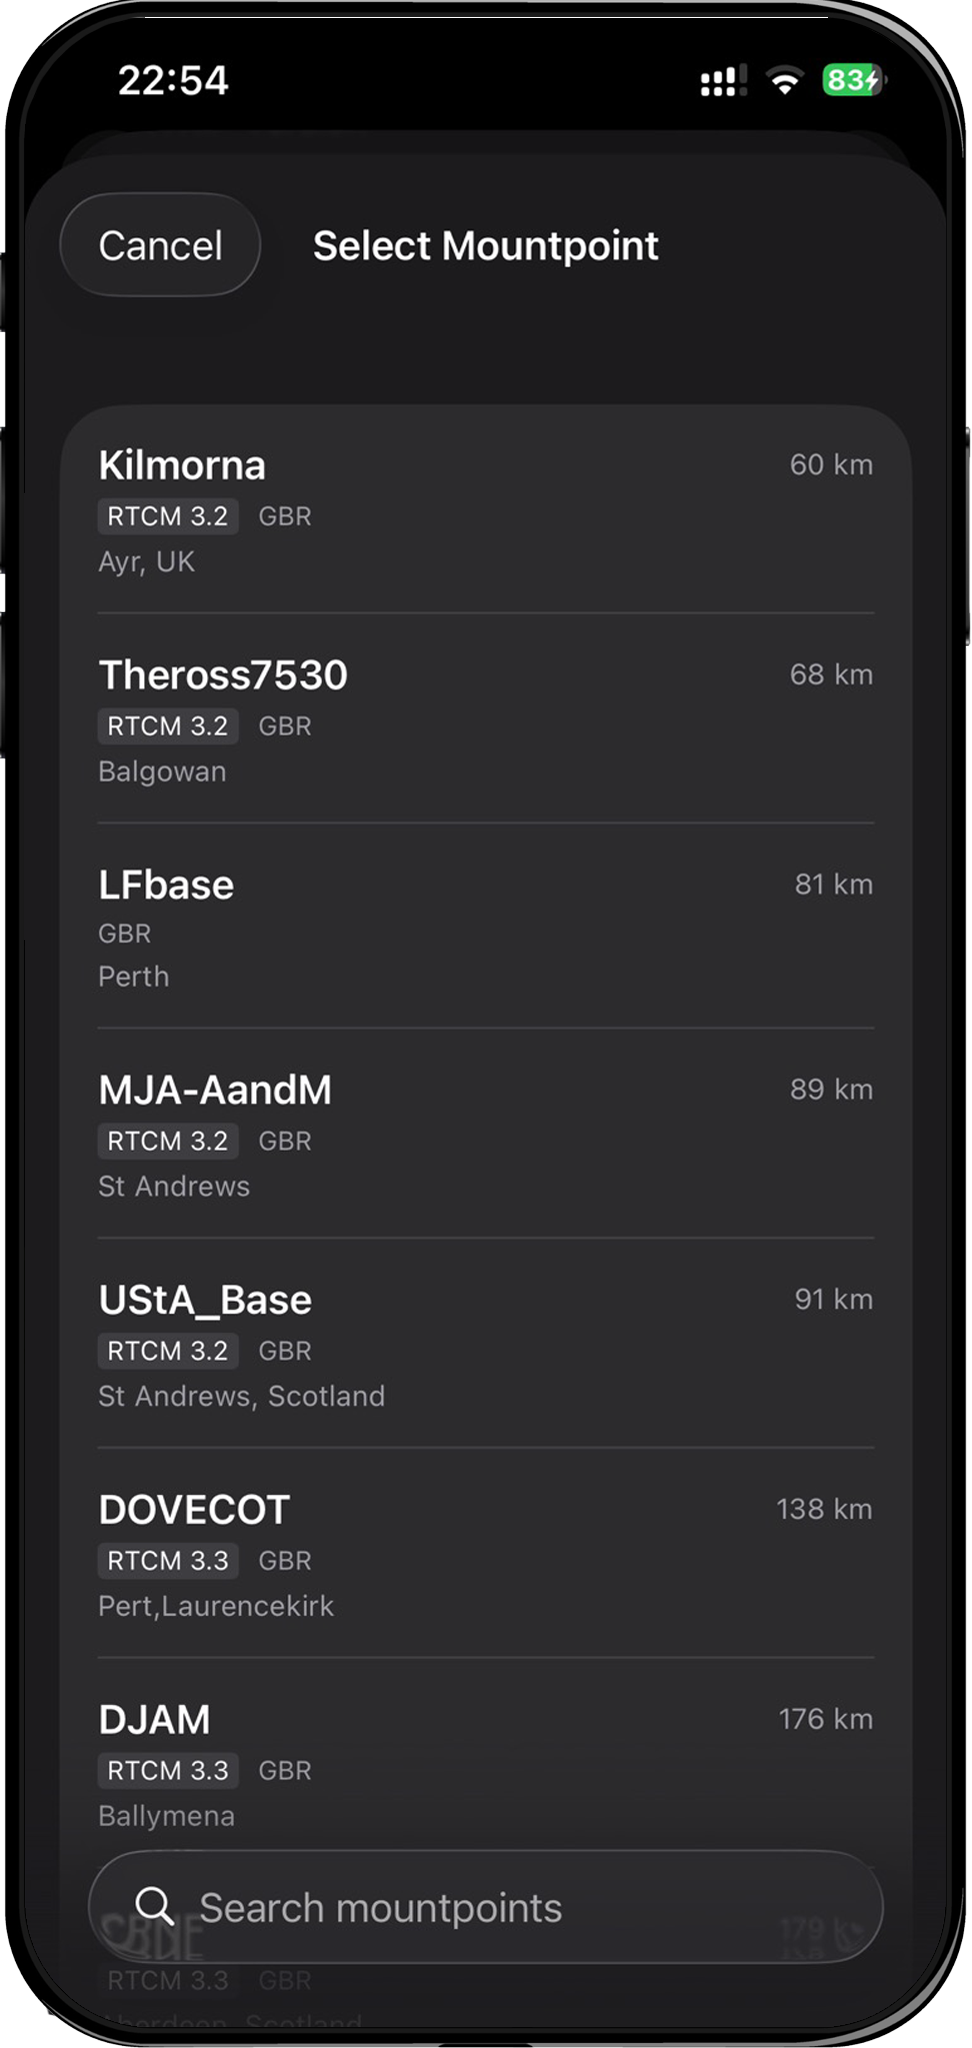
Choose a mountpoint within 30 km of your survey site for reliable RTK Fixed solutions. The closer the reference station, the better.
5. Configure GGA sending
Leave Send GGA enabled (on by default). This sends your approximate position to the caster so it can select the nearest reference station or generate Virtual Reference Station (VRS) corrections. The default interval of 10 seconds works well for most casters.
6. Test the connection (optional)
Tap Test Connection to verify your configuration before going to the field. A green checkmark confirms the caster is reachable and the mountpoint is valid.
7. Save and connect
- Tap Save in the top-right corner.
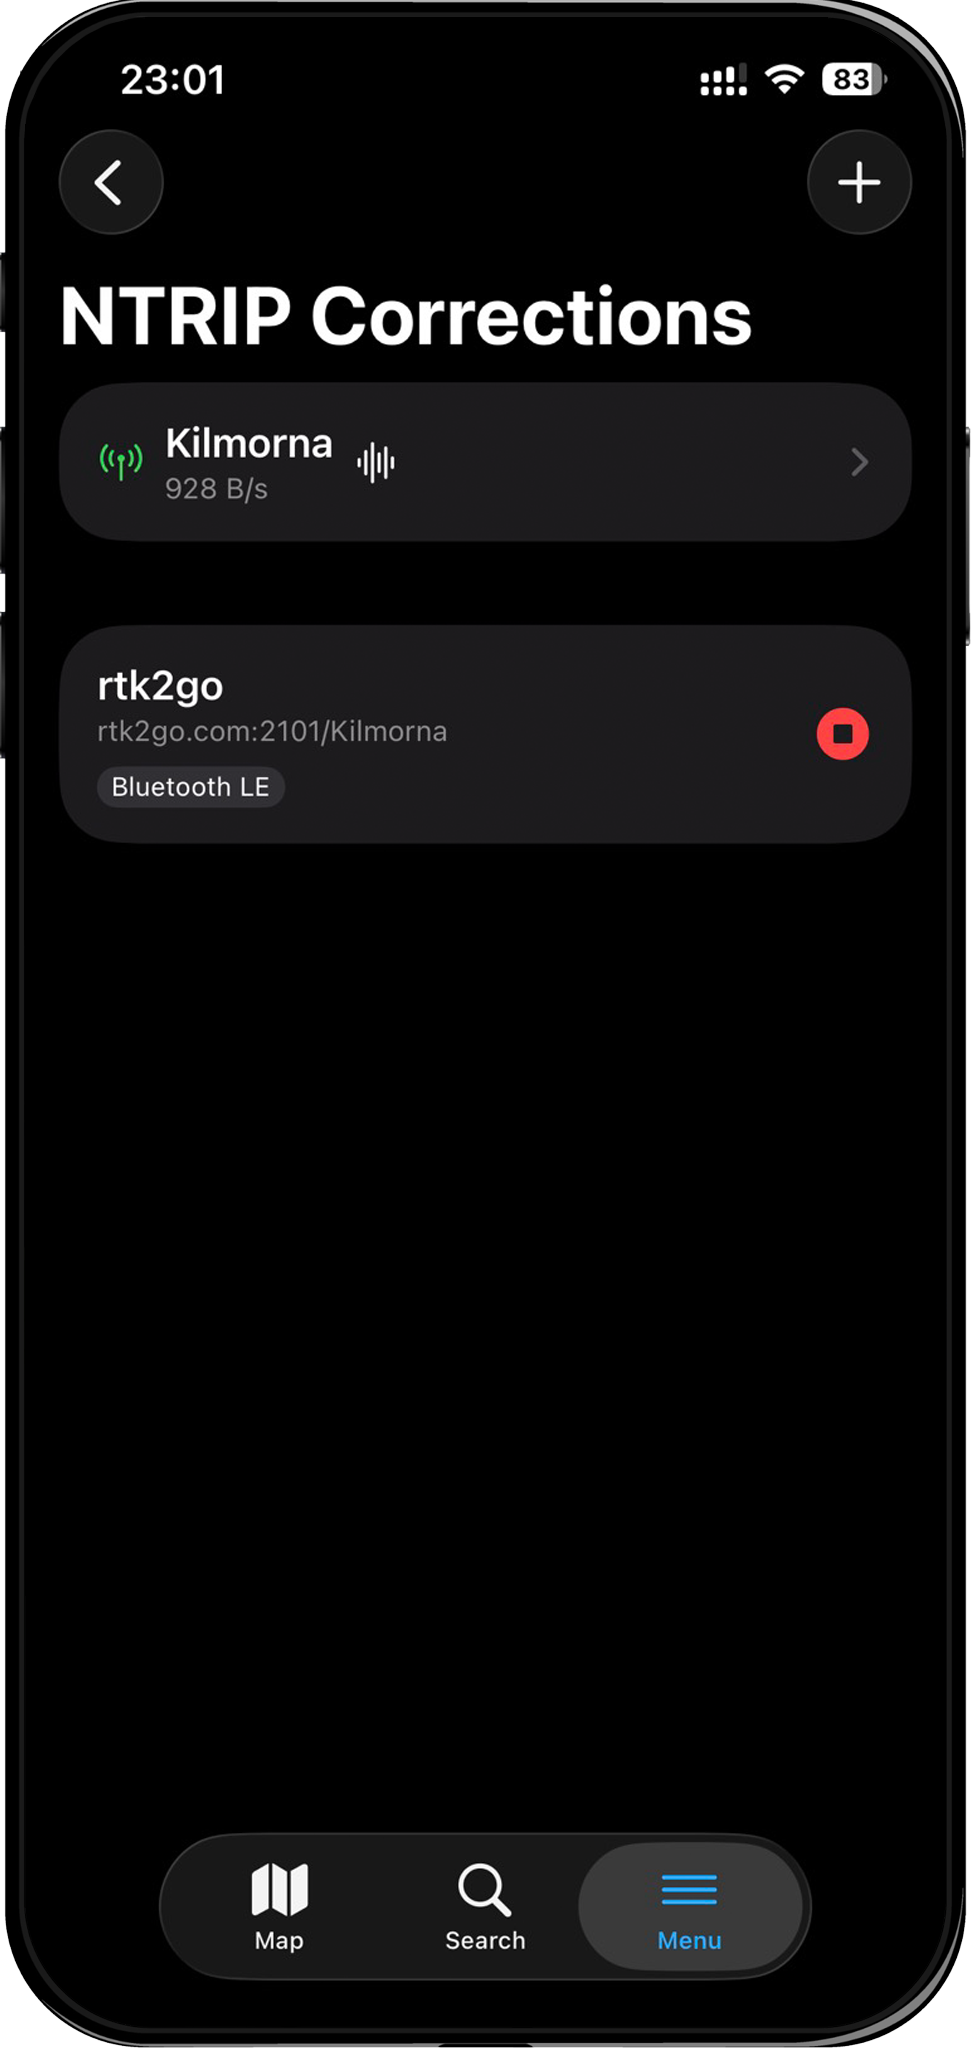
- Back on the NTRIP settings list, tap the play button next to your profile.
- The status bar appears showing the active mountpoint and data rate.
8. Verify RTK fix
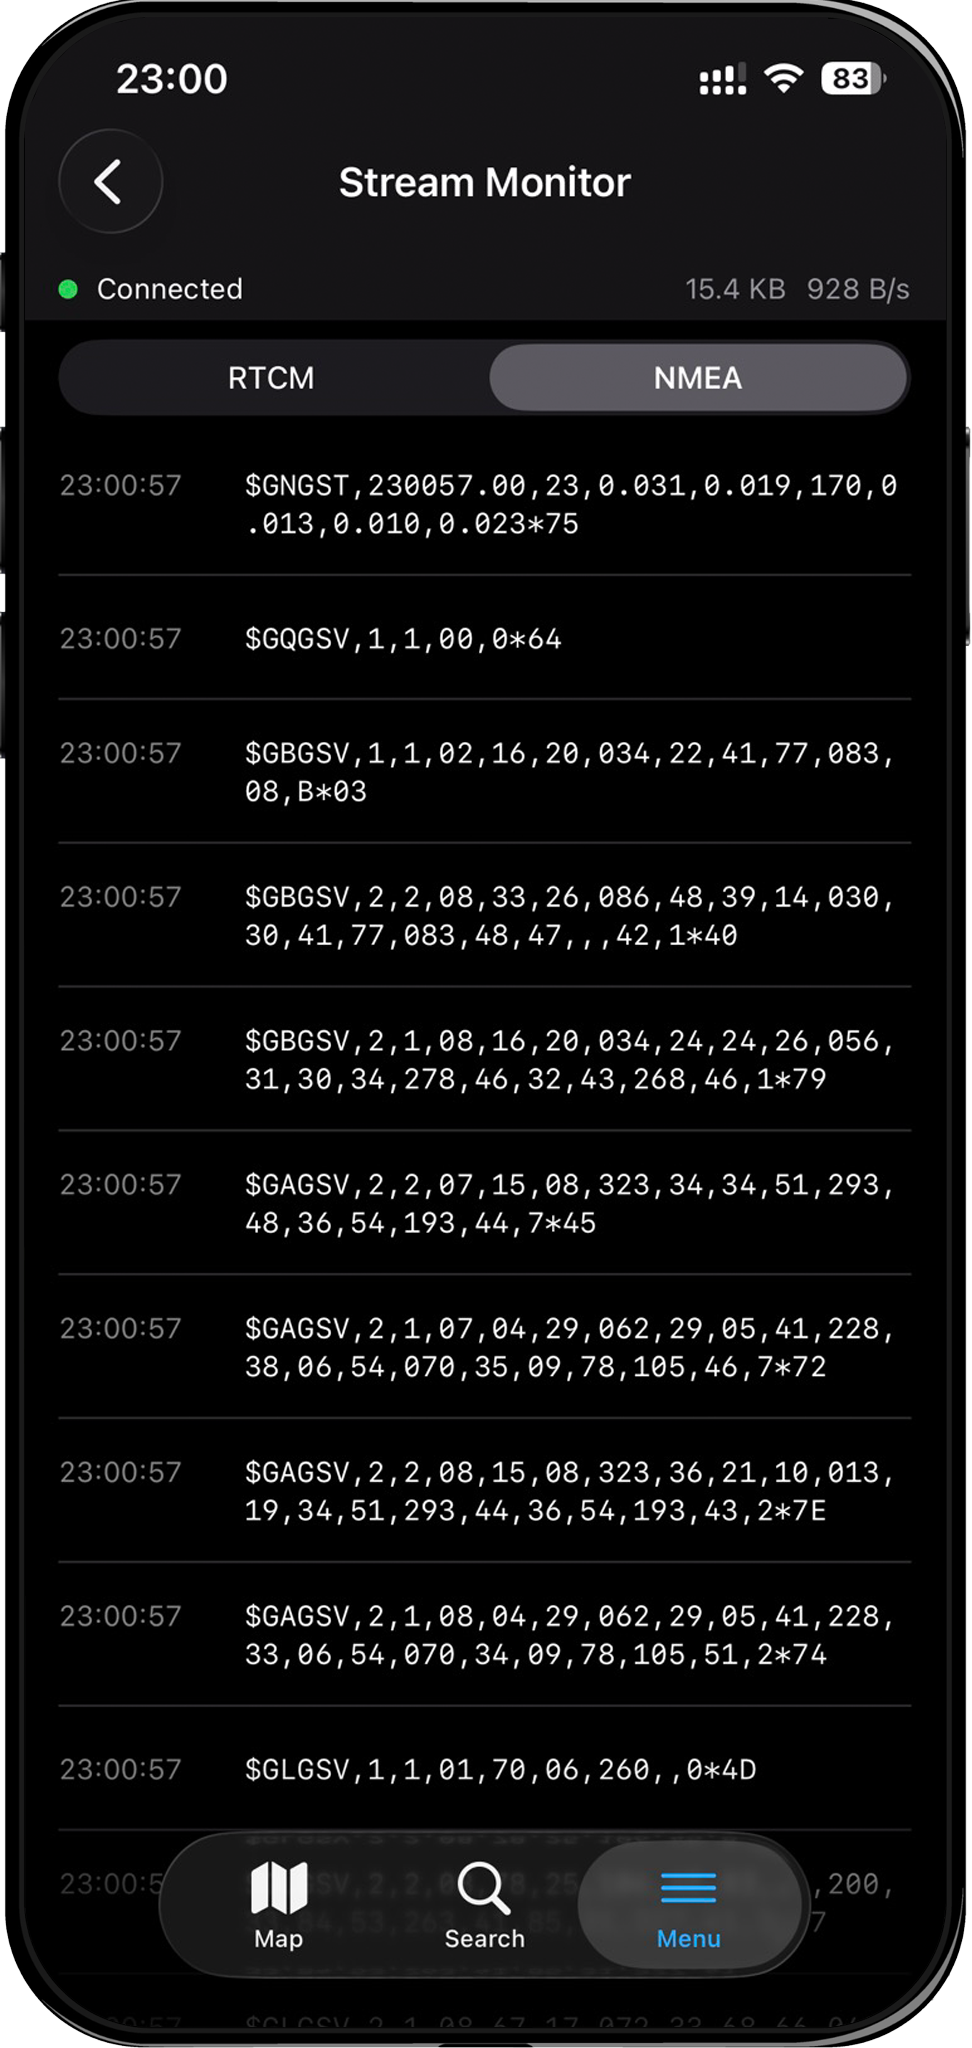
Open the Stream Monitor by tapping the waveform icon in the NTRIP status bar. Check that:
- The RTCM tab shows correction messages flowing (e.g.
1077 GPS MSM7,1087 GLONASS MSM7) - The NMEA tab shows sentences from your receiver (e.g.
$GNGGA,...)
Return to the map and check the GPS status indicator. Within a few seconds to a few minutes (depending on satellite visibility and baseline distance), the fix quality should progress:
3D Fix → RTK Float → RTK Fix
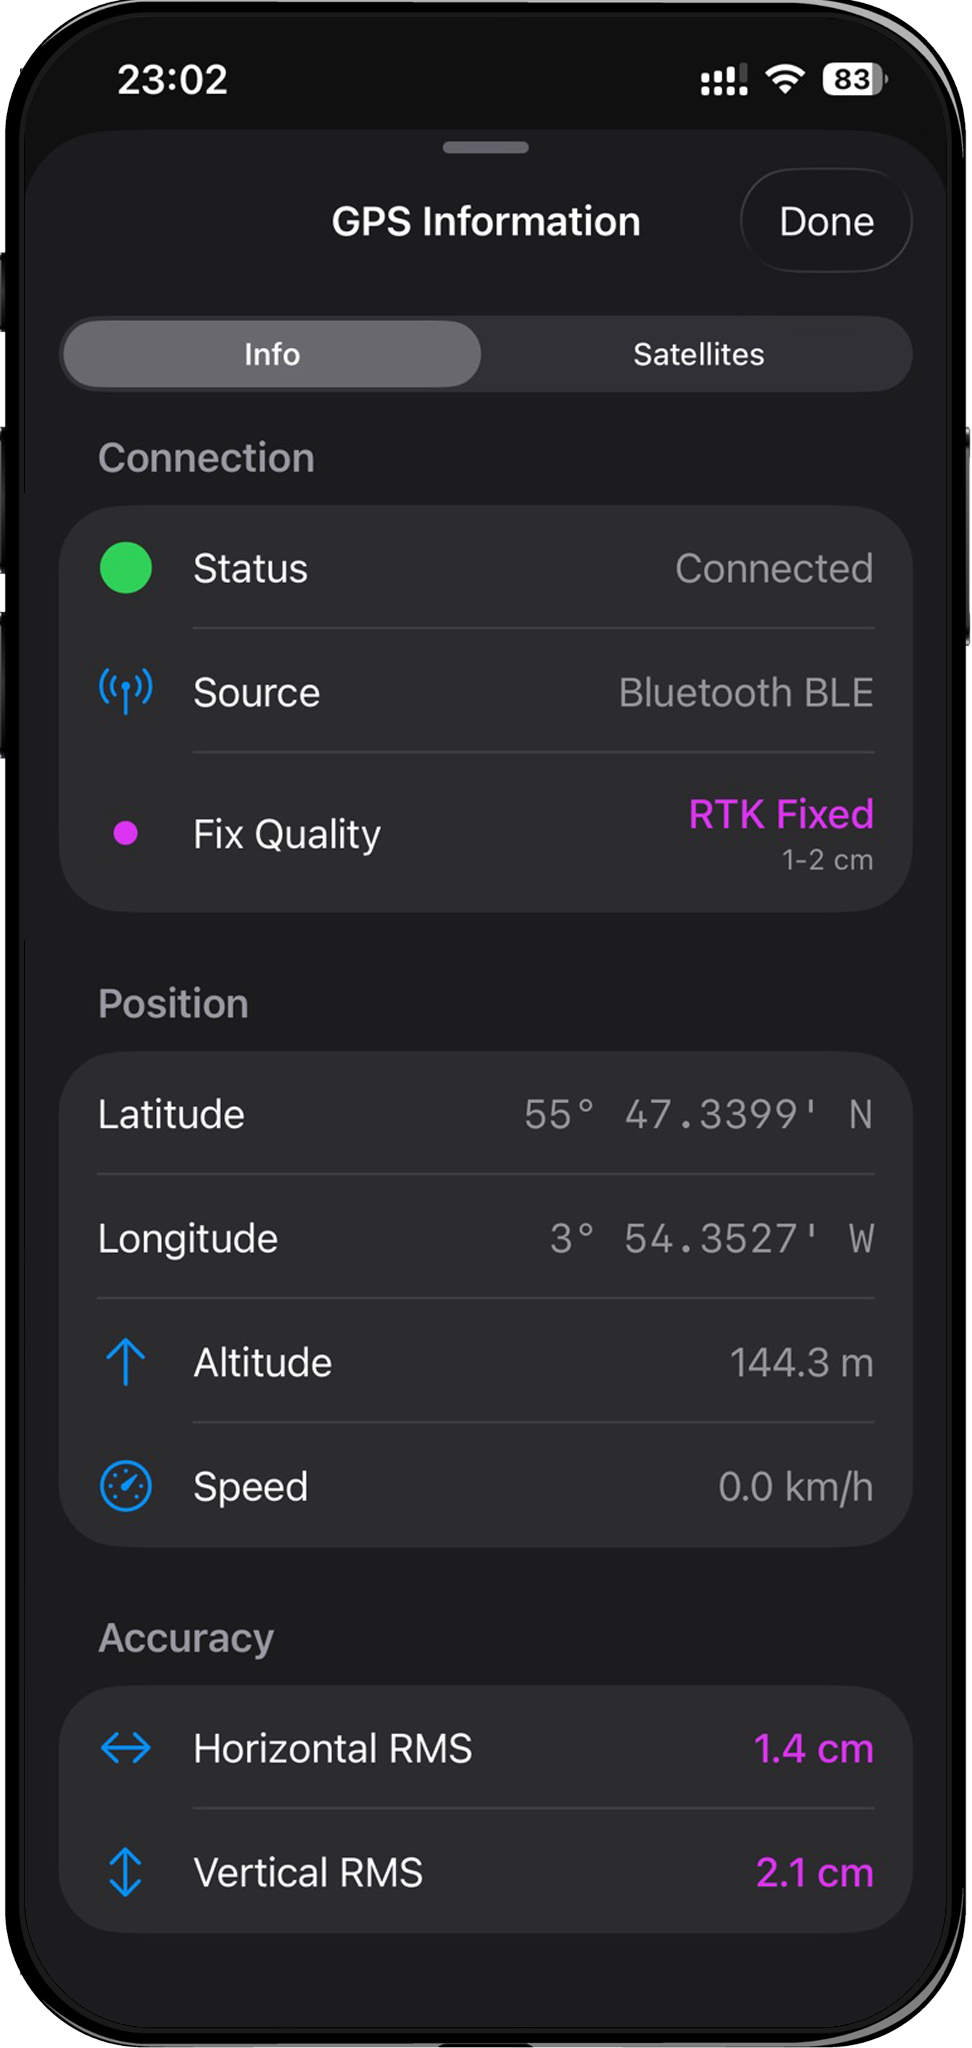
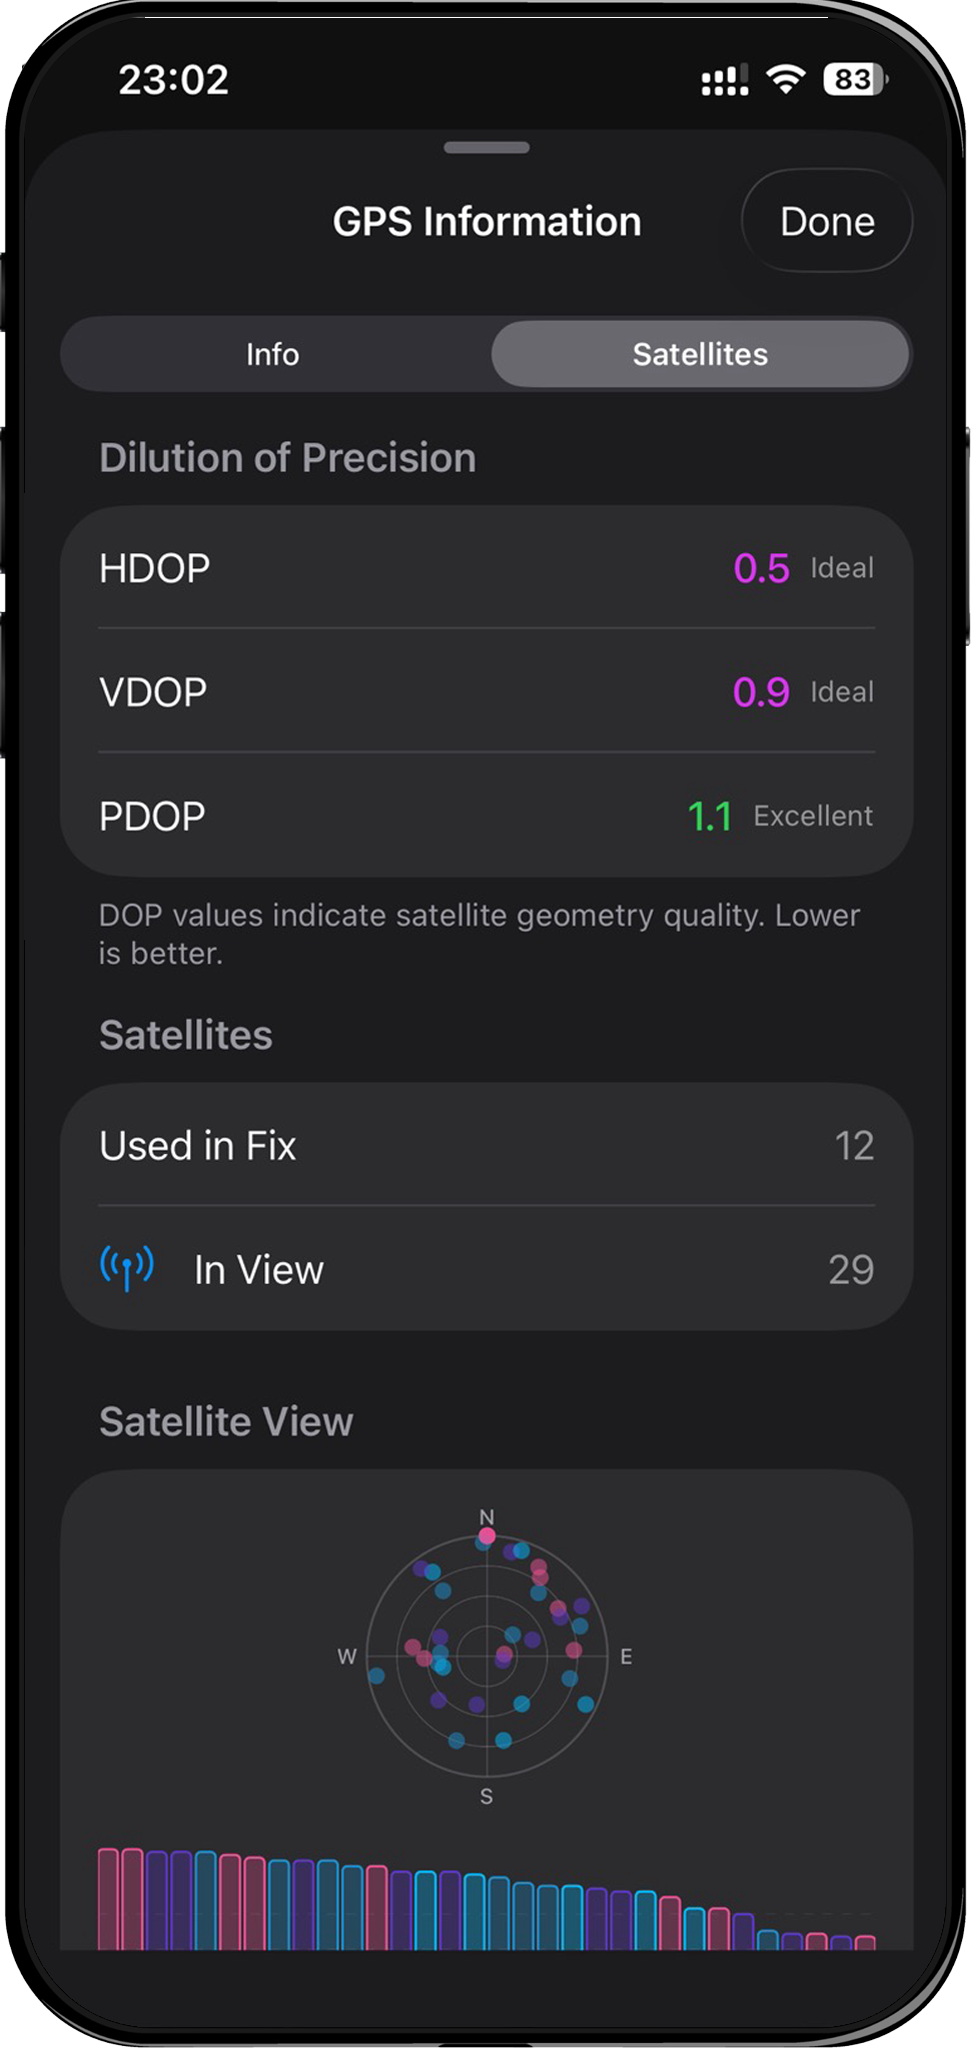
Once you see RTK Fix, your accuracy is in the centimetre range.
Start Surveying
With an RTK Fix, you are now receiving centimetre-level positions. You can:
- Add points, lines, and polygons to your GeoPackage layers
- Use position averaging for even higher accuracy on individual points
- Record tracks with high-accuracy positioning
- View detailed satellite and accuracy information in the GPS Info panel
Troubleshooting
BLE: Receiver not appearing in scan
- Make sure the receiver is powered on and the BLE module is active (check LED indicators).
- Ensure Bluetooth is enabled on your iPhone/iPad.
- Check that Mapit GIS has Bluetooth permission (iOS Settings > Privacy & Security > Bluetooth > Mapit GIS).
- Try moving closer to the receiver — BLE range is typically 10-30 metres.
- If the device still doesn't appear, restart the receiver and try scanning again.
BLE: Connection fails or times out
- The connection has a 10-second timeout. If the receiver is busy or out of range, it may time out.
- The app will automatically retry with exponential backoff (2s, 4s, 8s, up to 30s).
- Try toggling the GPS source to Internal GPS and back to Bluetooth LE to reset the connection.
BLE: Connection drops frequently
- Keep the receiver within range (10-30 metres, fewer obstructions is better).
- Avoid placing the iPhone in a pocket or bag where the BLE signal may be blocked.
- The app auto-reconnects on unexpected drops — check the status indicator for reconnection attempts.
- For very long sessions, ensure the receiver has sufficient battery.
NTRIP: Cannot connect to caster
- Verify the host, port, username, and password are correct.
- Use Test Connection in the NTRIP config screen to diagnose issues.
- Ensure your iPhone/iPad has an active internet connection (mobile data or Wi-Fi).
NTRIP: Connected but corrections not reaching the receiver
- Verify the Receiver Target is set to Bluetooth LE (not "Test").
- Confirm the BLE receiver is still connected (check the GPS status indicator on the map).
- Open the Stream Monitor to verify RTCM messages are flowing.
Stuck on RTK Float
- RTK Float is normal during convergence — wait 1-2 minutes for conditions to improve.
- Ensure you have a clear view of the sky with no obstructions.
- Verify the mountpoint provides corrections for your GNSS constellations (GPS, GLONASS, Galileo, BeiDou).
- Check the baseline distance to the reference station is under 35 km.
- Try a different mountpoint closer to your location.
Related documentation
- Connecting a Receiver - all connection methods
- NTRIP Client - detailed NTRIP configuration
- RTK and Fix Types - understanding fix quality
- GPS Info and Satellites - reading satellite data
- Position Averaging - improving point accuracy